1974 Evinrude 70 hp Help

Status
Not open for further replies.

Decker83

Commander
Joined
Apr 5, 2011
Messages
2,592
I brought home my old 1969 Skeeter Hawk with the 1974 rude 70 hp last weekend. I have not ran the motor in the last 5 years. It still turns freely by hand.
I have read some threads on starting up a old motor here. I also have the OMC repair manual for this motor. I plan on rebuilding the carbs and fuel pump and a
new water pump. Replace all the fuel lines with the newer ethanol resistance ones.
Now I have a few questions.
1. What type of sealer should I use after I replace the core plug on the top of the carb?
2. Would you suggest I take the intake manifold and the leaf valves out to clean and inspect?
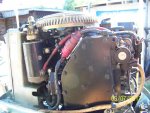
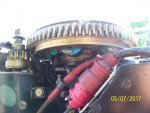
3.I have a picture of the engine and it looks like something has leaked down from under the flywheel. Would this indicate I may need to replace the stator or
something else under the flywheel?
100_3849 (Large).JPG


100_3848 (Large).JPG
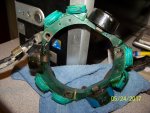
In this picture you can see some type of sticky residue on the blue coil.
4. I have a small hair line crack in the bottom coil. Can this cause a problem with the coil?

The id plate has been removed from the engine. I do know it is the 1974 70 hp because of the shop I bought it from.

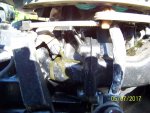
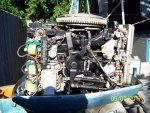
Couple of more pic's of the motor.


100_3845 (Large).JPG


100_3847 (Large).JPG

Thanks for any help you can give me.
 
Last edited:

oldboat1

Fleet Admiral
Joined
Apr 3, 2002
Messages
9,598
http://www.iboats.com/Crankshaft-Piston/dm/cart_id.104317406--session_id.125184766--view_id.1552797

Pull the flywheel, and try to figure out where the stuff is coming from. Could be a leaking crankcase seal. If a coil is cracked or leaking, you will want to replace it -- in process of failing.

Don't need sealer for that core plug (expansion plug that you tap in place) -- although some use some nail polish or a dab of epoxy.

I wouldn't be inclined to inspect reed valves unless you have operating issues (back firing through carb, inability to fine tune, etc.)
 

jimmbo

Supreme Mariner
Joined
May 24, 2004
Messages
12,944
The second picture shows the ignition charging coil dripping, it may be a cracked coil or as mentioned engine oil, but the colour is wrong for that.

If you want to put sealer on the carb plug, a very small amount of gas proof RTV.

Like Oldboat, I don't think there is any reason at this point to be looking at the reeds.

When you replace the fuel lines, don't forget about the one from the tank to the engine

You are sure that is a 74? A 74 - 77 70 hp is gold, that one looks blue. It looks like the colour of a 73 65hp. It can't be older as it has a mechanical gearshift, and it is older than a 78, as the transom bracket changed in 78
 
Last edited:

racerone

Supreme Mariner
Joined
Dec 28, 2013
Messages
36,033
That shift arm places the motor as 73 / 74 / 75 model.----Colour of the paint indicates that block has been replaced with perhaps the Johnson model.
 

Decker83

Commander
Joined
Apr 5, 2011
Messages
2,592
Thanks guy's for the fast response.
I had the motor rebuilt by a local marine shop and ask him to paint it blue. It was the green color they used back then..
The mechanic may have painted the engine black. I don't know.

I was afraid of the stator being bad. I will pull the flywheel this weekend and see what I can find out.

Will the motor start if the ignition charging coils are bad?

I'm also going to start on the carbs.
I have already bought the newer fuel line and primer bulb.
Thanks for all the help.:D.
 

Decker83

Commander
Joined
Apr 5, 2011
Messages
2,592
Pulled off the carbs and broke them down. The high speed orifice was completely plugged with black dried gas and oil on all three carbs. The float seat's were the same way.
The low speed orifice were all clean. Took the core plug on top out on each carb and made sure there was nothing plugged. Soaked all the parts in NAPA brand
cleaner. It worked very well. Spayed all the holes with Chemtool b12 and then used my compressor to blow out everything. Carbs looked super clean inside and out. Rebuilt the fuel pump.
Now I need to start checking under the flywheel. Hope that goes well.:facepalm:
Have a great day gents..
 

Decker83

Commander
Joined
Apr 5, 2011
Messages
2,592
The compressor goes to 135 psi. 10.1 cfm @ 90 psi. I used about 50 psi to blow everything out.
 

Decker83

Commander
Joined
Apr 5, 2011
Messages
2,592
I have not check the compression yet. I haven't started this motor in 5 years. Just trying to do what I need to do first and then I'll hook up a good battery and spin her over. Letting the cylinders soak with some premix gas and oil now. Going to drop the LU and replace the water pump. I will hook up a water hose to the motor
first and try and start it before buying the water pump. Need to check out the stator and the timer base and power pac and coils.
The last time I used this motor it ran great. I just let it set for a long time.
Going to give the boat to my daughter and son in law after I get it running good.
 

Decker83

Commander
Joined
Apr 5, 2011
Messages
2,592
Thanks F_R. I pretty much figured they were bad.
What size or the bolts that are used to pull the flywheel off?
Can I use a steering wheel puller?
Should I go with new stator or chance a used one?
Thanks for your help.
Have a great week..:watermelon:
 

Decker83

Commander
Joined
Apr 5, 2011
Messages
2,592
I removed the flywheel and the stator off the engine tonight. I checked the ohms on the brown/orange with the brown wire and got a reading of 868 ohms. Meter set at 2000 ohms. The manual says 900 +/- 30 ohms.
I check the yellow/gray with yellow and got a reading of 1.3 ohms. Meter set at 200 ohms. My meter will read .6 when I touch the two leads together when set at 200 ohms.
This looks like it is still in specs with the manual.
I also did a close visual inspection and all of the charge coils have leaked very bad.
Here is a picture.

100_3855 (Large).JPG

What do you guys think? Replace it or not?
 
Last edited:

Bosunsmate

Admiral
Joined
Apr 7, 2012
Messages
6,129
Id use it and see how the motor runs, put another coating of epoxy on it if you have the means.
Ive had ones in such shape as that run for years and many a still going, whereas smart new looking ones have given up the ghost on me
 

Decker83

Commander
Joined
Apr 5, 2011
Messages
2,592
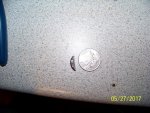
Does this key look like the right size for the crankshaft?

100_3856 (Large).JPG

It's only about 1/16" showing on the crankshaft.
 
Last edited:

oldboat1

Fleet Admiral
Joined
Apr 3, 2002
Messages
9,598
Use an oem key -- try a dealer or order one here. The location of the flywheel in relation to the keyway affects timing. Torque the flywheel nut to specs to make sure the flywheel is dead solid on the shaft. Clean up the shaft with some acetone or lacquer thinner before installation (no grease or other lubricants).
 

Decker83

Commander
Joined
Apr 5, 2011
Messages
2,592
Thanks oldboat1. This was the key I found under the flywheel. It didn't look right to me.
 
Status
Not open for further replies.
Top