Need Help With New Deck Dimensions

ERock82

Petty Officer 1st Class
Joined
Aug 14, 2014
Messages
230
This is a very detailed question so it may be a bit confusing referring to all of the attached photos and the drawing.

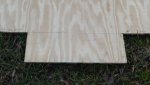
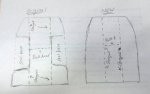
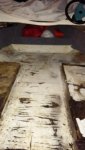
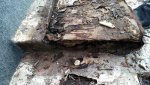
I am in the process of putting in a new deck in my 14' Bayliner Capri. I have removed the old deck and seat bases along with the foam for the seat bases and in the stern. What I expected when I started this was for the deck to go under the seat bases but that is not the case. In the drawing I did, you can see that the deck in the "original" diagram has a capital "I" shape. Basically, narrow in the middle and wide at the ends. It does not go under the seat bases. It is also split in halves at the bulk head. The seat bases actually had foam built up very high to the 4" height above the deck and had 1/2" plywood surrounding the edges (See photos of seat bases).

NOW, I wanted to make my new deck like the 2nd drawing labeled "NEW." That is what I thought the original deck would be like.

My question is, can I do this or do I have to make it like the original one? My main concern is the new seat bases.

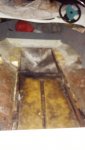
Do I have to have the foam going that high or can I just place new foam under the bases and have a hollow seat base box built on top? In the photo showing the deck completely removed, with gas tank showing, you can see that there was no foam under the center area in front of the gas tank. This leads me to believe that I may need that extra foam that was part of the seat base. Can I just put that extra foam somewhere else (such as in front of bulk head) to make up for it? Or…do I even need that extra foam?

If I have to make the new deck just like the original, it seems a bit complicated with the seat bases so any help is highly appreciated. Thanks!
 

Attachments

  • Deck 1.jpg
    Deck 1.jpg
    142.7 KB · Views: 0
  • Deck 2.jpg
    Deck 2.jpg
    28.8 KB · Views: 0
  • Deck 3.jpg
    Deck 3.jpg
    31.6 KB · Views: 0
  • Deck 4.jpg
    Deck 4.jpg
    35.3 KB · Views: 0
  • Deck 5.jpg
    Deck 5.jpg
    34.6 KB · Views: 0
  • Deck 6 (Seat Base).jpg
    Deck 6 (Seat Base).jpg
    50.5 KB · Views: 0
Last edited:

Georgesalmon

Lieutenant Commander
Joined
Apr 14, 2012
Messages
1,793
You can do anything you want to. There's a good chance the foam placement is important to meet the "level" floatation requirements. The flotation foam if the right amount and placement will keep you afloat and the boat won't roll over in the event of disaster. Manufacturers don't put in any extra foam because it costs money. There is just enough foam to meet the basic and level floatation requirements for max load and HP. I would keep the same amount and placement. However there is no law that says you have to do that. Only the original manufacturer has to meet the regs. JMHO
 

gm280

Supreme Mariner
Joined
Jun 26, 2011
Messages
14,597
If I understand what you're asking, yes you can build YOUR boat to any design YOU think you like. But I would first remove all that rotted everything down to a clean slate basic hull and grind it like all the other project glass boaters do on these forums for a place to start. You can build any size shape deck you want. But make sure you put back ample support stringers in place as well. If you build your new deck higher, then the stringers have to be higher as well. The deck is supported via the stringers. More support is never a bad idea...ever! And as far as replacement foam, again I would but more in as well to fill the voids of a higher deck. That could be a life saver one day. You really don't know if or when. Yes all those things do cost money. But it is the nature of the beast and I would boat better knowing I didn't take any shortcuts along the way in the rebuild efforts. With all that stated, you came to the best place to get ideas, assistance and support for your project. Keep the pictures come and your questions and ideas. We all started at the same unknowing place with more questions then answers...
 

ERock82

Petty Officer 1st Class
Joined
Aug 14, 2014
Messages
230
Thanks gm280. If you were building this and it was just between the two choices in my hand drawing, which way would you go?
 

gm280

Supreme Mariner
Joined
Jun 26, 2011
Messages
14,597
ERock82, That is a very subjective question not really know what YOU actually want. I like the new idea and yes new seat bases can be built to accommodate the seating layout. Those seat bases can even have piano-type stainless steel hinges to allow some storage inside too. But not knowing what you are looking for or me even being there, That is all I can suggest... Maybe you could take some more pictures of a further away shot and layout your design on top of the pictures using ms paint or some other type program. That way we all can get a much better idea what you are wanting to do... :thumb:
 

ERock82

Petty Officer 1st Class
Joined
Aug 14, 2014
Messages
230
Thanks. I will probably end up doing it the new way with the deck coming to the edge on all sides and the seat bases built over top. Now, another question I have is this:

When I removed the original deck and noticed that it was not screwed down. It was just fiberglassed to the edges of the boat. Should I put the new deck in the same way or should I use screws? If I use screws, do I just screw them into the stingers and bulkheads? I would rather avoid screwing the deck on if possible so I don't have any holes in the stringers for water to get in.

Also, I am replacing the bulkhead. It was also not screwed in. I assume I would just cut this to fit tightly in the space and then fiberglass it in like the old one?? If I don't screw this on, would I just use something like a clamp to keep it from moving when I fiberglass it in there?
 

JASinIL2006

Vice Admiral
Joined
Feb 10, 2012
Messages
5,559
The 'new' deck sure seems like it would be simpler to build and install... I would also attach it to the stringers with thickened resin (aka peanut butter) and screws, in addition to tabbing it to the hull.

Hard to know if you need the extra foam, but I agree with what's been said above: boatmakers (esp. Bayliner) don't add anything that costs money without a purpose. You could probably add foam elsewhere instead of under the seats, but you should only do so knowing you might affect how the boat would float if capsized. Your choice. (I'd probably consider relocating the foam, but you need to decide if you're comfortable with that.)
 

Woodonglass

Supreme Mariner
Joined
Dec 29, 2009
Messages
25,924
It sure would help me if I had a pic of the entire inside of the boat so I could see the whole lay out. You pics are so "close up" it's hard to get a perspective of the Layout. What the others have said is all true...Your boat...Your decision. Flotation Foam is an important safety factor for all boats and needs to be a consideration in your restoration process. There are methods to screw your deck to the stringers and bulkeads that will ensure that water intrusion will not re-occur. I'd encourage you to start searching the forum for Bayliner Restorations and you'll find PLENTY of examples of others that have done this same kind of work that will help you understand what you are about to undertake.
 

ERock82

Petty Officer 1st Class
Joined
Aug 14, 2014
Messages
230
Here is an update on where I am at with the deck replacement.

I have cut out the old deck, leaving a couple inches all around of what I think is just fiberglass that is very thick (it is definitely not wood). I removed all foam and cleaned up the residue. I removed the rotted bulkhead and grinded down the fiberglass edges that are on the hull floor to about 1/4". I have also, removed my gas tank in preparation to clean and get my fuel gauge working.


Here is what I plan on doing next:

1.) I am going to fill the area where the old bulkhead was notched into the stringer with epoxy. I did core samples and the rot goes for only an inch on either side most likely due to the bulkhead rotting and the space cut out in the stringer for it.

2.) I am going to buy 2 sheets of 8x4 plywood 1/2" thick

3.) I am going to cut out a new bulkhead and place into the old slot for testing purposes only.

4.) I will then take an 8x4 sheet of drywall or fiberglass insulation (whichever one ppl recommend for a template that is under $10) and cut out to my best guess.

5.) I will make adjustments and then trace onto new plywood and cut out plywood.

6.) I will place new deck into boat for testing only.

7.) If everything fits well, I will put 1 coat of poly resin on the bottom and sides of deck. I will then lay down 1 layer of 1.5oz chopped strand mat on bottom.

8.) I will coat the bulkhead with 1 layer of resin and place into the old slots.

9.) I will then make "peanut butter" and fill any gaps on bulkhead.

10.) I will then put a layer of 1.5oz CSM on, 1 more coat of poly resin and second layer of 1.5 oz CSM. I will curve the mat around the edges and sides of stringers in that area. so it is completely sealed.

11.) I will then place the new deck on that has already been resined and glassed on the bottom. I will mark where all screw holes will be drilled.

12.) I will then drill about 5 or 6 holes. (Old deck wasn't screwed on at all so 5 or 6 should be plenty). I will then fill holes with loctite epoxy and immediately after place stainless steel screws in.

13.) I will then use "peanut butter resin" around all edges of the deck where there are any gaps.

14.) I will attach pre-cut out 2x4's with screws to the deck for seat base sides. These will be pre-coated with poly resin.

15.) I will then cut 1" holes for pouring foam in select areas. Please recommend hole size if another is better.

16.) I will then resin hole openings.

17.) I will mix and pour foam in holes. After it settles a couple of hours, I will cut excess foam and put hole cut outs back on. Maybe with epoxy to keep in place??

18.) I will then put a coat of poly resin on top of deck and sides which are fiberglass.

19.) I will lay down 1 layer of 1.5 oz CSM to entire top of deck and edges going about 6 inches up onto sides/gunwales.

20.) I will repeat again for a 2nd layer giving me 3 oz of glass.

21.) I will place pre-resined 1/2" plywood seat base tops onto bases. These will have a hole cut out for foam as well.

22.) I will pour foam into seat bases and seal and glass.

23.) I will glass all sides of seat bases to the deck and gunwale.

24.) Put carpet back. I think I will put carpet all over seat bases too. Any suggestions??

DONE.

******Now, here are my thoughts:**********

1.) I am on a budget and the original deck which is 20 years old never had any CSM on the bottom and only had CSM on the sides and edges of seat bases. It did however have 1 layer of gelcoat. Not sure why since there was carpet, which I plan on putting back.

2.) Considering I am already doing more than Bayliner did and my budget, I feel like I can probably skip doing any "Tabbing" with that "1708 17oz mat stuff" or whatever it is.

3.) Also, considering no glass was on most of the original deck, I feel like 3oz is way better than it was before. Some people are saying to have 8 or 9 ounces of CSM on the top of the deck but I'm not looking to use the boat forever.

4.) Some people say to grind down the fiberglass edges all the way off, but there is no rot on the 2inch edge I left and I can't see why when it would involve a lot more work and cost, and I would probably have to do tabbing. If I use the "peanut butter resin" I would think that would seal these gaps quite well. It doesn't have to look perfect, just be water tight bc I am putting the carpet back.

************************************************

Please let me know what you all think. I will probably order my materials online soon. Here is what I plan on ordering (rough guess):

1.) 3 gallons of poly resin w/hardener (about $150)
2.) 50inch X 10 yards of 1.5 CSM (about $30-40 online)
3.) A couple things of .5 oz loctite epoxy ($4 each at Walmart)
4.) 2 sheets of 8x4 non treated regular plywood ($26 each at Home Depot)
5.) Something to thicken the resin for "peanut butter" I need help on this.
 
Last edited:

jbcurt00

Moderator
Staff member
Joined
Oct 25, 2011
Messages
24,878
IMO, skipping the tabbing isnt a good idea

CSM isn't a structural fiberglass, and that's what you need to tie the deck to the sides of the hull. 1708 IS structural fiberglass.

IMO, leaving the 2in perimeter makes a joint w/ 2 seams not just 1. The original connection (seam) between the lip you're leaving and the hull, and a 2nd connection between the lip and the new deck.

Where are you getting the poly resin? Does it have wax in it? Do you know why that's an important question? If the can isn't labeled w/ or w/out wax, which is it most likely to be, Waxed or Unwaxed?

Where you get the CSM should sell cabosil to thicken the resin into PB. You can cut your left over scraps of CSM into 1/4" loose pieces to make the PB thicker still.

Don't forget, poly and epoxy only work well 1 way: Epoxy sticks to poly, but not the other way around......

Also don't forget, the poly resin isn't impervious to water, and w/ out protection between the poly and the carpet, wet carpet won't be good for the poly beneath it. That's why Bayliner put the gelcoat you asked about under the carpet. To improve the resistance to water.

THIS is an excellent road map for how to do the work you need to do:
Fabricating Decks, Stringers, and Transoms

Polyester resin needs the bulk of fiberglass, esp in structural areas (again, the tabbing). For the deck, 3 layers of CSM 1.5oz is plenty and less then 5oz of total glass. The TABBING w/ 1708 ties the deck to the hull on either side of the boat. The CSM and plywood tie the port side to the starboard side, so as to be a continuous surface.

The hull, stringers, bulkheads, deck and cap are all part of a system. And need to be treated as such.

Bayliner may not have done all that was possible when your boat was built, but had some build specs, and met those build specs.

Good luck w/ your project, and if you can post some pix. The other 3 or 4 topics about this boat are light on pix.

Questions about boat deck replacement
Are there any good alternatives to Epoxy Resin for boat deck?
Need Advice on Building a New Deck

Boat and boat resto safely.........
 

Woodonglass

Supreme Mariner
Joined
Dec 29, 2009
Messages
25,924
I agree with JBC ^^^ except... (Sorry JBC) If you put wax in the last coat of the poly resin on top of your deck, and then lay your carpet you'll be fine. It is true that Poly is NOT 100% waterproof but having said that, it would take Decades for wet carpet to do any damage to waxed resin especially that which is heavily coated with marine carpet glue. Gelcoat is Poly based and will absorb water in the long term too. I Totally agree that you should have a minimum of a 6" tabbing or 1708 on the deck hull joint.
 

jbcurt00

Moderator
Staff member
Joined
Oct 25, 2011
Messages
24,878
Yep ^^^

I suspect the $150 for 3gals resin is going to have wax in it anyway........ And was speaking to the why gelcoat from Bayliner behind the carpet.

Besides, if the resin isn't waxed, I figure wax would be a 'value engineering delete' cost savings measure on any order ER is likely to make.

Else, me and an Ole' Okie agree ;)
 

ERock82

Petty Officer 1st Class
Joined
Aug 14, 2014
Messages
230
I have a question about cutting an access area for fuel tank hoses:

I have attached some pics for reference.

You can see the area on my newly cut deck that goes into the bilge on one pic and in another you can see the entire area of that section while my deck was laying on the ground. This is where the fuel tank will butt up against the bilge area. In the 3rd pic you can see that area of my fuel tank.

Now, the old deck had a section in the middle of this area cut out to expose the 3 hoses (Filler, gas out and vent). It however, did not have any access to the fuel sender (you had to feel under there and would probably not be able to remove).

I have cleaned my tank out and it's ready to be used. I was using external 6 gallon tanks before and this one is about 21 gallons so I want to use this.

The fuel gauge was never working so I removed the sender to try and test. I used my multimeter but just couldn't figure anything out so I gave up. I cleaned all the corrosion and checked for any corrosion on the gauge itself. Nothing seemed wrong but I give up on testing the sender.

I have found a universal sender online for about $30. So here is what I am wondering:

Should I just put the new sender in and assume I will probably never need to access it again? If that is likely then I could just cut that same area out as the old way. If I ever need to access it I would have to cut out that area which I don't want to do. How should I do this?

I'm thinking maybe just a really wide area cut out or a removable piece (maybe hinged door). The deck going back like that prevents water from going under it.

Another idea could be to cut out the width I would need and then have some sort of cover or to have a circular cutout around the sender. Maybe it is not a big deal about water getting in the fuel tank area because there is a drain there going into the bilge. So, any good ideas?
 

Attachments

  • IMG_20150203_102730.jpg
    IMG_20150203_102730.jpg
    10.2 KB · Views: 0
  • IMG_20150203_103024.jpg
    IMG_20150203_103024.jpg
    53.7 KB · Views: 0
  • IMG_20150203_102842.jpg
    IMG_20150203_102842.jpg
    28.3 KB · Views: 0

Mikeopsycho

Senior Chief Petty Officer
Joined
Feb 6, 2014
Messages
738
As WOG suggested to me for access to my sender, just put a 4" inspection port above it. Kinda like this,


ERock82

Petty Officer 1st Class
Joined
Aug 14, 2014
Messages
230
Thanks Mike. That sounds like a good idea. Where would I get something like that and how would I install?

Also, another thought I had is, with about an inch or 2 clearance between the fuel tank and deck, I could reach my hand under there with a right angle rachet screw driver although that would be a serious pain.
 
Last edited:

Woodonglass

Supreme Mariner
Joined
Dec 29, 2009
Messages
25,924
Fairly simple process. Skil Saw, 3M Sealant, Screws. Instructions come with em soooo, you won't have any problems doing the install.;)
 

ERock82

Petty Officer 1st Class
Joined
Aug 14, 2014
Messages
230
I have a question about foaming my new deck.

Okay, so when I removed the old foam along the stringers and under the seat bases there were these 2 fairly large sized sheets of white plastic wrap type stuff that were tucked under there. I saved them and they are still in good shape. Could someone tell me what those are for and do I put them back before I foam for the new deck? Sorry, I don't have any pics of that.

Also, the way my new deck is cut out, I have it going to all of the edges, but there is a gap that I can barely fit my hand through on both sides where the seat bases end near the bow. This was so it would lay flatter. Now, I was planning on drilling a 1 inch hole for foaming under there. Would I just pour the foam down into that gap instead?

Also, as far as the foam pour holes are concerned, will a 1 inch hole be good (I already have that drill bit and nothing bigger)? Also, I have heard that you want to drill your hole at the deepest part of that section.

For example, I have a section that is about 60" long by 18" wide that needs foaming. This is along the side of the boat. The deepest parts would be right up against the stringer and the lowest point would be at the very back because of the trailer jack (everything is angled back slightly). Would I make my foam hole at that point? (If I made it at the highest point, I would think that would make everything flow down and up) Would I only have just 1 foam hole or should I have another towards the bow?

Thanks in advance.
 
Top