1976 Tom Boy Boat, 1976 40 HP Johnson Outboard and who knows what Trailer

gm280

Supreme Mariner
Joined
Jun 26, 2011
Messages
14,593
Oh, I've NEVER, NEVER, NEVER done ANYTHING like that, NOPE, NEVER EVER. Can't make me admit it. Never Happened. I'm Perfect!!!! Just ask the Admiral She'll be happy to tell you ALL about it!!!! She KNOWS!!!!!:facepalm:

Back to Reality now!!! Sorry for your Brain Fart!!! You Will Recover and soon it will become a Fond Learning Experience!!!!:rockon:

Oh WOG, please don't think this is the only mistake I've made on his boat. It is just the stupidest one I've made...recently! There are lots more. But I was able to work myself out of them. I will with this too. In fact I just came in from the shop and was going to do some polying today. But even with the kerosene heater assist, I couldn't get the shop to 60 degrees, so I stopped and gave up for a warmer day. I guess if I started the heater earlier it would have heated up, but not so late in the afternoon.

Something like this doesn't stop me. Only makes me do some serious thinking. :eek: I have a bad habit of once starting a project, I have to complete to satisfy myself. And so this too will past. I just had to post this to show others, we all make mistakes and so others understand they will as well, but it is only a small setback and not a show stopped.

Red Herring's boat project was a real inspiration to me. So I am trying his methods. I'm sure it won't look like his, but I have to try anyways. Never know. :thumb:
 

sphelps

Supreme Mariner
Joined
Nov 16, 2011
Messages
11,435
Stuff happens !
But not to me ... I'm like Woody and never mess up anything .... :rolleyes: :whistle: :lie: :flypig:
 

Woodonglass

Supreme Mariner
Joined
Dec 29, 2009
Messages
25,924
Yeah, That RH Dude can do some SERIOUS Mold Fiberglass work. I've been VERY impressed with his work. When I was in my 30's my next door neighbor made a set of Glass Saddle bags for his Honda Goldwing Motorcycle out of Bondo PolyGlass and Chicken wire. I laughed when he started...But NOT when he finished. They looked Factory and matched his bike perfect. Heavy Blue Metalflake Paint!!! Learned a lot from him too!!!! Thin strips of CSM Kinda like Paper mache' outside the wire and then you could mould the wire to final shape and sand and smooth and then lay final layers on inside to stiffen it. Worked GREAT!!!
 

gm280

Supreme Mariner
Joined
Jun 26, 2011
Messages
14,593
Yea Sam and WOG. I told my two boys when they were younger that when you make a mistake, you learn things. They replied almost together that then I should be a genius. Oh the pain, the pain. :der:
 

nurseman

Lieutenant Junior Grade
Joined
Jun 2, 2013
Messages
1,045
LOL! I can relate totally to your pain as well. Like filleting almost an entire side of a stringer and then remembering that I didn't add MEKP to my PB!!! The best lessons are the painful ones...
 

sphelps

Supreme Mariner
Joined
Nov 16, 2011
Messages
11,435
^^^^^I did the same but it was a 1708 layup ... ^^^^ :facepalm:
 

gm280

Supreme Mariner
Joined
Jun 26, 2011
Messages
14,593
As my kerosene heater is running presently in my shop, if I can get the shop up to 60 degrees, I'm going to try this again. Hopefully it works this go around. :eek:

Okay now I have to ask, both nurseman and Sam, how did you guys fix your lack of MEKP in your layup mixtures? I have no idea how to recover from that other then scrap it all off and clean up the resin and mix again with new fiberglass. :noidea:
 

sphelps

Supreme Mariner
Joined
Nov 16, 2011
Messages
11,435
scrap it all off and clean up the resin and mix again with new fiberglass. :

Bingo ! :lol:
I guess the pb could have been reused by adding the hardener to it ...
I can't remember what Nm did with it ...
 
Last edited:

nurseman

Lieutenant Junior Grade
Joined
Jun 2, 2013
Messages
1,045
I scraped it out right away, added MEKP and put it right back!
 

gm280

Supreme Mariner
Joined
Jun 26, 2011
Messages
14,593
Ha guys, nice save(s). I would have scraped it off, but didn't thing about mixing MEKP and use it back again. I probably would have thrown what I scrapped off and the poly soaked fiberglass all away and caulked it up to a lesson learned. Now I know, because I am sure that is going to happen one day with me as well. I can't learn form other people's uh oh's. I have to do them myself first. :facepalm:

I did get some more done to the boat today. I installed a few cleats for the rod boxes and front deck in prep for install those things next. It is getting exciting again for me now. I cut out a 3/4" plywood laminate panel to install under the trolling motor area of the front deck. I figures it would need extra thickness to support the trolling motor mounting hardware. Just need the weather to co-operate and I will finish this puppy one day. :thumb:
 

gm280

Supreme Mariner
Joined
Jun 26, 2011
Messages
14,593
Got some more work done today. It took a few hours to get the shop to 60 degrees, but it finally got there and I did a little polyestering (I know not a word) again with some small areas. I also drilled some more holes for cable runs and rod tubes. And even glued up some hatch supports in the front platform. So if I can keep up the pace, I will finish all the hatches and front platform shortly. I still need to install some more cleats around the from platform area to support it before PBing it in place for final. But getting real close. :thumb:

Oh, I didn't forget about pictures. But showing pictures of holes drilled and cleats PBed really isn't much to see. I will post some progress pictures when there is something to really see. JMHO!
 
Last edited:

gm280

Supreme Mariner
Joined
Jun 26, 2011
Messages
14,593
Again, I got a lot of needed work done today on the boat. Not much to post with pictures, but needed work all the same. I tabed in the front gauge deck support on both sides and waterproofed the port side rear storage floor wood as well. And even made some other little parts for the port side rod box. So little by little it is coming together nicely now. If things keep going this way, I will finish up the top of this boat in the next week or so. Long over due I will admit. Odd how you imagine how long things will take, and then something else crops up and throws everything out of schedule.

I have to say the weather where I live has been on the cold side with today only reaching the 40's. So I am burning through kerosene pretty quickly now trying to keep the shop in the 60'd to keep working. But it is doing it nicely. I can work everyday in mid 60 degree temps and even break a sweat. I sweat really easily. It is an inherited thing. But it allows me to keep polyestering (not a real word :facepalm:) and getting things finished as well. So hopefully I can post some pictures of things shortly.
 

sphelps

Supreme Mariner
Joined
Nov 16, 2011
Messages
11,435
Thinking about boat work counts as boat work .. So that means that you have been going nonstop on your project .. The other stuff that keeps you from the boat is just being able to multi-task .. :D
Your moving faster than you think gm ... About average or better than all us other diy'ers I would say ...
 

gm280

Supreme Mariner
Joined
Jun 26, 2011
Messages
14,593
Thanks Sam. But I started this project years ago now. And honestly when I started, I was thinking a few months at best. I have to laugh at that now looking back. But I do see so many others with similar ideas with their projects as well when they start out. Odd how what seems like a quick project can get stretched over years. But then we have no idea what life offers up as we proceed. I can say that IF I didn't like this type work, which has work wooding, electronics, fiber-glassing, painting, engine rebuilds and trailer welding, it would never be worth it at all. Obviously you will never make this type work a career. But then I made this boat the way I wanted it to be.

But I would like to do a true Bass Boat for my next one. :facepalm:
 

gm280

Supreme Mariner
Joined
Jun 26, 2011
Messages
14,593
I put in another good day's effort today in the boat. More little things that were still there to do like tabbing 1708 on the front gauge plate from the inside. And installing the floors in all the rod and storage boxes and PBing them in place as well. I even started the box that will hold the master switch panel on the Starboard side of the boat.

It is coming along real nice. But until I can coat all the storage areas with either Gel Coat or truck bed liner, I can't put the final tops on any of these boxes yet. So I am running out of things to do on the top side of this boat now. And I will need to flip this hull over and start on the prep for painting.

Hopefully I can post some pictures tomorrow with some visible progress. I just hate posting tabbing and PBing efforts. Not really much to see. I mean if you seen tabbing or PBing once, what else is there to see. :noidea:

While all these little efforts are needed to finish this project, lots of times it isn't really much to see. I also have to mix and pour foam into the lower sections of the rod boxes as well. I already pre-drilled the access holes for doing that before I PBed the rod box floors in place. So I can do that soon as well. I decided to wait until I paint the hull to start wiring the hull. So that is still there to do as well.

Until next update, you all have a wonderful day... :thumb:
 

gm280

Supreme Mariner
Joined
Jun 26, 2011
Messages
14,593
I have a great question for those of you that have done this before. I am just about to PB in the bow platform either today or tomorrow or so, and I already removed the aluminum rub rail. And the new bow platform will fit tight up against the inside of the hull where I removed all the rub rail rivets. How do you propose I reinstall the rub rail after I finish painting the hull? I know I can't access the inside again to use the large headed rivets I purchased for the rest of the railing install now. And I also know some folks use screws from the outside to install the railing. What do you all suggest? My initial thinking was to drill out the holes a little larger then actually needed from the outside and then PB the holes in again, let it cure and then re-drill for the correct size screw with some 3M 5200 on them as I install the railing system. What do you all think of that idea. My only worry is, will it stay using that method? :noidea:
 

nurseman

Lieutenant Junior Grade
Joined
Jun 2, 2013
Messages
1,045
gm, my boat had the rub rail screwed in from the factory. When I took it apart to start my resto, the screws were all tight and holding well. I think that what you are thinking of will work just fine! But that is JMO!
 

gm280

Supreme Mariner
Joined
Jun 26, 2011
Messages
14,593
gm, my boat had the rub rail screwed in from the factory. When I took it apart to start my resto, the screws were all tight and holding well. I think that what you are thinking of will work just fine! But that is JMO!

Thanks nurseman, I figured it might. And actually I can't think of any other way to install the bow railing. So That IS my plan unless somebody else has something better. :eek:

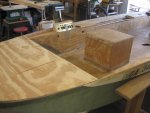
I did take a few pictures today, and while they are not pictures of everything finished on the top side, there are mockup shots. Until I coat the bow area and the rod boxes and storage compartments, I don't want to attach the tops just yet. I figured it would be a lot easier to coat them before PBing the final tops on everything. So I really need to decide on what I'm going to use and buy in now.

In this first picture you can see the bow platform sitting in place. You can also see the mockup for the switch panel on the Starboard side. I haven't made a final decision on that just yet. You can also see two holes for the kill switch and control cable openings. And an outline for the engine's remote controls. In the background you can see everything just sitting on top of the rod box side. I still have to coat the insides before PBing all those things in for good. There is also a hatch on the bow platform for storage access.
IMG_0087.JPG


Another shot from the rear end looking forward. I have already install all the floorings in the rod and storage boxes and they are waterproofed as well. They just need coated yet. If you look real close, you can see a lot of wood circle plugs laying around. Those are there to install after I pour the mix and pour foam in the lower sections of the rod and storage boxes. So there will be plenty of floatation foam in the sides as well.

Another shot from the starboard side near the front Switch panel. I really didn't want the switch panel to extend above the side of the hull, but I haven't figured out another way to mount it yet. And ideas are certainly welcomed. I presently have the bow platform curing after I applied some 1708 to the underside today. And I installed some cleats around the sides to support the bow platform. Everything is come out nicely. Once I make the final decision for the switch panel and coat the boxes, I can install all the top box parts and flip this baby over and start prepping for paint.

One other thing I've tried after see Red Herring's excellent work on his storage boxes. Now mind you, these are no where even close to his efforts, but I certainly did learn a lot trying it. And will try again.


This is my first try on making the lips around one of the storage top. No it isn't nice looking, but I did learn so much doing this and will continue until I get it right. Presently the lip is cut at 3/4" height. I am going to cut them a little lower. Probably 5/8" because I have to get it to fit into the opening with a lid closing on top.

If you remember, I mistakenly sprayed everything with mold release including the wood section that it has to attach to. So I took everything off and used carb cleaner and some elbow grease and cleaned it all off. I was wondering if the polyester would stick to the wood after that. Well in really did stick and is very solid. I used three layers of 1708 and polyester resin to apply everything. The corners I used regular molding clay. I couldn't fine fillet wax and the proper tools to install that, so molding clay was my last choice. And the polyester didn't stick to the clay in the least. And once I cut this to the final height, I think it will look pretty nice. Not Red Herring's nice, but okay.

I know it needs a lot of improvement. :facepalm:
 

nurseman

Lieutenant Junior Grade
Joined
Jun 2, 2013
Messages
1,045
Hey gm, for some reason (and it may be at my end) I can only see the first picture. :confused: Also, (and I'm sure you thought of this) be sure to use stainless screws for the rub rail. ;)
 

gm280

Supreme Mariner
Joined
Jun 26, 2011
Messages
14,593
That's odd I just opened the thread up and all five are there. :noidea:

However, yes I was planning to use stainless steel. Every other piece of hardware I've used this far has been stainless steel.

I have no idea about the pictures showing up. They show for me. :noidea:
 
Top