1967 Starcraft Jet Rebuilding

catbones

Petty Officer 1st Class
Joined
Jul 15, 2012
Messages
319
Hi all,

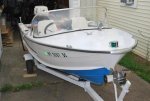
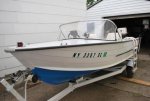
So after few runs with my newly acquired 15 foot 1967 Starcraft Jet I'm deciding that I will put her away, maybe one more fun ride out but after that it's the garage. I'm thinking sometime at the end of September I will start getting her rebuilt to my best ability and funding. So I wanted to start a thread here and introduce her. I will also update this with few pictures.

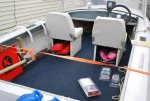
Few things I don't like on her, is the fact of no closed off storage so new floor storage will be in plans. Dashboard will need to be redone and I will also be redoing the flooring. The motor a 1969 I think Johnson 33 will be reprinted to match exterior of the boat and I believe that will be either black or white. Right now the Johnson is white as all of them are. I also don't like the color of the hull and the deck was painted pretty bad too. I've got blue bottom and white top side. I'm heading for a firy red topside and black bottom. The thing is she leaks also a little so im guessing a rivet or something gone lose which is perfect if im repainting.

Seems there were quite the number of rivets on her too that someone used some caulking on which looks bad up close so i will replace that. The other parts that worry be are a few spots like two that look like big blobs of something, hope that isnt to cover up a big hole but on aluminum its fixable i undersand.

Few other little things will also be added if I have time like side walls to hide cables away and rewriting the entire thing too.

I will be going through quite the number of questions and answers, other rebuilt threads as I will need help specially when it comes to parts, paints and wiring this stuff up.

If anyone has start up suggestions or objections do let me know.

I guess the first question would be (I dont have a big space like acres of land or anything just a driveway) would you flip the boat or simply take it off the trailer and work upside down.. It's 15' so it's about 400 pounds I'm guessing, any other ideas of flipping this boat? I dont want to invest much into once of flipping a boat. I'm guessing I can put it in the front yard and flip it off the trailer then slowly pickup each side and put it back on the same trailer with the trailer having some kind of frame built out of wood? What you guys think.

Pictures following this in a bit.
 

catbones

Petty Officer 1st Class
Joined
Jul 15, 2012
Messages
319
Re: 1967 Starcraft Jet Rebuilding

It's a beautiful day and I really really hope winter won't be kicking my behind sanding, painting and doing other things to this starcraft. Here are the photos of how it looks right now :)

DSC_0616.jpg

DSC_0617.jpg

DSC_0619.jpg
 

jbcurt00

Moderator
Staff member
Joined
Oct 25, 2011
Messages
24,871
Re: 1967 Starcraft Jet Rebuilding

Nope, you won't find many objections to doing it up however you want, to suit your wants/needs etc.....

If you end up removing the entire interior, seats, deck, trim~everything, flipping the hull to prep & paint it will make it much easier then working on the trailer upside down. But it can be done that way. Got a stout tree & a come along/hoist you can attach to the tree? An engine hoist can be used as well. Look thru some of the Starcraft rehabs posted here, and some of the threads in the Starcraft owners group forum. You will find lots of suggestions for flipping the hull. Most are after gutting to bare aluminum. Others roll the hull from 1 side to the other & paint the hull 1/2 at a time....

I will mention that even in NY, dark red or black tin will get pretty hot in the sun. Particularly along the gunwale at the helm where you might lean an elbow, same for near the other seats & anywhere bare feet might be stepping getting in & out of the boat.

Although you don't care for it, I do like the blue & white together.... But if you need to remove a bad paint job, current color doesn't matter. Vintage correct Johnson paint is available here, and other places.

You may find lots of interesting stuff over in the SC forums. Lots going on w/ tin boats over that way. Ask as many questions as you can & you'll get lots of tips & info along the way....


Welcome to the tin dry dock at iboats
 

catbones

Petty Officer 1st Class
Joined
Jul 15, 2012
Messages
319
Re: 1967 Starcraft Jet Rebuilding

Hey, thanks ... Yeah I have been reading a few things about flipping it and how. My ideas so far without investing into any crazy hoist was to either push it onto grass and then make a quick frame out of wood and put it on the trailer then slide the thing onto it upside down. Then have it set. A lot of people here have plenty of room but I'm very limited. So one of the challenges will be to make the garage, driveway and front of the house lawn useful as much as possible. I never actually thought of flipping one side up, paint, then do the other side.

How heavy would a 15 footer jet be? I can seem to lift it off the trailer but flipping is another thing lol. I think having it up side down, hull up would make it easier repairing rivets, sanding, etc... Then hull down on bunch of tires or other stands.
 

jbcurt00

Moderator
Staff member
Joined
Oct 25, 2011
Messages
24,871
Re: 1967 Starcraft Jet Rebuilding

If you strip the interior out of it, and the windshield, I suspect it won't be too heavy for 3 or 4 guys to slowly roll the hull onto a tire or 2 on 1 side & then continue flipping it over. Set it down, prep the 'rack' for upside down storage, and pick the boat up & set it down onto the rack. Upside down....

W/out the motor, with no gas, but with a complete interior it looks like the 1967 Jet was @450lbs +/-, it's very hard to read on the 1967 brochure page. Stripped, maybe 325-350lbs?
 

jasoutside

Supreme Mariner
Joined
Dec 20, 2009
Messages
13,269
Re: 1967 Starcraft Jet Rebuilding

Bah, a Jet emptied out is cake to flip even just one guy. No sweat;)
 

jigngrub

Fleet Admiral
Joined
Mar 19, 2011
Messages
8,155
Re: 1967 Starcraft Jet Rebuilding

After you've sanded and removed the caulk looking junk from the rivets and have tended to the 2 ugly patch globs, you need to test and check your boat for leaks. You'll also need to fix any leaks properly before painting, painting will not stop leaks on an aluminum boat.
 

jbcurt00

Moderator
Staff member
Joined
Oct 25, 2011
Messages
24,871
Re: 1967 Starcraft Jet Rebuilding

Bah, a Jet emptied out is cake to flip even just one guy. No sweat;)

W/out a stout tree? Or the garage ceiling mounted gantry? Lifted up & onto the trailer while upside down? Maybe, but way easier w/ 3 :)

But yeah, Jas would know, having done it solo, I have not, so.......... Unless things take an unexpected turn, I never will :facepalm:
 

jasoutside

Supreme Mariner
Joined
Dec 20, 2009
Messages
13,269
Re: 1967 Starcraft Jet Rebuilding

Yah, just pull it off the trailer, tip it up on it's side, come around, lower it down. Easier than fallin otta bed in the morning:D
 

lakelover

Rear Admiral
Joined
Mar 26, 2003
Messages
4,386
Re: 1967 Starcraft Jet Rebuilding

Yah, just pull it off the trailer, tip it up on it's side, come around, lower it down. Easier than fallin otta bed in the morning:D

You got that right. I did my '64 Jet Star by myself after I got tired of waiting for help to be available. The hardest part was balancing it on one side while I moved around to the other to let it down. But not that hard, really. The literature listed the weight of mine as a 415 lb. hull. The weight difference between that and 450 might be the supports under your flat floor (?), mine is curved, no supports underneath..

You're right about the lack of closed storage, I'm pondering the best way to add a little to mine this fall. I don't plan to add much, but since I left the dash tray out for more knee/leg room, I need a place to throw my sunglasses and store my binoculars, and a few other small items.

I kind of like the blue/white you have, but like jbcurt00 said, if you need to remove a bad paint job, that's irrelavent. Besides, I'm partial to red and think a red/black color scheme woud be way cool. ;)

Looks like it's in pretty decent shape to begin with, I had to fill a million holes in the top deck.
 

jbcurt00

Moderator
Staff member
Joined
Oct 25, 2011
Messages
24,871
Re: 1967 Starcraft Jet Rebuilding

But not that hard, really. The literature listed the weight of mine as a 415 lb. hull. The weight difference between that and 450 might be the supports under your flat floor (?), mine is curved, no supports underneath..

That 450lb was just a cover my arse estimate, it's unbelievably hard to read that green spec sheet on the 1967 brochure. It could read 420, might read 480.....

But getting it flipped was only 1/2 of of the OP's question... Once flipped, the upside down hull needs to be put back onto a trailer mounted rack. That's really were the 3 guys comes in: 1 up front & 1 at each of the 2 stern corners :) Unless you've got Jas collection of burly & oh so helpful trees.....
 

lakelover

Rear Admiral
Joined
Mar 26, 2003
Messages
4,386
Re: 1967 Starcraft Jet Rebuilding

But getting it flipped was only 1/2 of of the OP's question... Once flipped, the upside down hull needs to be put back onto a trailer mounted rack. That's really were the 3 guys comes in: 1 up front & 1 at each of the 2 stern corners :) Unless you've got Jas collection of burly & oh so helpful trees.....

Well, I gotta differ with ya on that!...I got mine up on the trailer platform upside down all by my lonesome. In my heavy season it's a lot if I break 175 lb. & I'm no Bluto, and I was able to handle it. But I'll be the first to admit that brains are better than brawn and I would have preferred help!!!
 

catbones

Petty Officer 1st Class
Joined
Jul 15, 2012
Messages
319
Re: 1967 Starcraft Jet Rebuilding

You got that right. I did my '64 Jet Star by myself after I got tired of waiting for help to be available. The hardest part was balancing it on one side while I moved around to the other to let it down. But not that hard, really. The literature listed the weight of mine as a 415 lb. hull. The weight difference between that and 450 might be the supports under your flat floor (?), mine is curved, no supports underneath..

You're right about the lack of closed storage, I'm pondering the best way to add a little to mine this fall. I don't plan to add much, but since I left the dash tray out for more knee/leg room, I need a place to throw my sunglasses and store my binoculars, and a few other small items.

I kind of like the blue/white you have, but like jbcurt00 said, if you need to remove a bad paint job, that's irrelavent. Besides, I'm partial to red and think a red/black color scheme woud be way cool. ;)

Looks like it's in pretty decent shape to begin with, I had to fill a million holes in the top deck.

Hey lake, love the work you did on yours amazing job and same goes to Jas, it's why I'm going to try and make mine pretty. I don't know why but something about the color red for me this year... So I'm thinking black bottom, red top and interior white or milky white with all that nice shiny wood for under the seats and the dash. I might make my floor straight flat like it is now to have floor storage and make floor a nice wooden color darker but with the floor storage opening covers shiny woody. Lol wife's gonna kill me, all she thinks is I'm repainting lol.
 

catbones

Petty Officer 1st Class
Joined
Jul 15, 2012
Messages
319
Re: 1967 Starcraft Jet Rebuilding

You got that right. I did my '64 Jet Star by myself after I got tired of waiting for help to be available. The hardest part was balancing it on one side while I moved around to the other to let it down. But not that hard, really. The literature listed the weight of mine as a 415 lb. hull. The weight difference between that and 450 might be the supports under your flat floor (?), mine is curved, no supports underneath..

You're right about the lack of closed storage, I'm pondering the best way to add a little to mine this fall. I don't plan to add much, but since I left the dash tray out for more knee/leg room, I need a place to throw my sunglasses and store my binoculars, and a few other small items.

I kind of like the blue/white you have, but like jbcurt00 said, if you need to remove a bad paint job, that's irrelavent. Besides, I'm partial to red and think a red/black color scheme woud be way cool. ;)

Looks like it's in pretty decent shape to begin with, I had to fill a million holes in the top deck.

Lake forgot to ask, what did you use to patch those holes up. I'm worried that I've got a lot of drill and new rivet work on the hull. She leaks at this point a little and I'll be posting a few pictures tomorrow of what I mean and I've got two spots I fou d today that I'm not sure about. The owner before me must of hit something, one place looks like a hole right in the very bottom of the hull. The other one seems like a rivet hole but it has a rubber within it so after I'm on the lake and the pump is working, if I put her on the trailer and press with my finger barely on that rubber in part which is pushable, I get drainage from it which is 3/4 at the front of the boat. Very strange but ripping the floor will show.

You guys suggest I keep the floor and repaint and release with epoxy or put in new? I know the floor was done beginning of this year by the previous owner but I'm not sure what white stuff he covered it with and he used threaded plywood too. Might save me time just resealing it, painting it and putting it back on and spend more time sealing the hull completely with GLUVIT and 5200 + new rivets.

Anyone used g-flex? http://www.westsystem.com/ss/g-flex-epoxy/
 

jigngrub

Fleet Admiral
Joined
Mar 19, 2011
Messages
8,155
Re: 1967 Starcraft Jet Rebuilding

I know the floor was done beginning of this year by the previous owner but I'm not sure what white stuff he covered it with and he used threaded plywood too.

Threaded plywood, or treated plywood.

Using treated plywood in an aluminum boat is a bad thing, the chemicals in the wood will corrode your aluminum.
 

jbcurt00

Moderator
Staff member
Joined
Oct 25, 2011
Messages
24,871
Re: 1967 Starcraft Jet Rebuilding

Threaded plywood, or treated plywood. Using treated plywood in an aluminum boat is a bad thing, the chemicals in the wood will corrode your aluminum.

I don't remember what thread, but it may have been LakeLover's Permanent Vacation, or his reference to it on someone else's thread, but the only leaks they had were from the previous owner's use of pressure treated lumber and it's corrosion of the hull, not leaking rivets :facepalm:

In fact removing that treated lumber may have been the only motivation for starting the resto....
 

catbones

Petty Officer 1st Class
Joined
Jul 15, 2012
Messages
319
Re: 1967 Starcraft Jet Rebuilding

I don't remember what thread, but it may have been LakeLover's Permanent Vacation, or his reference to it on someone else's thread, but the only leaks they had were from the previous owner's use of pressure treated lumber and it's corrosion of the hull, not leaking rivets :facepalm:

In fact removing that treated lumber may have been the only motivation for starting the resto....

Jb lol yes treated wood I mean and yes it does bother me that it's in there. Thanks for reminding me, almost forgot about the chemical reactions between the two. It will be the first thing I change.
 

lakelover

Rear Admiral
Joined
Mar 26, 2003
Messages
4,386
Re: 1967 Starcraft Jet Rebuilding

Lake forgot to ask, what did you use to patch those holes up. I'm worried that I've got a lot of drill and new rivet work on the hull. She leaks at this point a little and I'll be posting a few pictures tomorrow of what I mean and I've got two spots I fou d today that I'm not sure about. The owner before me must of hit something, one place looks like a hole right in the very bottom of the hull. The other one seems like a rivet hole but it has a rubber within it so after I'm on the lake and the pump is working, if I put her on the trailer and press with my finger barely on that rubber in part which is pushable, I get drainage from it which is 3/4 at the front of the boat. Very strange but ripping the floor will show.

I used JB Weld with thin aluminum backing. The aluminum was from old printing press plates, not too common an item, but you could use anything thin that won't rust/rot. Cut to small size, add a dab of JB and apply from the underside...smooth out what oozes through with a putty knife, getting it as flat as possible. You'll want to minimize sanding JB because it's tough stuff.

http://forums.iboats.com/showthread.php?t=309879&p=2654202&viewfull=1#post2654202

You guys suggest I keep the floor and repaint and release with epoxy or put in new? I know the floor was done beginning of this year by the previous owner but I'm not sure what white stuff he covered it with and he used threaded plywood too. Might save me time just resealing it, painting it and putting it back on and spend more time sealing the hull completely with GLUVIT and 5200 + new rivets.

If the PT plywood floor is from the recent past, it is the newer kind and will corrode your aluminum eventually. It's your call on whether to replace it or re-use it, it depends on how long you're going to keep the boat. I tend to keep things until nobody else wants them, so I'd replace it. Seal on both sides and especially all the edges with 2 or more coats of epoxy resin, then paint to protect it from UV, should last a very long time.

Very strange having a rubber-filled hole in the hull. You'll want to seal that up. Curious to see what it is when you get the floor up. Probably just a quick fix to a lost rivet. Also curious to see how much storage space you'll be able to get under the floor, it doesn't look like it's very high off the hull, and you'll probably have some lateral stringers under there? I'm not familiar with the structure in those.

Also, a light color is good for the floor/interior. I didn't want all the glare from white, so I used gray Rustoleum Marine topside paint, with their anti-slip mixed in. It has held up very well and the non-slip works great even when wet. However, as mentioned above, even in upstate NY, even the light gray will get very hot in the sun. I managed to burn my bare feet pretty good one time this summer when I hopped in to move some stuff around. I immediately soaked them in the lake, but they still hurt that night.:eek: If you go with the Rustoleum, I wouldn't bother with the more costly Marine version, their Professional line is cheaper, more readily available and just as tough. However, I found the Rusto took a lot longer to really cure and harden than they claim, almost 30 days to get very hard.

I used the Rusto Marine primer for wood/fiberglass on my deck and transom board and even though it's a little pricey, it's tough stuff. Anywhere I have an interior chip or scratch, it was the paint that was removed, I can still see the primer underneath. I ordered it through the DoItBest.com website and they offer free shipping to any Do It Best store, takes a week or so. You probably have a local hardware store that is affiliated with them.

Primer: http://www.doitbest.com/Marine+paint-Rustoleum-model-207014-doitbest-sku-778990.dib
 

lakelover

Rear Admiral
Joined
Mar 26, 2003
Messages
4,386
Re: 1967 Starcraft Jet Rebuilding

catbones, I just sent you a private message...
 
Top