1964 Starcraft Jet - First Boat Restoration Project

WinnipegJet91

Seaman
Joined
May 17, 2016
Messages
65
Evening All, definitely enjoy this forum as it has boat loads of information that will help me as I go through my resto.

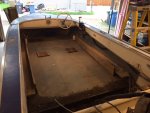
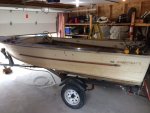
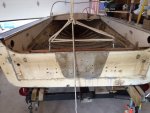
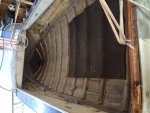
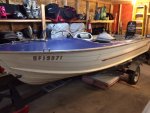
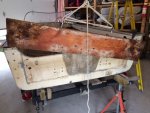
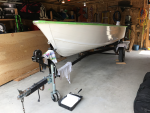
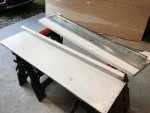
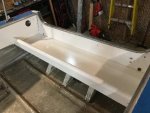
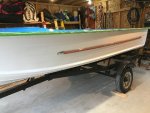
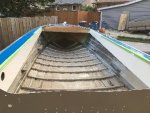
A week ago I got a 1964 Starcraft Jet w/ a 1969 Mercury 50hp short shaft.

To date, I have accomplished the following:
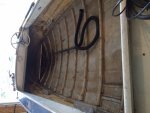
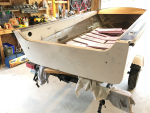
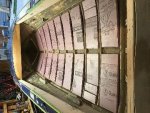
- removed the existing seats, flooring, foam and built up storage unit that the PO had built in replacement of the rear bench seat and dash tray
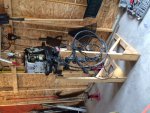
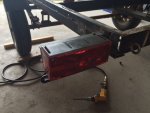
- lifted the motor off the rear transom and put it on a stand
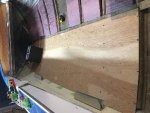
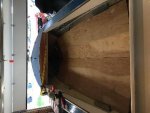
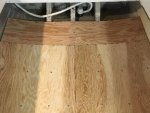
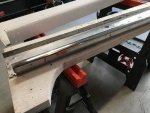
- removed the rear aluminum transom plate that the PO created/installed and the rotten wooden transom board (that was a tough task, thank god for a come along and garage rafters)
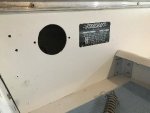
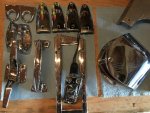
- and tonight I began to remove the dash & steering wheel (let me tell you when I say don't try to take the dash out unless you really have too. Starcraft has built these boats in a manner that the dash needs to be lifted straight up which makes things difficult)

Next step is to strip all the paint and begin self etching primer.

One day I'll figure out the upload for pictures. Game plan is by August long 2016 I will have this boat for a splash on Falcon Lake, Manitoba. Aggressive timeline but I think I can get it done.


I am definitely following the build that lakelover did with combination of other 1964's.

Appreciate any feedback and looking forward to this build.
 

WinnipegJet91

Seaman
Joined
May 17, 2016
Messages
65
The 1969 Merc 500 that was on my 1964 Starcraft Jet is having a very hard time turning over and never actually does start. The starter and solenoid are either been replaced by the PO or original. When the starter engages the flywheel it might get a 1/4 turn then stop. I'm using a fully charged battery (750 cca) I can pull all the plugs and the starter will spin the engine with no problem at all so the motor isn't seizing up or sticking. When I have all the plugs in, and only take one out at a time it doesn't help the cause.

I took the starter motor out (third time) and took it apart, cleaned off the contacts and put it all back together. With no luck at starting it kept turning the flywheel only 1/4-1/2 way, on the second try a spark came from the negative terminal on the battery and the motor will no longer turn over, may have fried the solenoid. I will be replacing the solenoid this weekend from my parts motor but I don't have high hopes.

What should I look for next? Might the exhaust port be plugged?

Any advice would be a great help!
 

WinnipegJet91

Seaman
Joined
May 17, 2016
Messages
65
Status Update:

- Removed the dash
- Began drilling rivets out of the hull
- Purchased the 3/4" marine grade plywood for the new dash
- Attempting to get the Merc 500 to start

Soon I'll try and get some of the pictures up.
 

TruckDrivingFool

Lieutenant Commander
Joined
Jul 30, 2007
Messages
1,818
Mainly posting so I remember to watch,

Option #3 for pic posting is the best but all options are there.

Check that all your contacts Pos and Neg is the best motor advise I have for ya.
 

WinnipegJet91

Seaman
Joined
May 17, 2016
Messages
65
As promised, here are some pictures of my ongoing build.

IMG_1124.JPG IMG_1139.JPG IMG_1130.JPG


image_246614.jpg image_246611.jpg IMG_1140.JPG

image_246620.jpg IMG_1221.JPG IMG_1222.JPG

IMG_1224.JPG
 

Attachments

  • image_246610.jpg
    image_246610.jpg
    111.4 KB · Views: 8
  • image_246612.jpg
    image_246612.jpg
    107 KB · Views: 7
  • image_246613.jpg
    image_246613.jpg
    98.6 KB · Views: 7
  • image_246615.jpg
    image_246615.jpg
    148.3 KB · Views: 6
  • image_246616.jpg
    image_246616.jpg
    113.6 KB · Views: 6
  • image_246617.jpg
    image_246617.jpg
    118.6 KB · Views: 4
  • image_246618.jpg
    image_246618.jpg
    115.8 KB · Views: 5
  • image_246619.jpg
    image_246619.jpg
    121.3 KB · Views: 9
Last edited:

redneck joe

Supreme Mariner
Joined
Mar 18, 2009
Messages
10,286
Making progress. I always had trouble staying focused on one job.

Any luck on the motor?
 

WinnipegJet91

Seaman
Joined
May 17, 2016
Messages
65
I dumped a whole can of Seafoam into the cylinders/carb and got it to pop/billow exhaust for a couple seconds, but it definitely didn't stay running. as soon as i let go of the key it shut off.
 

WinnipegJet91

Seaman
Joined
May 17, 2016
Messages
65
Next on the progress update:

- aquired a mig welder, so time to fix the trailer and make it a beauty like GM280 did with his.
- once trailer is straight, plumb, level, and true with a side of paint we can then paint the hull of my boat!
 

WinnipegJet91

Seaman
Joined
May 17, 2016
Messages
65
Little Status Update:

- Began teaching myself how to Flux-Core weld as i needed to fix my trailer because it was definitely not road worthy with shady bunks and extension cord for my wiring held on by bolts with washers.
- Ended up welding on new light supports and bought some slick submersible rectangle tail lights that installed very easily.Ran the wires down the tongue and then clipped them to the top flange of the C-channels and where it went though a frame member I made sure I installed rubber grommets to prevent from fraying over the year. My plan is to rebuild a brand new trailer this winter when it get's a little cooler in the Garage so I coiled the leftover wire in the tongue to use later on with my slightly longer design.

IMG_1594.JPG

IMG_1595.JPG

IMG_1597.JPG

- Next on the project list was the shady bunk supports that were mounted (basically C-clamps and pins with vertical 2x4's)
- Removed the old, sanded the paint off the trailer to make good contact, mocked up the new bunks and then got to welding.
IMG_1602.JPG

- setup my mobile welding station (one day will get a proper one) and got started marking/measuring
IMG_1604.JPG

- End product of the supports looked good enough for me. I tested out rounding the corners of one of the supports and i liked the look of them but need to mount them on the frame of the trailer before trying to grind them down (way easier).since my boat has a more flat bottom i only had about a 5 degree angle on them just enough to make the boat slide easily and held on the bunks.

IMG_1606.JPG

Next on the list is to:

- Install bunk supports
- Add P.T. 2x6" bunks
- Wrap the bunks in the black marine carpet
- Place insurance the trailer and haul it to the shop to weld the cracks in the aluminum hull and fill some un-needed transom holes
- Then paint (that will be a milestone for sure)!

For anyone who didn't know, this boat trailer used to be a tilt frame, and the PO had very shadily welding this thing together to avoid it from tilting. but, it will last me the summer and a quick splash or two then over the winter i'll rebuilt a brand new one and make it similar styling as another user on here with his trailer build!
 

Attachments

  • IMG_1594.JPG
    IMG_1594.JPG
    92.9 KB · Views: 3
  • IMG_1594.JPG
    IMG_1594.JPG
    92.9 KB · Views: 3

lckstckn2smknbrls

Lieutenant Junior Grade
Joined
Sep 18, 2008
Messages
1,114
Don't use pressure treated wood for the bunks. The copper in the pressure treated wood will cause corrosion to the aluminum.
 

jwdavis28

Seaman
Joined
Mar 14, 2016
Messages
52
I know nothing about boat rebuilds but I find these threads extremely interesting!
 

WinnipegJet91

Seaman
Joined
May 17, 2016
Messages
65
No Title

Well there has been a lot of time passed and let me tell you I have failed to inform the groups my progress.

Here is where I am sitting now after a long cold winter where I had a bit of a hiatus and my truck burning down this spring ruined my spirits but here we go:

Painting the Hull of the Jet:
 

Attachments

  • photo276997.png
    photo276997.png
    2 MB · Views: 8
  • photo276999.png
    photo276999.png
    1.9 MB · Views: 8
  • photo277000.png
    photo277000.png
    1.7 MB · Views: 8

WinnipegJet91

Seaman
Joined
May 17, 2016
Messages
65
No Title

[FONT=&quot]Painting the splash well and installed it, I got so excited about this step that I needed to put on my re-manufactured Starcraft capacity sticker but thought mounting it on the portside gunnel was the best sport because I didn't know how well the 3M adhesive would work on the wooden transom:[/FONT]
 

Attachments

  • photo277002.jpg
    photo277002.jpg
    16.5 KB · Views: 6
  • photo277003.jpg
    photo277003.jpg
    25.9 KB · Views: 6
  • photo277004.jpg
    photo277004.jpg
    27.4 KB · Views: 6

WinnipegJet91

Seaman
Joined
May 17, 2016
Messages
65
No Title

Freshly cleaned and installed (faded) red rub rail on the starboard and port side and you can't see but under the green painters tape is the cleaned up white rubrail along the top:
 

Attachments

  • photo277005.jpg
    photo277005.jpg
    32.6 KB · Views: 5

WinnipegJet91

Seaman
Joined
May 17, 2016
Messages
65
No Title

[FONT=&quot]Installed the 1? density foam in the floor cavity that will compress nicely when I rivet the floor in. The key to riveting in straight lines on the floor is mark the ribs with tape on the hull sides and measure from centre of boat to the outside to have straight rivet lines. I used marine grade 1/4 plywood for the floor as it contours to the ribs the best. My spacing for the rivets was 2", 8", 16" & 24" from the centre strapping. [/FONT]
 

Attachments

  • photo277006.jpg
    photo277006.jpg
    33.3 KB · Views: 6
  • photo277007.jpg
    photo277007.jpg
    45.2 KB · Views: 6
  • photo277008.jpg
    photo277008.jpg
    34.5 KB · Views: 6
  • photo277009.jpg
    photo277009.jpg
    30.6 KB · Views: 6
  • photo277010.jpg
    photo277010.jpg
    26.5 KB · Views: 6

WinnipegJet91

Seaman
Joined
May 17, 2016
Messages
65
No Title

Installed the new dash and prepped/mounted the steering wheel and began mounting the dash tray as I want to keep it as original as possible. Went out and bought the Mothers power ball waxing kit for the drill and let me tell you it did wonders on my aluminum trim pieces!
 

Attachments

  • photo277011.jpg
    photo277011.jpg
    29.7 KB · Views: 7
  • photo277012.jpg
    photo277012.jpg
    39.9 KB · Views: 7
Top