That time of year...

Mark_VTfisherman

Lieutenant
Joined
Nov 29, 2008
Messages
1,487
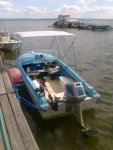
I haven't been around for a while- other than a little lurking and to look something up. But here it is winter: cold, some snow, and although there is still open water at several Champlain ramps it is a little too icy for my 2WD car to fish. Time for catch-up! I have spent the last week or so reading several fishing sites and getting up to date on some MFG threads here on iBoats. Then today I realized I never posted the updates for *my* little Niagara Deluxe for those who might be interested. MFGs are great little boats.

Each summer I go to Oneida Lake in New York for a week of walleye fishing. July was 2011's trip. I learned that I CAN run 4 or 5 miles in 3-4' seas (25- 30-knot winds with higher gusts) in the Niagara. The get to the reefs I wanted to fish was about 20 degrees south of dead upwind; I had to pay attention, but it can be done. Although I was not convinced it was a good idea, the water temps were 70s to 80s so I gave the MFG a workout. Was very thankful for the closed bow and full windshield. I made it safe and other than some water splash, dry! Here is a pic I snapped in a trough while trolling in 3 footers after it finally laid down a bit. I would not want to have been out there in any other boats this size!

Oneida2011 (1).jpg

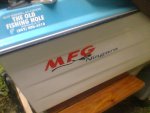
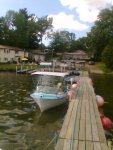
The biggest deal about the week actually was my construction of my MFG top. Unwilling to spend money on a commercially made top that may have been a compromise at best, I instead purchased 1/2" EMT from Home Depot, white rip-stop nylon tent cloth material and heavy blue thread from JoAnne Fabrics (total about $20), and about $40 of bimini hardware and a strap set from The Old Fishing Hole in Morrisville, VT. The colored thread sets off nicely with the Niagara's blue.

I made a scale drawing, sewed the top, and then butt-welded the 10' conduit to get the longer lengths I needed. I bent them to fit with an electrician's bender. I dry fit everything, wiped the oils from the conduit, treated the zinc tubing with white vinegar, and painted the tubing with ACE Hardware's polyurethane floor and deck enamel color matched to MFG blue. Here is the whole thing installed:
Oneida2011 (15).jpgOneida2011 (13).jpg

Shade from the sun, minimal dew overnight, and shelter from the drizzle one day brought in. Easily removed, foldable for transport, and not too much in the way of fishing. And it is fine running 25-30mph across the water. I don't know why I did not do this years ago.

Other than getting rid of the '64 Johnson and perhaps losing the OEM seats, this is by far the best mod I have done to the old MFG. I love these boats!

Hope this inspires others to make good stuff for their MFGs.
 

bhammatt

Cadet
Joined
Mar 28, 2008
Messages
25
Re: That time of year...

Mark
Do you have the formula that ACE used to match the blue deck? I'd like to try it on my '60 Oxford.
 

Jon Sob

Master Chief Petty Officer
Joined
Jun 11, 2011
Messages
827
Re: That time of year...

Hey Mark ....... that is a great pic of the water when you were trolling. You won't catch me out there with my little 13ft'er .... lol.
Good work on that top also .... looks like you picked it up at West Marine. Nice job.
 

sphelps

Supreme Mariner
Joined
Nov 16, 2011
Messages
11,440
Re: That time of year...

Hey Mark , looks good and plenty of head room! I went offshore Mayport at mouth of St Johns river in my dads Edinboro trolling in 2 to 3 ft. It,s been around 28 years since I last rode in the old girl. I can,t wait till she's ready to splash!!
 

Mark_VTfisherman

Lieutenant
Joined
Nov 29, 2008
Messages
1,487
Re: That time of year...

Hey Mark , looks good and plenty of head room! I went offshore Mayport at mouth of St Johns river in my dads Edinboro trolling in 2 to 3 ft. It,s been around 28 years since I last rode in the old girl. I can,t wait till she's ready to splash!!

6-foot-1-inch :)
I actually scaled it out on paper first with an architect's scale. It had about 6'4" and it really looked tall on the boat so I cut the main tubes down a little bit. Wanted just enough to stand under, not do jumping jacks. :D

Mayport.... New Jersey? I will have to look that up. Good luck with you project and I hope I remember to connect the dots when I check out your posts.
 

Mark_VTfisherman

Lieutenant
Joined
Nov 29, 2008
Messages
1,487
Re: That time of year...

Hey Mark ....... that is a great pic of the water when you were trolling. You won't catch me out there with my little 13ft'er .... lol. Good work on that top also .... looks like you picked it up at West Marine. Nice job.

Thanks for the complement on the top. God didn't give me skills to win American Idol, but I did get a good helping of hand-skills and mechanical ability! The thing I am most happy about is how well butt-welding 1/2" EMT worked. No breaks even when I bent the tubing. I am pleased as well with how it came out as common sense gave me some doubt. Don't know why I didn't make one years ago!

Trolling in the waves: ya- that was a rough morning. 13' isn't much shorter than mine ;) It was VERY hard to get rods in the water as I had to constantly man the helm. The occasional "big ones" crested tall enough to potentially swamp the boat. Plus, I figured if I didn't pay attention and got the boat sideways to the waves the new top would be a pretty good sail to help it go over if it wasn't going to do it by itself. I just had to focus on boatmanship and let the fishing rods suffer; I missed a few. Getting a picture on my phone took many attempts as I needed to pay attention to navigating the waves. On the plus side, I did limit out when it calmed down later in the AM. :)

It was fun watching charter boats in 24-footers watch me go by LOL
 

sphelps

Supreme Mariner
Joined
Nov 16, 2011
Messages
11,440
Re: That time of year...

Sorry Mayport Navy Base . I live in Jax, Fla. :cool:
 

Mark_VTfisherman

Lieutenant
Joined
Nov 29, 2008
Messages
1,487
Re: That time of year...

Mark
Do you have the formula that ACE used to match the blue deck? I'd like to try it on my '60 Oxford.

Yes, I do have the formula. ?Next question? "Where is the can!" LOL

I actually used a Benjamin Moore Classic Colors "fan deck" chart and came up with a good match. Went to the ACE store and asked for it mixed in ACE's Polyurethane Floor and Deck Enamel. I am sure the ACE Paints factory engineers would say it isn't recommended, but the truth is with a little thinner and a good white china brush and careful flagging it goes on 85% as good as Interlux (which is a marine polyurethane paint) and has worked well. Probably Interlux IS a better boat paint, but a lot more pricey. The ACE stuff is what I used on the fir plywood dry lockers which have held up well for 10 years now with maintenance.

In short, I will find the can and post the color here another time. I don't remember the color.

caveat: other oil based deck enamels won't do any better than just buying cheap rustoleum. The ACE deck enamel is a polyurethane paint and acts as well as performs like other marine paints I have used. So don't just use oil based floor paint; buy the real thing or use this inexpensive quality substitute.
 

Mark_VTfisherman

Lieutenant
Joined
Nov 29, 2008
Messages
1,487
Re: That time of year...

Mark
Do you have the formula that ACE used to match the blue deck? I'd like to try it on my '60 Oxford.

Wait! I remember!
Benjamin Moore #769 "Dream I Can Fly"
This was matched to the gel color found under the windshield corner bracket on my boat. Nearly perfect.
Doesn't match the "aged" areas quite perfectly, but it the paint looks really good as a match if I rub in a fresh coat of Gel Gloss on the deck and hull cap and buff it off.

NEVER paint out of the can- pour off a little and use a splash of xylene and up to 10% paint thinner to get it to level out well. I like 5%-ish better. Flow it out of the brush really smoothly and flag if it has any brush marks after a second or two. If you flow it on too heavy or brush it down to thin it will run (heavy) or have a lot of brush marks (too thin) just like Interlux. Flow it on- spread it- flag it. Brush dry into wet and then flag the overlaps. You will have a nice smooth shiny finish when it dries.

Hope this helps your MFG work!
 

SteveMFG_Oxford

Petty Officer 1st Class
Joined
Nov 22, 2011
Messages
207
Re: That time of year...

Mark .. I have no idea what you mean by "flagging" as mentioned in you paint comment. I've never heard the term.

Could you explain?
 

Mark_VTfisherman

Lieutenant
Joined
Nov 29, 2008
Messages
1,487
Re: That time of year...

Mark .. I have no idea what you mean by "flagging" as mentioned in you paint comment. I've never heard the term. Could you explain?

Oil base paints "level out" nicely because they dry slowly. Better real china brushes leave less brush strokes visible than cheap china ones or synthetic bristles. A loaded brush "flows" paint on to the surface. Loading a brush means that it is full of paint but not dripping. Painting from the "dry" into the wet you flow paint onto the surface with the handle 45 degrees-ish from the dry surface. Although with experience you can begin to "work" the paint a little bit without negative consequences, in general you DO NOT brush back-and-forth at all after you flow paint on in about a 1-to-2 square foot area. Leaving a wet edge against the dry surface to avoid lap marks, you smooth the paint very little to provide nearly even coverage. Then, as the brush becomes unloaded but not dry or dragging, you brush in a single direction from the wet/dry edge into the wet with the brush at 90 degrees to the surface using the bristle tips only without bending the bristles. This is flagging- smoothing the freshly applied paint into the previous wet but starting to "set" paint area with little to no pressure. This light "working" or the paint leaves a nearly brush-stroke-free surface that levels into a smooth coating.

Flagging is using an unloaded brush that is not dry at right angles to the work to smooth and evenly apply the paint, thereby avoiding sags and runs, most brush marks, and "thin" areas. Paint applied too thinly dries too quickly to either level out or provide enough time for proper cross-linking of the coating surface. The latter can effect adhesion and longevity with some appearance consequences. The former effects appearance primarily with some longevity consequences.

I hope this helps. I didn't know how to explain it quickly without describing it.

Incidentally, I try to work an area about a foot wide by one or two feet long depending on how fast paint is drying. Assuming we are painting a hull side, I start on the left and try to paint an area which has a horizontal break like a hull seam (or on most MFGs a lapstrake line) and go the whole length of the boat so as to avoid "lap-lines" which are very hard to work out. I attempt to work fast enough that all my dry-to-wet and wet-to-wet areas have not taken a "set" before I flag the area. Then I go back to where I started and make the next pass; the hull seam or line gives me a place where horizontal lap-marks can be worked out or disguised so as to be unnoticeable.

Spraying can be used to apply "oil-based" paints, but paint has a property which actually makes it lose viscosity when it is agitated or worked (which is why your paint should be frequently stirred even if it is not separating or settling). Rather than spray and then back brush (to work the paint) I have found it easier to just brush it on well and be done with it. There is a lot more to spraying paint succesfully (air temperature, humidity, proper thinning for the conditions) and I have found that on small boats like ours brushing works out fine. And I prefer it.

Hope this helps answer some questions and makes you a better boat finisher. I don't know everything but I have been painting stuff with a brush and sometimes a sprayer since I was 14 which gives me about 30 years of experience. That, and I have a friend who brush-painted a 186 Lund with the $45 Interlux polyurethane paint who is not picky and not an experienced painter (this is the third boat he has painted and only the second "fancy" one). By using a wicked good brush and following the directions to a "t" his boat looks fantastic and I am hard-pressed to see evidence that it is not a factory paint job. As good a job as I can do! And I have painted a lot of boats, furniture, houses, etc. with a brush. So you can do a great job.

Final thought- DON'T depend on tape to give a good transition to trim or another color. You can use the tape as a safety, but think to yourself of "cutting" a good line as if the tape wasn't even there. Then wait until the paint has "set" but is not dry or gummy and peel the tape back on itself. IF a second coat is required or desired, wait the recommended dry time and re-apply the tape. This will give you a professional looking job without gooey paint solventing the tape adhesive along the edge and leaving a yucky looking edge. And any "cleanup" at transitions might best be sanded after dry. However, mouldings, vinyl edges, etc. can sometimes be cleaned while wet with a thin cotton cloth dampened (not dripping wet) with paint thinner and placed over a 1" putty knife. Tear strips of rag and be patient with little sections at a time, changing the rag strips frequently when they get a little paint in them. Runs and sags should be allowed to dry fully and then sanded. Then repainted.

Incidentally, I am the kind of guy that can paint all day and usually not have any drips of paint on me anywhere, and my brushes don't have dry paint in the bristles or on the ferule. By being careful you can do as well- make the brush an extension of your mind to manipulate the paint to do what you envision the end result to be.
Phonemem011.jpg
 

bhammatt

Cadet
Joined
Mar 28, 2008
Messages
25
Re: That time of year...

Just want to report that I stopped my my local Ace Hardware (also a Benjamin Moore dealer) yesterday and with the name and number you provided they easily came up with the "formula" with their paint computer. A few mouse clicks later they converted it to the formula for their brand of floor and deck paint. In five minutes I was heading home with a can of MFG 1960 Deck Blue. Haven't tried it yet but I'll report back when I do.
Mark, thanks for the help. I've tried mixing my own but have never been satisfied that the color was just right, or that I could duplicate it again.
 

SteveMFG_Oxford

Petty Officer 1st Class
Joined
Nov 22, 2011
Messages
207
Re: That time of year...

Thanks for the expert explanation on paint technique! I think I understand it! Sounds pretty Zen ...
 

Mark_VTfisherman

Lieutenant
Joined
Nov 29, 2008
Messages
1,487
Re: That time of year...

Just want to report that I stopped my my local Ace Hardware (also a Benjamin Moore dealer)....In five minutes I was heading home with a can of MFG 1960 Deck Blue. Haven't tried it yet but I'll report back when I do. ....

Glad I could help! It is a great match- don't forget to keep it stirred.

Also should mention that you want to use soap/detergernt and a foam 150-grit (120 in a pinch) "sanding block" to scrub down the boat wherever you are planning to paint it. You shouldn't need a primer on 'glass with that paint but crud and/or gelcoat may keep it from adhering and lasting well. The sanding block with detergent and water does two jobs at once. Just make sure that the surface is evenly dulled where shiney and that dull-surface residue is fully gone and that all the nooks and crannies are dry before painting. A cheap way out to "prime" aluminum or galvanized pieces is to soap-and-water scrub them and then wet rub them down with vinegar and then dry after a few minutes, followed by the paint. (The "right" way would be to degrease galvanized metal or aluminum with a solvent, prep with self-etching primer, and then paint.)

Good luck with it and looking forward to your great results.
 
Top