My 1981 Citation Marquis...

Luposian

Petty Officer 2nd Class
Joined
Aug 15, 2015
Messages
108
Ok, I'm basically finished restoring my trailer, so back to working on the boat!
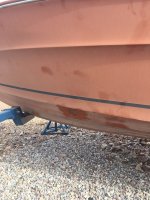
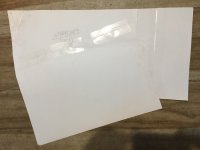
I'm looking at repainting my boat. The hull (everything at/below the water line (which I assume is where the black tape/vinyl is) is the main priority, because it has to go back onto the trailer before March (wife is hosting a church "party" at out house, in March, so don't want kids playing around a boat on stands). Have several pictures. Not sure exactly what I'm dealing with. Is it horribly oxidized gelcoat? Ablative paint? How can I tell the difference? It's chalky and comes off on my fingers. But... both oxidized gelcoat and ablative paint will do that.

1st pic: Before cleaning
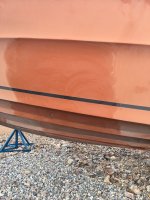
2nd pic: first scrub (with water, dish soap and a scrubby sponge)
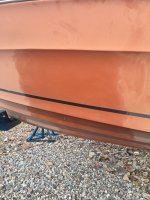
3rd pic: rubbed away chalky swirls left behind after first scrub (even after blasting it with a garden hose nozzle), with my fingers and a towel.
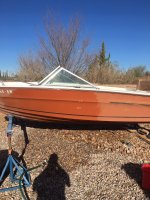
4th pic: larger section more thoroughly cleaned.

Am I seeing what I should be seeing (after a thorough cleaning and wipe down)? As long as it's as clean as I can get it, is it good enough? Do I need to do any prep sanding to help the paint adhere? I'm going with water-based bottom paint, to limit fumes. I want white. The upper sides will be a shade of blue. We'd like to go with something similar to our truck, but... not sure we can get that close a match. Not that our truck will ever haul our boat (my wife/son won't do it and I don't drive), but the color scheme seems nice. Wife likes the idea. Trying to get her "into" (interested/involved with) the boat at all, as it was nearly impossible to get her to agree to having me own one... even for just $250!
 

Attachments

  • IMG_1987.JPG
    IMG_1987.JPG
    633.6 KB · Views: 4
  • IMG_1988.JPG
    IMG_1988.JPG
    547.8 KB · Views: 3
  • IMG_1989.JPG
    IMG_1989.JPG
    515.2 KB · Views: 4
  • IMG_2013.JPG
    IMG_2013.JPG
    856 KB · Views: 4

Luposian

Petty Officer 2nd Class
Joined
Aug 15, 2015
Messages
108
This is the current state of my transom. All rotted plywood removed. Inside of skin sanded down. The perimeter has about .5"-1" depth, but the inside is real bumpy. The red oval is where there is an indent conforming to the shape of the exterior, so that's not flat like the rest of the inside of the skin. The black outline is where a second piece of plywood reinforces the rear. There is a "lip" along the entire perimeter, to tab to, once it's been sanded down to bare fiberglass. I know the total thickness of the transom is 1.5" in the middle, but .75" everywhere else. But I can't use .75" plywood, because resin/fiberglass has to be considered, so would I use .5" and make up the other .25" with resined fiberglass?

Would be a lot simpler if I removed the cap, but don't want to mess with having to build a cradle and such, so trying to do it without removing the cap.
 

Attachments

  • TransomEdit.jpg
    TransomEdit.jpg
    1.2 MB · Views: 6

Luposian

Petty Officer 2nd Class
Joined
Aug 15, 2015
Messages
108
Ok, decided to skip painting and put her back on the trailer (not perfectly; the rollers are not set to the correct positions, but I can adjust later). I'm working on the transom.

I've gutted out the old, rotted plywood, and sanded down the inside of the outer skin as clean as I can imagine. The pic shows the current state. Not exactly sure what step to take next. Trying to replace the transom without removing the cap definitely makes it a harder task.
 

Attachments

  • TransomEdit.jpg
    TransomEdit.jpg
    1.2 MB · Views: 7

GSPLures

Chief Petty Officer
Joined
Sep 3, 2019
Messages
564
The sides can be 3/4 ply and it shouldn't interfere with anything. Going thicker is not bad but do not put less than what was there. You should also be able to double some 3/4 for the keyhole. There is a minimum thickness for a stern drive around the keyhole, if its a mercruiser it is between 2" - 2.25" and parallel within 1/16".

I made mine 2.125" out of 2 pieces of 3/4 which worked once you add the PB for gluing the wood together the PB to glue in the transom.

I wrapped the transom wood in 1.5 CSM then I put 2 layers over the entire thing once I tabbed it in. I had to put 1 or 2 more layers over the raised area (can't remember right now)to get the proper thickness as it was still slightly under the recommendation for a mercruiser.
 

Scott Danforth

Grumpy Vintage Moderator still playing with boats
Staff member
Joined
Jul 23, 2011
Messages
47,680
This is the current state of my transom. All rotted plywood removed. Inside of skin sanded down. The perimeter has about .5"-1" depth, but the inside is real bumpy. The red oval is where there is an indent conforming to the shape of the exterior, so that's not flat like the rest of the inside of the skin. The black outline is where a second piece of plywood reinforces the rear. There is a "lip" along the entire perimeter, to tab to, once it's been sanded down to bare fiberglass. I know the total thickness of the transom is 1.5" in the middle, but .75" everywhere else. But I can't use .75" plywood, because resin/fiberglass has to be considered, so would I use .5" and make up the other .25" with resined fiberglass?

Would be a lot simpler if I removed the cap, but don't want to mess with having to build a cradle and such, so trying to do it without removing the cap.
the cradle is to hold the hulls shape regardless if you pull the cap or not you should use a cradle
 

76SeaRay

Lieutenant Junior Grade
Joined
Aug 24, 2017
Messages
1,047
I replaced my transom without removing the cap but you have to cut the stringers back to have room to slide the new plywood up under the cap area. The cap on makes it a little more challenging to clamp the new plywood to the hull. I used horizontal 2x4's on edge with bolts through the hull transom.
 

Luposian

Petty Officer 2nd Class
Joined
Aug 15, 2015
Messages
108
I replaced my transom without removing the cap but you have to cut the stringers back to have room to slide the new plywood up under the cap area. The cap on makes it a little more challenging to clamp the new plywood to the hull. I used horizontal 2x4's on edge with bolts through the hull transom.
Biggest issue with that approach is that I have the existing fiberglass "lip" all around the transom, to tab to. I assume your approach is to grind all that away so the plywood just lays flat up against the rear skin, once you've slipped it in under the rear portion of the cap? I'm trying to keep as much of the original fiberglass intacts, so there is less work laying down/attaching new fiberglass.

Supposing I go with your tactic, how much (in inches) of the stringers do I need to cut back? And how do you connect new wood to the end of the old wood? Or will I simply have to skim the top of the stringers and rip out the old wood and insert new wood in it's stead? With the cap attached, does that take any warping risk out of removing the stringers?

I'm not afraid to do things "the hard way", assuming it's something that keeps things as intact as possible, to prevent getting into a situation I can't get out of.
 

76SeaRay

Lieutenant Junior Grade
Joined
Aug 24, 2017
Messages
1,047
I pulled out all the old transom wood and sanded it flat with a belt sander. I trimmed the stringers back about 10 inches. It depends on how tall your stringers are as to how much space you need to allow. In the pic below you can see how I cut back the floor and stringers. I was replacing the stringers so I wasn't splicing them. If you aren't replacing the stringers then you would need to drop the new transom wood in from the top. It is not really advisable to splice the stringers particularly in this area but others can weigh in on that.

Stringer Cut Back.jpg
 

todhunter

Canoeist
Joined
Sep 15, 2020
Messages
1,261
I'm trying to keep as much of the original fiberglass intacts, so there is less work laying down/attaching new fiberglass.
Honestly you may end up making more work for yourself by trying to keep as much of the old stuff there, especially the old tabbing lip. Grind it flat, install your new transom, make PB fillets, and lay new tabbing. This is the way.
 

76SeaRay

Lieutenant Junior Grade
Joined
Aug 24, 2017
Messages
1,047
I also found the farther forward I went with cutting out the stringers, the more rotted stringers I found.. I am replacing them all the way to bow..
 

Luposian

Petty Officer 2nd Class
Joined
Aug 15, 2015
Messages
108
I'm wondering... can new transom plywood be inserted in sections/pieces? In other words, like, say, two or three pieces (port, starboard, and center)? Obviously, pulling the cap would be the right/best way to do this, but I am just 1 person, and have no hoisting tools, no cradle, nor other help, so it's not a feasible tactic. So, I'm trying to figure out a method that will be "good enough" or even a bit better than it was done originally (given the fact all holes for everything (drain, bilge pump, etc.) were made through exposed plywood. No "mouse hole" (drain) or protective (resined-in) oversizing of holes or anything. So all water that seeped in... soaked into bare, exposed plywood. I plan to do things a bit better than that.

So, as long as the "jigsaw" (pieced together) approach won't compromise the transom horribly, I think that's the easiest way to go about it, in my situation.

I plan to use epoxy resin and whatever type(s) of fiberglass is suitable for use with it.
 

Luposian

Petty Officer 2nd Class
Joined
Aug 15, 2015
Messages
108
I couldn't figure out why there was a layer of rotted fiberglass between the 1st and 2nd pieces of plywood, when I was tearing it all out. But what they probably did was attach the first piece of plywood against the outer skin, then fiberglass over it, then attached the middle I/O reinforcing piece. Then fiberglassed over the whole shebang, to create the inner skin. Is that the proper approach? To fiberglass between the layers?
 

GSPLures

Chief Petty Officer
Joined
Sep 3, 2019
Messages
564
They probably laminated the 2 pieces together with csm to get the proper thickness. You can do it like that. Others use PL to laminate the 2 pieces together.

You can make the whole transom glass it all then glue it in and tab the outside or glue in tab the outside then glass it in. Not sure if one way is better than the other some do it each way so I am assuming its just personal preference.
 

Luposian

Petty Officer 2nd Class
Joined
Aug 15, 2015
Messages
108
They probably laminated the 2 pieces together with csm to get the proper thickness. You can do it like that. Others use PL to laminate the 2 pieces together.

You can make the whole transom glass it all then glue it in and tab the outside or glue in tab the outside then glass it in. Not sure if one way is better than the other some do it each way so I am assuming its just personal preference.
I know CSM = Chopped Strand Mat (only usable with polyester or vinyl ester resin, which I won't be using), but what is PL?
 

Luposian

Petty Officer 2nd Class
Joined
Aug 15, 2015
Messages
108
If PL is the stuff in this thread, sounds like it's not ideal to use...
 

76SeaRay

Lieutenant Junior Grade
Joined
Aug 24, 2017
Messages
1,047
I used Titebond III to bond my two layers of 3/4 inch marine plywood. Others recommended it. I used Polyester to bond the laminated plywood to the outer hull. Polyester to glass over the entire transom. Haven't used PL anywhere.
 

GSPLures

Chief Petty Officer
Joined
Sep 3, 2019
Messages
564
If PL is the stuff in this thread, sounds like it's not ideal to use...
I am talking about just for laminating the pieces of ply together to get the proper thickness. Not to glue to the hull, although many have and to bed stringers with success. I used PL to laminate the transom wood and bonded the wood to the hull with PB(thickened resin) on mine
 

Luposian

Petty Officer 2nd Class
Joined
Aug 15, 2015
Messages
108
I've started piecing together a transom template from some card stock (long) my wife had and wasn't using...
 

Attachments

  • Transom Template 1.JPG
    Transom Template 1.JPG
    787.5 KB · Views: 3
Top