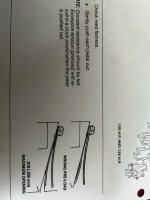
The service manual says;
0.10 (.255mm) maximum opening ALLOWED
Like Nordin asked; are all the pedals having this gap? & check with a flashlight how many?
If the motor is running with "bad" valve reeds it would be spitting fuel out the carb's throat
Do not flip the pedal reeds around! there will be a too strong of preload
***********************TO SET UP THE ENGINE***************************
Here's a old post (from the late Frank) that I have printed out & live by;
1.Disconnect the ball link to the carb cam at the timing tower. Disconnecting at the cam risks bending the cam. Move the cam away from the carb roller.
2. Loosen the screw(s) on the aluminum tie bar and let all carbs close completely, then tighten again.
3. Set the cam so that the scribed line is pointing directly at the black roller on the carb lever. If the cam has two closely spaced lines, set the black roller directly between them.
4. The black roller is held with an offset screw and nut. Loosen the nut and turn the screw until the black roller JUST touches the cam. Tighten the nut and re-attach the ball link maintaining the scribed line at the roller.
5. Adjust the ball link so that at full throttle the bottom carb butterfly opens substantially horizontally. Adjust the aluminum tie bar so all carb butterflies open equally at full throttle. They need not be perfect but should be rather close to horizontal for best performance.
6. Adjust timing to 28 degrees before top dead center at full throttle. ( STATIC TIMING / CRANKING SPEED )
7. Adjust idle speed to 700-750 RPM in the water in forward gear. Do this with the screw on the bottom of the timing tower. Loosen the locknut and adjust. Screwing in increases idle speed. Do this in small increments and let the engine rev and adjust itself before the next adjustment. A little goes a long way here. When correct, tighten the nut. Note that the scribed line on the roller will now be (usually) below the black roller a bit.
8. NOW we adjust the mixture on the carbs. Set all low speed needles to about 1 1/4 turns out from lightly seated. Do not force as this will damage either the needles or the seats.
8A. With the engine idling in neutral, turn each the needles in equally about 1/8 turn at a time. Give the engine a couple of seconds between each adjustment to stabilize. Adjust until the engine either "sags" or stalls. Note this setting.
8B. Now go the opposite direction. Adjust until the engine runs rough, burbles, or stalls. Note this setting.
8C. Set all needles to the average between the two settings: That is, for example, if it stalled at 3/4 turn out and burbled at 1 1/4 out then set all needles to 1 turn out.
8D. Readjust idle speed to 700-750 RPM.
9. Take the boat out on the water and do a "hole shot"--Full throttle acceleration from a stop. If the engine "sags" then recovers and picks-up it is too lean. Open the needles about 1/16 turn at a time until the engine accelerates with no hesitation.
If the engine sputters or coughs or burbles, then clears itself and accelerates, it is too rich. Close the needles about 1/16 turn at a time until the engine accelerates smoothly.
10. I can NOT stress this enough! NEVER set the low speed needles less that 1 turns out no matter how poor the idle or acceleration. To do so will run the engine too lean and detonation and melted pistons at or near full throttle operation will result.