Honda BF50a milky oil…did I buy a bad motor

Noah4200

Petty Officer 3rd Class
Joined
Oct 17, 2022
Messages
90
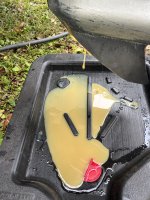
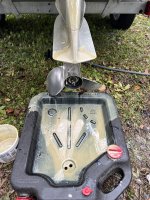
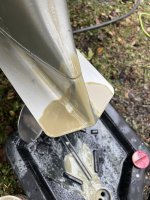
Rough day guys…still have the flywheel noise after tensioner, belt and some filing of one of the coil pickups…then changed the engine and lower oil and both looked terrible. The guy I bought it off of had good service records and engine has 1200 hours but it’s a 1997. He said that it has been sitting for 2 years unused tho. Am I looked at eaten out water jacket internals, head gasket failure or is there ANY way this is due to long term sitting exposed to elements/temp swings. It ran ok when I took it out last week. First is lower second and third is engine oil. Really bummed

Noah
 

Attachments

  • 0AA7F81B-4594-46BB-A6B9-87029D2D7CBA.jpeg
    0AA7F81B-4594-46BB-A6B9-87029D2D7CBA.jpeg
    2.2 MB · Views: 7
  • 64C2E9C3-0C05-4DA5-A50B-2E238D106BC9.jpeg
    64C2E9C3-0C05-4DA5-A50B-2E238D106BC9.jpeg
    2.4 MB · Views: 7
  • AF6405FF-3775-42DB-BB4F-5B4AA6F12D19.jpeg
    AF6405FF-3775-42DB-BB4F-5B4AA6F12D19.jpeg
    1.8 MB · Views: 7

Noah4200

Petty Officer 3rd Class
Joined
Oct 17, 2022
Messages
90
I think I have an answer..:it had NO thermostat. I cleaned the housing and added a new one. I read this will cause the moisture! 58D08CCC-A0F5-478C-BAD8-566D6DC781FB.jpeg
 

MattFL

Master Chief Petty Officer
Joined
Oct 20, 2010
Messages
845
First the gearbox - if the oil is milky it's got a leak. You can pressure test it to find the leak, but it might just be easier to change all the seals while you're at it.

For the powerhead - it's an old motor so corrosion is definitely a concern. Odd that it had no thermostat, I wonder what that was all about. I would put new oil in along with the new thermostat, run it for a little bit and check the oil frequently to see if any more water shows up.
 

ahicks

Captain
Joined
Sep 16, 2013
Messages
3,957
Sorry, missed this note earlier. Safe bet the engine is mixing oil with water, and yes, the lower is due for a new set of seals. These are sort of a specialty of mine. MOST (95%) can be brought back with a new head gasket and some very careful cleanup of the head and block. Others will have a hole eaten through the block casting that require block replacement - but that's not the end of the world.

Might just as well plan on pulling the head. There' no way around that. Pretty safe bet the cooling passages are going to be packed with hardened sand that's all going to be picked/blown out. Each side can take hours!

The more important thing though, is what's left of the sealing areas the head gasket needs to seal off - on both sides. The area immediately surrounding the bore has to be wide enough to get a good seal. Corrosion that's had a chance to build up between the block and the gasket and the head and the gasket, can eat into this enough to ruin either side.

No thermostat is a pretty good sign of an engine in trouble - or about to be. Have a good look at the paint colors on the exhaust side. If some look dark, it's been hot. Some get so hot they actually melt the plastic valve cover. Look to see if the rocker cover bolt washers don't appear to have plastic oozing out from under them on the exhaust side.

If it gets THAT hot I will absolutely guarantee you 2 things. First, the head gasket is destroyed. 2nd, all is not lost. I've put a BUNCH of these back together carefully using economical used parts that have gone on to lead long service lives afterward. A BUNCH of them!

Lower units not that big a deal, unless you see it's badly corroded, or there's a crack in the case running parallel with the prop shaft. Still salvageable, but will be in need of some serious TLC to bring back to full service. They're generally affordable to fix...
 
Last edited:

Noah4200

Petty Officer 3rd Class
Joined
Oct 17, 2022
Messages
90
Captain Ahicks I really appreciate all your responses to my various issues with this recent 15 dauntless I purchased with this 1997 BF50 (~1076 hrs). Let me give you an update. I did a complete carb rebuild/sync, valve adjustment, checked timing, new belt/tensioner, plugs, thermostat, water pump rebuild, oil and clean fuel tanks (fresh REC87). My dad came down and we took it out today and it ran great on the way out (30 min 4000 RPM). Strong tell tale no running or cooling problems at all. THEN on the way back I started to get a shaking/misfire every few minutes off plane at a fast idle. Felt almost like hitting bottom or something like a fast reduction of load. Then I got on plane and I felt it falling out as well I reduced throttle and just kind of did whatever I could to get back home. These symptoms are the exact same as when I took it out last time BEFORE doing ANY work on the motor. So here is what I’m thinking…the FLYWHEEL. I think the ticking magnet clearance issue is overheating the ignition causing misfire after getting warm. 1000’s of strikes a minute surely produce heat. Reminds me of a bad cap and rotor on a vehicle…problems after warming. Secondly, as of now there is NO water in the engine oil after 5 hours of running on muffs and in the ocean. I really think the thermostat caused condensation as there was NO extra oil in the motor when milky. NO added volume. I see no indication of overheating around the exhaust side paint and valve cover looked great. Maybe some idiot removed thermostat due to weak water pump or to avoid liability. So I think my head gasket is ok for now…will keep an eye on the oil. So what do you guys think?? Can my flywheel magnet swelling issue be causing these running problems once warm?? I was planning on getting a new flywheel anyway just wanted to take my dad out…not trying to run a pinging flywheel long term :)


Thanks
Noah
 

ahicks

Captain
Joined
Sep 16, 2013
Messages
3,957
I'd say go for it Noah. Replace the flywheel, if for no other reason than to convince yourself that's not an issue.

Eventually though, you're going to have to figure out the cause of the milky oil.....
 

Noah4200

Petty Officer 3rd Class
Joined
Oct 17, 2022
Messages
90
I'd say go for it Noah. Replace the flywheel, if for no other reason than to convince yourself that's not an issue.

Eventually though, you're going to have to figure out the cause of the milky oil.....
So in your opinion there’s no way a missing themostat could sweat/condensate the cylinders over long periods of idling in cooler water?
 

ahicks

Captain
Joined
Sep 16, 2013
Messages
3,957
So in your opinion there’s no way a missing themostat could sweat/condensate the cylinders over long periods of idling in cooler water?
Anything is possible, but IMHO, no chance in hell...

With a t-stat installed, if run long enough, it COULD burn off some of the water in that oil, forming steam that would then vent out.

If you haven't already, maybe give the motor a fresh oil and filter change and then see how long it takes to turn milky?

Betting the oil filler cap is filled with white gook (water) on the back side. That's all I need to see to pull a motor down for a good cleaning and new head gasket at minimum.

Oh, and last, no captain here. That's just a title this site gives out based on the post count. I'm just a retired old man, lifetime shade tree mechanic, that found and enjoys a niche working on 40-90hp Honda outboards. More hobby than anything, but it does keep me in mad money.... -Al
 
Last edited:

Noah4200

Petty Officer 3rd Class
Joined
Oct 17, 2022
Messages
90
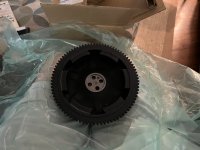
Ok guys…ordered the flywheel and it was here in 24hrs from Jacksonvile from boats.net. Good to know that I can get stuff quick here on the Georgia coast. This will at least fix the noise and magnet clearance issue. I really think the magnets hitting at 1000’s of times a minute would surely cause the misfiring I’m experiencing after running for awhile. I’ll swap it and take the boat out and see if it runs good again. I was meticulous with the carbs and don’t see them clogging first run with a new filter and spotless tanks with new Ethanol free gas. I probably should change the main gas lines with the bulb and clips. Looks original. Looks like a Honda line is 60$. As I said engine oil looks perfect so far…will run and give an update. Will also look at the lower oil after a second outing. When I took the prop off the notched end nut that holds the housing in looked really badly corroded to the housing like it’s never been out. Going to start spraying vinegar and corrosion spray and wire brushing the area. I have a new end nut but don’t have the end nut wrench or puller. Looks like 100$ for each. Would anyone recommend trying to pull the seals out the “easy way” with tapping screws? I guess the o-ring on the housing would not be able to be changed then. I’m just starting to feel like this housing may be fused in there. Will keep blasting it and wire brushing every few days so it can loosen up while I order the seals. May just have to get a lower unit. Already out 1000$ in parts so a lower would put me at 2200$. My “good deal” is quickly fading. I will never purchase a boat with an older motor again. Not worth it

Noah
 

Attachments

  • 1C4338D8-6757-4A1A-BF36-C8CD29C03978.jpeg
    1C4338D8-6757-4A1A-BF36-C8CD29C03978.jpeg
    2.9 MB · Views: 2

ahicks

Captain
Joined
Sep 16, 2013
Messages
3,957
Nobody working on that type lower (Merc is the same) will try to get that nut free on an older salt water lower. Instead, you drill through it in 2 places near the bottom about 1/2" apart. Then you give that 1/2 section a good whack with a center punch, breaking it right out of that ring. From there, removing the ring is easy. Thread clean up will be essential, with some time devoted to that purpose using a wire wheel in a drill. A new nut is less than 10.00 if memory serves me. Don't even waste your time trying to save/reuse...

Pullers used to pull the shaft and bearing carrier get pretty creative. Mine uses pipe fittings, with a large flange against the lower, then pipe extending out to the threads on the shaft. From there some large washers are stacked extending to the point a STEEL nut can be fully installed in place of the prop nut. And from there an impact wrench on the steel nut has never failed to break the bearing carrier loose. On occasion you may have to extend the pipe from the flange a bit to make it longer to finish the pull. EZPZ....
 

Noah4200

Petty Officer 3rd Class
Joined
Oct 17, 2022
Messages
90
Nobody working on that type lower (Merc is the same) will try to get that nut free on an older salt water lower. Instead, you drill through it in 2 places near the bottom about 1/2" apart. Then you give that 1/2 section a good whack with a center punch, breaking it right out of that ring. From there, removing the ring is easy. Thread clean up will be essential, with some time devoted to that purpose using a wire wheel in a drill. A new nut is less than 10.00 if memory serves me. Don't even waste your time trying to save/reuse...

Pullers used to pull the shaft and bearing carrier get pretty creative. Mine uses pipe fittings, with a large flange against the lower, then pipe extending out to the threads on the shaft. From there some large washers are stacked extending to the point a STEEL nut can be fully installed in place of the prop nut. And from there an impact wrench on the steel nut has never failed to break the bearing carrier loose. On occasion you may have to extend the pipe from the flange a bit to make it longer to finish the pull. EZPZ....
I can’t thank you enough! Would I still need the end nut wrench to properly torque the new nut after threads are clean? Also I installed the flywheel just now and it’s quiet!!! OMG it was so loud when I got it…between the tensioner screaming and the loud pinging…NOW it’s perfect. Will test run tomorrow but again, I can’t see metal banging on metal 1000’s of time a minute NOT affecting the ignition after an hour or so. The tell will be IF it runs ok at first then does it after time. It’s possible one of the coils are already damaged…looks like they were all getting hit…exciter coil plastic housing was damaged a bit. BUT I’m hoping it’s gonna run great!!! Will keep checking the engine oil for water..fingers crossed. Finally, I feel like this motor is hard to start especially after clean carbs and new plugs. Valves are on point and I squeeze the bulb thoroughly. Choke circuit is working and it’s 75 degrees out. Had to crank it quite a few times to get it going…seems weak off the start. I know it’s not fuel injected but man it’s cold blooded. Hoping to god it’s not low compression…has numbers of 195 and 190 written next to te cylinders in sharpie but I’m sure that test was a few years back. BF50 known to be kinda slow to start?

Noah
 

ahicks

Captain
Joined
Sep 16, 2013
Messages
3,957
Re: hard start, you say the "choke is working", but is it? You've verified the choke plates are closing completely? Does it start any easier using the manual choke? That motor should be running within seconds of the time you hit the starter - assuming only the compression is normal (something 110psi plus). They will start harder to start if things get too low (90psi or so).

Getting pretty shade tree, but I can tell you that that ring has been tightened by gently tapping on a 3/8 extension held against those lugs to the point it's snug. If you have more than maybe 1/8" end play when sliding the prop shaft in and out, there's a good chance the ring hasn't been tightened far enough. For God's sake, make absolutely sure you don't get it cross threaded (VERY EASY!!), and I will install that ring fully into the case previous to assembly to confirm the threads are good to go....
 

Noah4200

Petty Officer 3rd Class
Joined
Oct 17, 2022
Messages
90
This is great!!! Saved 250$ worth of tools I I will never use more than once or so. Can’t thank you enough for all your input. I will check the choke operation…I know Manual works but was trying the switch up front today it’s possible it wasn’t working…nervous to take this boat out tomorrow…hoping I don’t get the misfires!!!
 

ahicks

Captain
Joined
Sep 16, 2013
Messages
3,957
Note that the choke solenoid position is adjustable (by loosening the band that hold it in place). If that solenoid is installed too far towards the rear, it can't possibly pull the choke open all the way......
 

MattFL

Master Chief Petty Officer
Joined
Oct 20, 2010
Messages
845
Regarding being cold blooded: I've got a 99' 50 that I bought new in 99'. When cold, give it the choke and about 1/5 throttle and it should fire right away. Pull the throttle back to keep the RPMs reasonable and bump the choke a couple of times to keep it running. It will warm up and start running without the choke pretty quickly, but you will need to keep bumping the choke for several seconds to keep it alive. When warm, repeat except without the choke. All of that said; if you replace the EPA limited fuel screws with fully adjustable fuel screws (I posted the part numbers on here somewhere) then not only can you make it idle significantly better, but it won't be cold blooded anymore either, and only takes a little choke to get it started when cold, then will run fine right away.
 

Noah4200

Petty Officer 3rd Class
Joined
Oct 17, 2022
Messages
90
Regarding being cold blooded: I've got a 99' 50 that I bought new in 99'. When cold, give it the choke and about 1/5 throttle and it should fire right away. Pull the throttle back to keep the RPMs reasonable and bump the choke a couple of times to keep it running. It will warm up and start running without the choke pretty quickly, but you will need to keep bumping the choke for several seconds to keep it alive. When warm, repeat except without the choke. All of that said; if you replace the EPA limited fuel screws with fully adjustable fuel screws (I posted the part numbers on here somewhere) then not only can you make it idle significantly better, but it won't be cold blooded anymore either, and only takes a little choke to get it started when cold, then will run fine right away.
Matt it has the normal A/F screws…manual said 2 1/8 but I found the idle to strengthen a little richer at like 1 1/2. About where do you have your screws set? Thanks
 

MattFL

Master Chief Petty Officer
Joined
Oct 20, 2010
Messages
845
I don't recall where mine are set, I think I started about 1.5 or 2 turns out then just adjusted for best running and never went back to check where they actually were. That said, these are fuel screws, not air screws like you see on 2-strokes. So 1.5 turns out will be leaner than 2.125 turns out. But if that's where it runs best then that's what matters.
 

ahicks

Captain
Joined
Sep 16, 2013
Messages
3,957
Matt it has the normal A/F screws…manual said 2 1/8 but I found the idle to strengthen a little richer at like 1 1/2. About where do you have your screws set? Thanks
That right there could be the root of your evil (1 1/2 turns). Mine are generally sent out with 2.5 - 3 turns. This makes for a MUCH friendlier handling engine that's far less picky about starting or idling when it's cold.

And there's no downside to keeping them slightly rich like that I've ever run into. Yes, the plugs will handle it just fine w/no hint of fouling!
 

Noah4200

Petty Officer 3rd Class
Joined
Oct 17, 2022
Messages
90
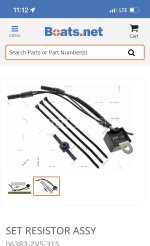
Good stuff guys…my tach is kind of unstable so for idle and WOT/prop testing I read on other threads that the output RPM from these is unstable and to get this attached Honda resistor part-
 

Attachments

  • CF116DD9-738B-4C8E-9A23-1D23911E8786.jpeg
    CF116DD9-738B-4C8E-9A23-1D23911E8786.jpeg
    468.9 KB · Views: 1
Top