So my seadoo with fibreglass hull had a quarter size chuck out of the gelcoat around the intake. Previous owner had tried to rtv the chip back into place. Anyway decided to take a crack at patching it with new gelcoat, first time, upside down, on my back, across curved surface. Anyway. It’s patched and sanded down and watertight. Just not super pretty. Had a couple questions to figure out how to improve next time.
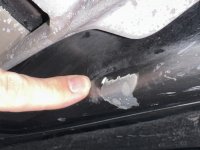
The two different colours are because my first fill had a big depression in it and a large air bubble so I had to do a second coat. Both could have used a lot more colour. Don’t really care about looks though as it’s under the waterline.
1) my biggest question is, is this watertight, protecting the underlying glass? It’s completely smooth, no exposed cracks or chips I can catch a nail on albeit a bit thin in places.
2) I have large white flake in my new gel. Top left in pic, by finger. it’s level with the surface so I don’t think it’s a chip. Any ideas? Resin that didn’t get mixed with colour?
3) I have some porosity presumably from air bubbles. I hand mixed in a cup. How can I avoid these next time?
4) I clearly sanded too much because you can see the edges of the original chip. Any tips for sanding across a rounded surface like this? I used a tiny sanding block I cut from 1x2.
Thanks all. And yes I know it’s amateur hour.")
The two different colours are because my first fill had a big depression in it and a large air bubble so I had to do a second coat. Both could have used a lot more colour. Don’t really care about looks though as it’s under the waterline.
1) my biggest question is, is this watertight, protecting the underlying glass? It’s completely smooth, no exposed cracks or chips I can catch a nail on albeit a bit thin in places.
2) I have large white flake in my new gel. Top left in pic, by finger. it’s level with the surface so I don’t think it’s a chip. Any ideas? Resin that didn’t get mixed with colour?
3) I have some porosity presumably from air bubbles. I hand mixed in a cup. How can I avoid these next time?
4) I clearly sanded too much because you can see the edges of the original chip. Any tips for sanding across a rounded surface like this? I used a tiny sanding block I cut from 1x2.
Thanks all. And yes I know it’s amateur hour.