Engine Bed Fabrication

markhodges78

Chief Petty Officer
Joined
Aug 4, 2016
Messages
416
So I'm getting closer to my engine change but not there yet but have a few more question's
for starters I will not be able to do the L bracket bolt thru option because there is no access to the back side of the stringer see attached photo below. So moving on I will have to make a mount from wood so ? number 1 what should I use to fab the bed from ( 4X4 1X1 or laminate plywood together) Then after the bed is formed it gets coated with a few coats of resin and after the mount gets attached to the stringer and floor of the boat using peanut butter ? once peanut butter is cured the engine bed gets glassed to the floor and the stringer..
Is this the way it should be done...
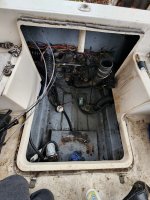
20221208_143938.jpg
 

88 Capri (2022 SOTY)

Master Chief Petty Officer
Joined
Aug 25, 2019
Messages
801
Hi Mark,

I used 4x4's out of Douglas Fir and I know others used plywood laminated together.
Any wood needs to be thourghly coated with resin, 2 coats is what I did, then after I used my PB I put another coat over everything before I glassed.
Before any glassing make sure all gelcoat is removed and thourghly cleaned with acetone.
I'm sure others will give you examples of their techniques.
 
Last edited:

markhodges78

Chief Petty Officer
Joined
Aug 4, 2016
Messages
416
Hi Mark,

I used 4x4's out of Douglas Fir and I know others used plywood laminated together.
Any wood needs to be thourghly coated with resin, 2 coats is what I did, then after I used my PB I put another coat over everything before I glassed.
Before any glassing make sure all gelcoat is removed and thourghly cleaned with acetone.
I'm sure others will give you examples of their techniques.
Thank you for your response and I look forward to more responses...
 

todhunter

Canoeist
Joined
Sep 15, 2020
Messages
1,259
On my restoration, I pulled the old engine mounts and cut them open to see what they were. Turns out they were a 2" piece of mahogany (very rot resistant) sandwiched between 3/4" plywood. The lag bolts go into the mahogany, so any moisture that gets in through the bolt holes is only impacting a rot-resistant wood. You can see pics of my engine mounts here (start there and scroll down and you can see them progress).

I coated them in resin, PB'd them into the boat, then covered them / tabbed them in with 2 layers of 1708.
 

Scott Danforth

Grumpy Vintage Moderator still playing with boats
Staff member
Joined
Jul 23, 2011
Messages
47,650
I sandwiched layers of plywood, laminated together with tite-bond III or PB (depending on which resto).

each block was shaped with a saw (table saw, band saw or chain saw) and glued in-place to the stringers and hull with PB. then it was screwed to the stringers with 4" screws thru pre-drilled holes and the whole block was tabbed in place
 

markhodges78

Chief Petty Officer
Joined
Aug 4, 2016
Messages
416
On my restoration, I pulled the old engine mounts and cut them open to see what they were. Turns out they were a 2" piece of mahogany (very rot resistant) sandwiched between 3/4" plywood. The lag bolts go into the mahogany, so any moisture that gets in through the bolt holes is only impacting a rot-resistant wood. You can see pics of my engine mounts here (start there and scroll down and you can see them progress).

I coated them in resin, PB'd them into the boat, then covered them / tabbed them in with 2 layers of 1708.
Nice work you have going on here
 

Baylinerchuck

Commander
Joined
Jul 29, 2016
Messages
2,726
Mine were dimensional lumber glued together with PL, then PB’d in place. Multiple layers of 1708 to tab in place and build final height.
 

markhodges78

Chief Petty Officer
Joined
Aug 4, 2016
Messages
416
Tabing that brings me to my next question I know it's been said to start with your widest tabing and go down in size. But I've also seen someone that says they just can't wrap there head around the concept. And by doing it that way there's only 1 layer of tabing actually coming into contact with the glass below it. So they do the opposite and start with the smallest tabing and work up in size. What methods do you guys use...
 

stresspoint

Lieutenant Junior Grade
Joined
Sep 19, 2022
Messages
1,003
Tabing that brings me to my next question I know it's been said to start with your widest tabing and go down in size. But I've also seen someone that says they just can't wrap there head around the concept. And by doing it that way there's only 1 layer of tabing actually coming into contact with the glass below it. So they do the opposite and start with the smallest tabing and work up in size. What methods do you guys use...
always remember when laminating > a bond is only as good as the first layer , start small and work outward , sand back between layups.
 

Scott Danforth

Grumpy Vintage Moderator still playing with boats
Staff member
Joined
Jul 23, 2011
Messages
47,650
Tabing that brings me to my next question I know it's been said to start with your widest tabing and go down in size.
Other way around. Each successive layer of tabbing is 2-3" wider in both directions. So your first strip is 6" wide, you next is 12", etc
 

markhodges78

Chief Petty Officer
Joined
Aug 4, 2016
Messages
416
Other way around. Each successive layer of tabbing is 2-3" wider in both directions. So your first strip is 6" wide, you next is 12", etc
This is my thought process as well but I've seen many say that you apply widest first. Like this video here at about 4:15. This concept just blows my mind I wanted to make sure my thought on this was agreeable


Scott Danforth

Grumpy Vintage Moderator still playing with boats
Staff member
Joined
Jul 23, 2011
Messages
47,650
This is my thought process as well but I've seen many say that you apply widest first. Like this video here at about 4:15. This concept just blows my mind I wanted to make sure my thought on this was agreeable

You should be looking in the forum stickies

specifically 4th sticky down. Links 14, 15, and 18
 
Top