2nd Dive boat build Thompson Fisherman 210

Davetowz

Petty Officer 1st Class
Joined
Sep 19, 2012
Messages
227
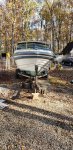
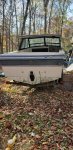
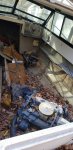
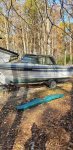
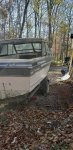
Beginning my second hull up rebuild into a dive boat. 1st was a Rinker V190( Hardtop, maybe the only one) This time it is a Thompson Fisherman 210 1988. 3.0 OMC Cobra... and ( GASP) I will be dropping in a 3.7 Mercruiser. .I'll also have mounts for the 4.3 that I will be building later for her, ( have the 4.3, just needs rebuild) besides I do kinda like the 470 motors, just loud. Looking for a pic hosting platform that won't screw me in the end, like .... did. She has been brought home and cleaned up a bit, Previous owner started the tear out. Moving her to the dive shop in the morning to put her in the shop to begin the fun part of rebuilding and redesigning a good looking, common Lake Erie boat, but not for fishing out of. This gal is meant to help us explore the bottom of the Great Lakes. Pics are from the CL ad. The price was ... well Very right. :)
I will try to document the process here... Feel free to comment or suggest... never know when you might have a better idea or method of attacking the task. Thanks ahead of time for watching and providing input.
 

Attachments

  • photo323679.jpg
    photo323679.jpg
    135.9 KB · Views: 2
  • photo323680.jpg
    photo323680.jpg
    113.8 KB · Views: 2
  • photo323681.jpg
    photo323681.jpg
    68.6 KB · Views: 2
  • photo323682.jpg
    photo323682.jpg
    118 KB · Views: 2
  • photo323683.jpg
    photo323683.jpg
    99.9 KB · Views: 2
Last edited by a moderator:

Davetowz

Petty Officer 1st Class
Joined
Sep 19, 2012
Messages
227
Got her moved into the shop. Tight fit into the door. Will be looking her over tomorrow and coming up with a plan. Probably going to build a cradle to support the hull, Previous owner did not, I see a little hook in the bottom from sitting on the trailer. Hope to get that straight before rebuilding the structure.
 

Davetowz

Petty Officer 1st Class
Joined
Sep 19, 2012
Messages
227
I am considering using epoxy for all the work below deck, and poly for all the wetout of virgin wood and the deck topside. I am wanting to gelcoat the deck, hence the poly and I am thinking the epoxy will give a better bond and be stronger, more flexible for the stringer build. Am I over thinking this and should just use poly for everything? Odor also plays into it a bit, I do hate the poly resin buzz, even when using a good filter on the mask.
 

kcassells

Fleet Admiral
Joined
Oct 16, 2012
Messages
8,613
I'm partial to EEEpppoooxxxyy but that's just me. Typically what you start with is what you finish with.
 

chevymaher

Commander
Joined
Mar 29, 2017
Messages
2,915
When mine was gutting and gutted. I had a laser flashlight deal. I was jacking it up in the right spots. Put a board. In a few days adjust it and the pressure. Little weight in on the hull on the inside in key spots.

By the time your done gutting it. The bottom be straight as a arrow. Just got to relax it into position. Not overnight.

I checked it before I bedded in the stringers. Got out fast and let it cure. Look up hull blueprinting and read on it. Worth the time and effort. Once the stringers are bedded and cured it wont move again.

Nothing some shims a few pieces of wood and a floor jack can't fix.


red-green.jpg

We all in this together I am pullin for ye.
 

Davetowz

Petty Officer 1st Class
Joined
Sep 19, 2012
Messages
227
Finished removing all deck hardware and Got the transom out today. Also removed the Pine 2x6 below gunwale shelves. The Thompson reputation for poor quality glass work is showing up. The transom and the shelves do not appear to be resin coated. The shelf s had full length tabbing on top side only. Pretty good delam. Looks like resin starved wet out, probably from the open wood. Transom is similar. Cap in center at keyhole was only stapled on, no adhesive. The full transom appeared to have been glued on with a light csm and was a poor adhesion. Tabbed at bottom and sides only. Perfect for deconstruction, It did leave a very smooth transom glass to build off of, but disappointing to see an OEM build a boat this way. Pics will be following, as soon as I can get the phone and the PC to talk to each other again.
 

Davetowz

Petty Officer 1st Class
Joined
Sep 19, 2012
Messages
227
Pictures soon. Went ahead and pulled the dash , steering and all the electrical. I currently have nothing that isn't glass. Been doing a lot of work with the chooch saw and grinder. I will be posting pics of my dust handling solution. Includes a Woodworking dust collector, a wood shop air cleaner, and a shop vac.I am actually grinding glass inside and not clouding up! The deck design is developing. I will be adding a second fuel tank fwd. 30 Gal. giving me 80 gal total capacity. Also looking at a stepped deck arrangement that will make an aft self bailing deck and a cockpit area. More to follow , some questions also. Still up in the air about epoxy vs poly. Leaning more towards epoxy below deck and poly above so I can gelcoat. Anyone have experience with bilge coat paints? Looking at JTD Total boat bilge paint to do cuddy and all other above deck parts hat don't get non skid.. hell maybe even use it for non skid areas ... Pics will be coming soon, need to solve a stupid phone vs puter argumet.
 

Davetowz

Petty Officer 1st Class
Joined
Sep 19, 2012
Messages
227
Picked up an Alpha 1 leg today from a 4.3... Looking good on getting a cracked block Mercruiser 4.3 I have a good running donor motor from a chevy van ( vortec) Power plant seems to be lining up.
 

Davetowz

Petty Officer 1st Class
Joined
Sep 19, 2012
Messages
227
Hard top off, 1st power washing completed. 20191226_164154.jpg Moved into The shop area I have been graciously allowed to use. 20191228_173334.jpg Tight space, but it will work. Much better than trying to do glass work in the snow. 20191228_173344.jpg Removed the transom ... wood.. former wood... Notice the square that surrounded the keyhole was only stapled on... Not much in adhesives used to install this transom. about 30 minutes to remove it all. 20191229_175148.jpg No more wood. 20191229_185623.jpg Got the rest stripped out. Nothing but glass now, and a little cuddy wood that is going to stay. 20200101_190656.jpg While taking a break from grinding, I beveled all screw holes on the hull with a countersink. A 20200101_154413.jpg lot of the holes are sloppy. I have filled them all with THIXO now. The ones in the open areas will get sanded when the skin gets wet sanded. There are a lot of screws holding on the rub rail! I also applied THIXO to the exterior of the joint. I have a plan for the inside of the joint also.
20200101_190650.jpg Ground down a few stress cracks and also rub wear from loose screws on the hard top frame. These will get filled later. 20200101_190834.jpg Aft corners of hull both had stress cracks, these will get filled later, and a layer of glass or 2 behind them to strengthen them. Probably will glass in plywood gussets on transom to cap where we will be climbing in and out with heavy gear.
20200105_205944.jpg Grinding has begun, just a pic to prove it :)
20200105_205829.jpg20200105_205843.jpg20200105_205934.jpg My dust management strategy uses a wood shop air cleaner above to filter airborne dust. I am using a 1.5hp woodshop dust collector with a big gulp hood sitting next to my grinding to gather dust at the source and a shopvac with drywall bag in it to also collect dust as I make it. I vac up any loose dust pretty often so I don't kick it up. Seems to be working pretty good.
 

kcassells

Fleet Admiral
Joined
Oct 16, 2012
Messages
8,613
Looks good. Just make sure you get all the wood off transom to clean glass.
 

Davetowz

Petty Officer 1st Class
Joined
Sep 19, 2012
Messages
227
Going to hit with the R.O at 40 grit one more time. The wood is all gone now. Will be starting to mock up layout to make sure I have all the areas ground that need ground. Although I am sure I will find more later.
 

Davetowz

Petty Officer 1st Class
Joined
Sep 19, 2012
Messages
227
Tossed in the fuel tanks, looking at layout options. Been looking at pics online to see where waterline sits so I can set the aft self bailing deck height. Looks like the waterline paint is pretty accurate for true waterline. Has anyone used the big scuppers for a self bailing deck? The ones that are friggin barn doors.. 2x6" I think. I can always go the deck drain route, but if I can I would like to be able to shed large volumes of water fast. I do spend a good bit of time on Erie, and she can change faster than most women.
20200106_170951.jpg
 

Davetowz

Petty Officer 1st Class
Joined
Sep 19, 2012
Messages
227
60 gal on primary tank another 30 in the fwd tank, 4.3 vortec 3400-3600lb boat. I should get some range. What kind of fuel burn do you get with a 4.3 in a similar boat?
 

Davetowz

Petty Officer 1st Class
Joined
Sep 19, 2012
Messages
227
Went and looked at a 89 Regal Valanti 255 tonight. Picking it up on Sunday. Has a nice tandem axle trailer under it and a lot of other useful parts. Under her deck is sitting a mercuiser 260. Yep. Gonna have a v8. Engine is hosed, but it is a small block chevy. That I can deal with pretty easy.The boat looks a little rough and I am sure after a quick glance that she is rotten. Giving it away if anyone is looking for a 22' cuddy project.
 

kcassells

Fleet Admiral
Joined
Oct 16, 2012
Messages
8,613
I looked at those scuppers. Like what they do. I drilled out 2 2" holes and will be adding scupper trim and flaps on exterior of transom.
I made my deck flush which I feel is a better design to me to clear deck water plus adds more flat space to stand on to fish.
To answer your question I did not use the large scuppers. I wan to see where my waterline will actually end up after the build and water float.
The I'll decide to use them or make other mods if necessary.
 

Davetowz

Petty Officer 1st Class
Joined
Sep 19, 2012
Messages
227
Milestone. Grinding, ( first phase) complete. Aracao plywood on hand eeeepoxy arrives tomorrow. Next step will be a complete wash of her, inside and out. Intend to rinse hard, wash and scrub with dawn, then maybe a wash with tsp, followed by heavy rinse and a few days drying. Should be getting the parts boat picked up on wed.
 
Top