1985 Bayliner 2750 Ciera Sunbridge Resto

mickyryan

Rear Admiral
Joined
Apr 18, 2016
Messages
4,210
looking good. Sweat equity paying off. If you intend to remove the blue and red pistriping I used heat gun ( not on full) and flat blade. Made it easy!
I used this soy based stripper with great success.
View attachment 372688
use a rubber wheel for all the removal of stickers/emblems it works great and is fast you will thank me later:)1669291895931.png
 

eggs712

Petty Officer 1st Class
Joined
May 8, 2012
Messages
335
Some progress was made last week. I spent a day scrubbing down the entire Hull, which revealed several patches that have poorly matching gelcoat.
20221115_122738.jpg
I sanded all those spots down and chased down spider cracking plus some cracking small patches with a dremel.
I failed at my first attempt at gelcoat matching the off-white (too much yellow after the gel cured). The color seen under the old pinstriping is what I'm trying to match.
20221116_180044.jpg
I'll sand it down and try again when it gets warmer.
On the port side, I sanded down the major spider-cracking and poor fairing job on the blue section. I sanded the curved part with a dynafile fairly deep then glassed a layer of CSM
20221115_171525.jpg

20221116_145247.jpg
I did a lot of fairing on the port side, forgot to snap a pic. I'll sand and gelcoat it when I get a warm enough day. I found a local supplier to match the blue gelcoat with a spectrophotometer setup; it cost $80/quart, but the color looks dead-on close to the original.
 

Attachments

  • 20221115_171519.jpg
    20221115_171519.jpg
    3 MB · Views: 9

eggs712

Petty Officer 1st Class
Joined
May 8, 2012
Messages
335
Once the cold front shut down any glassing, I disassembled the galley and part of the head to remove the last of the carpet. I then finally started some actual gutting.20221121_185002.jpg

20221122_140304.jpg

20221122_140315.jpg
Bayliner at least sealed off the deck and bulkheads separately from the galley and other wood, so the rot isn't too extensive. I will have to remove the entire head and part of the dinette to access the rest of the rotten deck and bulkhead.
20221122_142440.jpg

20221122_183930.jpg
 

kcassells

Fleet Admiral
Joined
Oct 16, 2012
Messages
8,613
Nice mess going on there. DeJa'Vu...
How are you going to get hat area outside the bath resolved?
 

Drivewayboater2

Petty Officer 1st Class
Joined
Aug 21, 2019
Messages
273
Wow… lots going on there…like wow! Nice to see progress but my goodness there’s a lot to work on… I’m working my way from aft to forward. What’s your situation with the transom? Is that shot or you do has a rebuild plan/ schedule there?
 

eggs712

Petty Officer 1st Class
Joined
May 8, 2012
Messages
335
Nice mess going on there. DeJa'Vu...
How are you going to get hat area outside the bath resolved?
Once the shower pan is out, I'll have good access to the rest of the rotted bulkhead, deck and small stringer (the two small stringers dead-end at the bulkhead). I'll replace the wood with what the factory had and a little heavier glass layup because we all love to overkill here lol
 

eggs712

Petty Officer 1st Class
Joined
May 8, 2012
Messages
335
Wow… lots going on there…like wow! Nice to see progress but my goodness there’s a lot to work on… I’m working my way from aft to forward. What’s your situation with the transom? Is that shot or you do has a rebuild plan/ schedule there?
Yeah I'm going after several things at once trying to make sure the weather can't shut me down! I got lucky with the transom, a few holes were drilled in it previously, but they were all properly sealed so no rot in my test holes. I haven't test drilled engine mounts yet though, I'll do that when I have to pull the engine
 

Drivewayboater2

Petty Officer 1st Class
Joined
Aug 21, 2019
Messages
273
Yeah I'm going after several things at once trying to make sure the weather can't shut me down! I got lucky with the transom, a few holes were drilled in it previously, but they were all properly sealed so no rot in my test holes. I haven't test drilled engine mounts yet though, I'll do that when I have to pull the engine
Gotcha… I feel the same way…. Several projects all at once. Great work! Like to see your persistence. Keep us posted
 

eggs712

Petty Officer 1st Class
Joined
May 8, 2012
Messages
335
I decided to take a few days off of work, so after catching a bunch of sheepshead at the coast, back to working on the boat!
With some warm afternoons, I finished fairing the hull.
20221213_143154.jpg
20221213_143142.jpg
20221214_155507.jpg
For the white gelcoat match, I found an old thread here that suggested Bayliner used only brown for their gelcoat tint, which worked great for me. I'll get pics when all the new gelcoat is applied and finished out.

For the many screwholes and cracks on the stern gunwhale, I first filled filled them with epoxy; the gelcoat there was REALLY thick (~3/16") so I was worried about it cracking out again.
20221212_185432.jpg
I gave the epoxy plenty of cure time, grooved it back down below original gelcoat, then filled up with gelcoat. I'll sand and buff it all when the weather turns too cold to glass.

In the cabin, the head is apart to allow access to the rotten wood.
20221213_185143.jpg
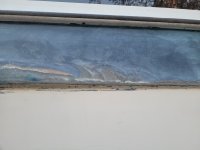
Behind the shower pan showing the good stringer:
20221214_190758.jpg
I'm really cramped for space on this build, so moving the bulky shower pan out of the way is a challenge right now. I also plan to pull/Inspect the gas tank while I'll have easy access.
 

eggs712

Petty Officer 1st Class
Joined
May 8, 2012
Messages
335
A couple questions:
1. Should I coat the aluminum gas tank with a protective paint? The boat will be used in saltwater. If so, are there any paints/coatings that won't break the bank?
2. Is there any reason not to add storage hatches under some hollow spots in the cabin? Under the steps is hollow, and there is zero floatation foam thus far.
20221122_183937.jpg
 

Scott Danforth

Grumpy Vintage Moderator still playing with boats
Staff member
Joined
Jul 23, 2011
Messages
47,649
I painted my fuel tank with Dupont Imron snow white. wasnt too bad for cost. the primer cost more than the paint.

access and storage is always a good thing. I added PFD storage under the risers by simply cutting an access hole and gel coating the interior, as well as line storage under the step in the cabin.


zool

Captain
Joined
Aug 19, 2012
Messages
3,432
Another choice for a built in tank is Por15. Its moisture cured and tough as nails.
 

Scott Danforth

Grumpy Vintage Moderator still playing with boats
Staff member
Joined
Jul 23, 2011
Messages
47,649
Another choice for a built in tank is Por15. Its moisture cured and tough as nails.
It may have been tough as nails prior to the company changing formulation in 2008. Today I wouldnt use POR 15 on anything as there have been too many applications that have failed amongst the car blogs globally in the past decade. I personally have had it fail on multiple occasions over the past 10 years and I must have gone thru 50 gallons of the stuff between 1990 and 2008 on multiple restorations.

It will not stick to aluminum even though they claim it does. even with 2 applications of metal ready over a blasted surface
 

zool

Captain
Joined
Aug 19, 2012
Messages
3,432
Well I applied it to my Aluminum tank in 2013 and its sticking fine a decade later. I did apply it over ppg alodyne and alumiprep tho. As usual, its all in the prep. Ive never had a problem with it, but frankly, for an under deck tank, even rustoleum would be fine. Hell, the tanks were installed by the factory without coating lol.

I could argue that Imron isnt rated for below the water line, and is a waste for something you rarely see ;)
 

1975oday22

Chief Petty Officer
Joined
Sep 2, 2022
Messages
578
following your restoration! thinking off getting a bayliner cabin cruiser for liveaboard.
 

Scott Danforth

Grumpy Vintage Moderator still playing with boats
Staff member
Joined
Jul 23, 2011
Messages
47,649
I could argue that Imron isnt rated for below the water line, and is a waste for something you rarely see ;)
yes, however I could buy it from work and spray it at work, so I went with Imron (technically Axalta Coatings). additionally if water gets to the fuel tank in the boat, that means there is over a foot of water in the bilge and it would be sinking.
 

tpenfield

Moderator
Staff member
Joined
Jul 18, 2011
Messages
17,732
I'll add my comments . . .

For the fuel tank, consider Interlux Interprotect 2000E . It is a 2-part epoxy paint used commonly as a barrier coat, but also works great as a bare metal primer. I coated my 160 gallon fuel tank with the stuff and could not get it to come off with the 'pull test'

As for adding storage compartments were suitable . . . sure. you may want/need to consider drainage from those compartments, as everything on a boat seems to get water in it at some point.

You may also want to look for opportunities to add flotation.
 

eggs712

Petty Officer 1st Class
Joined
May 8, 2012
Messages
335
Thanks for the suggestions! I've been reading some really mixed reviews on Por15 possibly having to do with residual moisture in the metal. However, an epoxy like Interlux won't break the bank and seems like the safe option for me.

I'll definitely be adding some storage where possible with weep hole drainage.
 

eggs712

Petty Officer 1st Class
Joined
May 8, 2012
Messages
335
following your restoration! thinking off getting a bayliner cabin cruiser for liveaboard.
Thanks for tagging along!
I'd recommend looking at something at least a few feet longer than mine for a liveaboard; it would be a bit cramped IMO for all the extra storage I'd want for daily living. Also, mine being trailerable sacrifices a lot of beam width.
 

eggs712

Petty Officer 1st Class
Joined
May 8, 2012
Messages
335
I managed to roll on 3 coats of blue gelcoat during the short warm window yesterday.
20221215_175331.jpg
I'll wipe on some PVA this morning and start sanding tomorrow when the gel is plenty hard.
I have WAY too much gelcoat left over, so I have to find ways to use it in the cabin now, lol. I may freeze a quart of the blue for any needed touch-ups.

Today I'll siphon out the gas tank, and finish demo in the cabin.
 
Top