1976 22' SUS O/B "Hydration Break"

SHSU

Lieutenant Junior+Starmada Splash Of The Year 2019
Joined
Mar 8, 2017
Messages
1,668
That engine hoist is a back saver. I can't imagine doing our project without it. Used more often then thought.

SHSU
 

DWbaseball

Petty Officer 2nd Class
Joined
Aug 25, 2020
Messages
110
Now that I have the transom out, the boat is tempting me to go the easy route and just drop a new transom board in that's the existing size. I'd then need to use a fixed jack plate to hang the 25 inch shaft on the 20 inch transom. Seems like the reviews on doing this are mixed where some would say no problem and others would caution that mismatched shaft length and extra stresses due to the jack plate will cause issues.

Not sure which camp I am in. On one hand it would be an easier and faster build to replace the transom as is. And it would be solid with the fresh transom board. On the other hand, it wouldn't solve the issue with the big low open splash well that I'd like to raise up and away from the waterline.

Either way I still plan to marry on a new piece of aluminum to the transom to cover the existing holes. Here's a question about trying that....if I was to use closed end blind rivets for this, wouldn't the rivet heads on the inside get in the way of dropping in the new transom board? I feel like the new board and the existing transom aluminum sheet need to be flush with each other, and not spaced apart by a bunch of blind rivet tails?

Also, on the outside if the existing transom I would stay away from having the z channel and knee brace rivet heads between the new and old sheets, which would keep them from being flush. Anything else to take into account here? Am I overthinking this?

Thanks
 

DWbaseball

Petty Officer 2nd Class
Joined
Aug 25, 2020
Messages
110
Some new pics. Sanded the Transom down to bare Aluminum with the orbital. Then I got the splash well drilled out today. Pretty happy with the sturdyness of my knee brace with PO welded mods. My z bracket not as much and two of the rivet heads are sheared off on the port side. Some light corrosion under the wood engine pad but nothing bad. Didn't sand the rivet heads too much and they still have some remaining paint on them. Any tips for this? Stripper?IMG_20211126_164523519.jpgIMG_20211204_153314680_HDR.jpgIMG_20211204_153246023_HDR.jpgIMG_20211204_153239670.jpgIMG_20211204_171840487.jpg
Went fishing twice and each time only landed two small channel cats. No big blues. Chestertown behind me. IMG_20211030_114611677.jpg
 

SHSU

Lieutenant Junior+Starmada Splash Of The Year 2019
Joined
Mar 8, 2017
Messages
1,668
I used a wire wheel to help remove paint around rivets and such. Otherwise a paint stripper and elbow grease will do the trick too.

SHSU
 

DWbaseball

Petty Officer 2nd Class
Joined
Aug 25, 2020
Messages
110
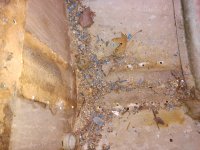
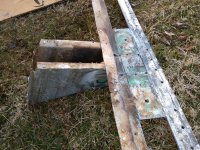
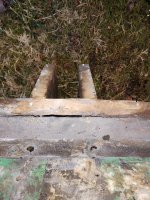
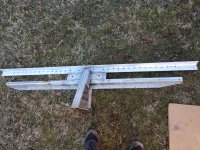
Winter here so not much work lately, still acquiring parts I will need. Got the Knee Brace removed on a nice day this Sunday afternoon, still pretty cold out. Did a pretty good job of drilling out the center of the solid rivets and although I marked a few edges I didn't oblong out any holes all the way through. Also did more sanding than is shown in the pics. Glad I took the knee brace off as I am finding some transom corrosion, but nothing all the way through. Going to give it the wire brush, vinegar, and jb weld or marinetex treatment. I then think I will prime and paint the inside of the transom skin. Was expecting some corrosion in the bilge underneath the knee brace but looks good there, which is a plus.

The amount of work ahead of me to rebuilt this boat is pretty daunting, but I'm going to work my hardest to get it done and do it right so I can eventually enjoy this thing for alot of years to come. Would never have even tried this without iBoats.
 

Attachments

  • IMG_20220206_163025965.jpg
    IMG_20220206_163025965.jpg
    4.9 MB · Views: 16
  • IMG_20220206_163216632.jpg
    IMG_20220206_163216632.jpg
    3.1 MB · Views: 15
  • IMG_20220206_163229507.jpg
    IMG_20220206_163229507.jpg
    2.2 MB · Views: 14
  • IMG_20220206_163245335.jpg
    IMG_20220206_163245335.jpg
    7.3 MB · Views: 16

Moserkr

Chief Officer + Starmada Splash Of The Year 2021
Joined
Nov 23, 2020
Messages
836
You eat an elephant one bite at a time. I couldnt have done anything without this site and the starmada either. Looking good!
 

SHSU

Lieutenant Junior+Starmada Splash Of The Year 2019
Joined
Mar 8, 2017
Messages
1,668
I think every transom removal requires you to find some corrosion behind it. That being said, sounds like you have plan of attack and are good to go.

SHSU
 

DWbaseball

Petty Officer 2nd Class
Joined
Aug 25, 2020
Messages
110
Ok so I need some advice on my transom pitting which I have been cleaning up with the wire wheel inside and out. Some of the pitting is probably halfway or more through the transom skin but no pin holes that I found. Lots of PO holes and I have not standard OB mounting holes. I have a new piece of .663 50502 aluminum sheet metal which I plan to use to skin over my existing transom, basically covering the entire existing transom exterior. Trying to nail down my plan of attack for this. Based on research I think the best practice is this: Will take action on both sides in and out. Please let me know your opinions.

Vinegar wipe down
Light power wash just water.
Dry
Fill putting with grey marinetex (or jb)
Orbital sander smooth
Self etching primer
Rust-Oleum with hardner metal paint (2+ coat)
5200 the new aluminum plate on with it buttered on smooth and thin


Question. Should/Could I attach the new transom skin piece with buttered on JB weld on the bare metal instead of doing the paint first?

Finally feel like I am making some progress. Trying to build some momentum for the spring and should be able to get some friends involved for some workdays which I hope will help me take some of the big steps forward. Also been talking to a welder about cleaning up my knee brace. Going to the Atlantic City boat show on Saturday because my uncle wants to go then hoping for a nice workday on Sunday.
 

DWbaseball

Petty Officer 2nd Class
Joined
Aug 25, 2020
Messages
110
Been working with the nyalox cup brush. Pretty happy with what I am finding. I think I am going to remove the stringers too where before I had just planned to re rivet them while in place.

Should I do coat it sealing first? Or should I skim corrosion with marinetex first? I am worried about spillover from filling the transom corrosion getting on the transom seam and such where I was planning to seal with coat it. Blue tape it?


IMG_20220311_175457984_HDR.jpg
IMG_20220311_175507881_HDR.jpgIMG_20220311_175628666_HDR.jpg
 

MNhunter1

Ensign
Joined
May 12, 2014
Messages
982
I did all my MT skimming before I laid down the Coat-it. Just give the MT plenty of time to cure if your covering it at all.
 

SHSU

Lieutenant Junior+Starmada Splash Of The Year 2019
Joined
Mar 8, 2017
Messages
1,668
I used JB Weld for my skim coats.

SHSU
 

DWbaseball

Petty Officer 2nd Class
Joined
Aug 25, 2020
Messages
110
Still working on hull prep. Got the stringers out. Almost to rebuilding phase.
 

Attachments

  • IMG_20220604_170948782_HDR.jpg
    IMG_20220604_170948782_HDR.jpg
    4 MB · Views: 20
  • IMG_20220604_170938877_HDR.jpg
    IMG_20220604_170938877_HDR.jpg
    1.5 MB · Views: 21
  • IMG_20220604_170923242_HDR.jpg
    IMG_20220604_170923242_HDR.jpg
    5.2 MB · Views: 20
  • IMG_20220604_170856131_HDR.jpg
    IMG_20220604_170856131_HDR.jpg
    3.9 MB · Views: 19

SHSU

Lieutenant Junior+Starmada Splash Of The Year 2019
Joined
Mar 8, 2017
Messages
1,668
Nothing like shiny aluminum!!! You going to dress the rivets with Gluvit or CoatIT?

SHSU
 

DWbaseball

Petty Officer 2nd Class
Joined
Aug 25, 2020
Messages
110
Lots of surface area on these Stringers for the 22 footer.
IMG_20220618_111130628.jpgIMG_20220618_111119537.jpg


Next up for the hull is any pits on the shiny metal will get marine tex and then the hull will get Coat it. Then the transform and knee brace/bilge area will get etching primer and rusto inside and out.
 

Watermann

Starmada Splash of the Year 2014
Joined
Jan 12, 2013
Messages
13,753
Painting the inside bottom is a waste of material and a source for issues, as water stands on the paint it will blister and water will get under the paint. The proper prep work for painting the inside bottom would take many hours too.
 

DWbaseball

Petty Officer 2nd Class
Joined
Aug 25, 2020
Messages
110
Thanks for the advice, I will still plan to marinetex, prime and paint the inside of the transom skin where it will be in contact with the wood transom. But I will not prime and paint any of the bilge area.

Stringers cleanup done. Going to practice marinetex on a few spots on these firstIMG_20220628_193112193.jpg

New Tools
IMG_20220628_193145158.jpg

Overdue on acquiring Rivets.
 

Attachments

  • IMG_20220628_193643562.jpg
    IMG_20220628_193643562.jpg
    1.3 MB · Views: 6

Watermann

Starmada Splash of the Year 2014
Joined
Jan 12, 2013
Messages
13,753
For sure clean and skin pitting on the transom skin with MT, I always prime and paint it for that added protection, great plan. (y)
 

DWbaseball

Petty Officer 2nd Class
Joined
Aug 25, 2020
Messages
110
S is for Starcraft SuperSport!IMG_20220714_193200576.jpg


The build is on!IMG_20220702_150414305.jpgIMG_20220710_190321093.jpg
Still getting used to the metalwork.


IMG_20220714_184412930.jpgIMG_20220714_184916789.jpg
Carpentry is more familiar. Found out that my plywood developed a nice warp over the winter. Should have known better.I bet it would be more expensive now anyway so still counting myself ahead.
IMG_20220714_193105639.jpg
 
Top