Screamineaglet
Cadet
- Joined
- Jul 13, 2014
- Messages
- 6
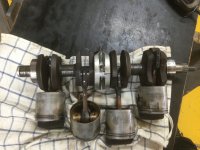
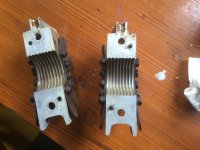
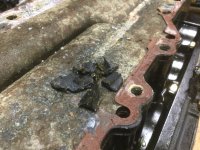
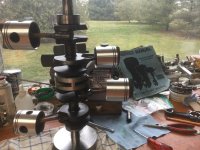
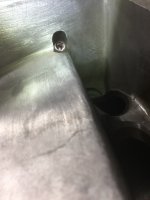
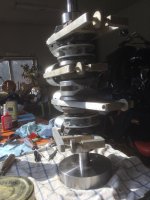
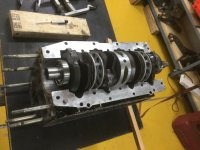
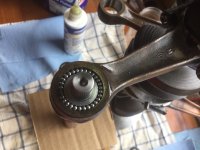
I’ve a 1973 850 Mercury that I purchased in 2021 for my 1973 Peterborough boat project . The floor and transom were rotten so I rebuilt with Coosa . The plan was to hang the 850 on her so out went the rotten wood and in came the Coosa . Transom , stringers and floor . That went well and is solid once again . The 850 I went through as much as I could pre summer . The information is extremely valuable here and that’s what’s guided me along on this adventure . New wiring harness , stator rewound , carb kits , fuel pump rebuilt , water impeller too . I examined the reed valves when the carbs were off and they looked really good . All visible pedals were laying flat . Did a link and sync .. brought the timing from 27 deg to 25 deg ….compression is 130 ish +/- 5 lbs across the 4 cylinders . I’ve run it in a barrel instead of muffs to simulate the lake levels for exhaust pressure too . This old girl will run all day long at 1000 rpm …..adjust the idle down to 850 ….she tries but just can’t hold it for any length of time ….of coarse that is frustrating and dangerous trying to dock a boat that can’t stay running . I put a piece of cardboard in front of the carbs while running looking for splash back ….nothing there either .I’ve been chasing this elusive idle up till now ( Jan 2023 )There isn’t any apparent excess fuel/oil leakage under the stator where the top crank seal is ….soooo…to look at the bottom seal the power head had to come off . nothing obvious there either . From reading here in some post it has mentioned excessive clearance between the reed block inside diameter and crankshaft outside diameter could allow seepage between cylinders . This makes sense as it would pull air/fuel from the other cylinder instead of just fresh air and fuel from the carb at low idle rpm .. I must say I love these old Mercs and this is a labour of love and its worth it to me to try to save … No choice but to go in and have a look see ….I’m glad I did as it does need some attention….been 50 years after all ") The crankshaft has wear grooves that match the ones on the reed blocks . I’m assuming that’s not like that from new . on the other hand it’s hard to imagine aluminum wearing into the crankshaft like that . Does anyone know the tolerance between the reed blocks and crankshaft ? I’m going to measure the depth of the grooves on the crank and the inside diameter of the reed blocks accurately . If this is the issue my thought is to grind the grooves out of the crankshaft to maybe .010 undersize then chrome that diameter and grind to a larger than factory diameter to suit the reed blocks . Thanks 8n advance for any help
The crankshaft has wear grooves that match the ones on the reed blocks . I’m assuming that’s not like that from new . on the other hand it’s hard to imagine aluminum wearing into the crankshaft like that . Does anyone know the tolerance between the reed blocks and crankshaft ? I’m going to measure the depth of the grooves on the crank and the inside diameter of the reed blocks accurately . If this is the issue my thought is to grind the grooves out of the crankshaft to maybe .010 undersize then chrome that diameter and grind to a larger than factory diameter to suit the reed blocks . Thanks 8n advance for any help
The crankshaft has wear grooves that match the ones on the reed blocks . I’m assuming that’s not like that from new . on the other hand it’s hard to imagine aluminum wearing into the crankshaft like that . Does anyone know the tolerance between the reed blocks and crankshaft ? I’m going to measure the depth of the grooves on the crank and the inside diameter of the reed blocks accurately . If this is the issue my thought is to grind the grooves out of the crankshaft to maybe .010 undersize then chrome that diameter and grind to a larger than factory diameter to suit the reed blocks . Thanks 8n advance for any help