This Doesn't Look Right, 4.3 MCM Alpha 1 Gen 1

Ackevor

Cadet
Joined
Sep 25, 2019
Messages
23
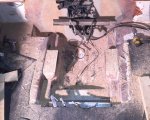
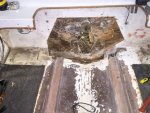
Sept Last year I bought an 88 Sea Ray Seville Bowrider for cheap. Ran pretty good and drove good in the water. Went to change the oil and saw cracking in fiberglass engine mounts. Started peeling away to find the wood inside is pulp.

Long story short I began pulling everything apart so I can get room to replace rotten wood. But found a couple things that seem odd to me.

First, The top nut on front engine mounts weren't tightened down to the washer and there was visible thread between nut and the mount, same for both sides :eek:.

Next comes the rear mounts. Looking at the photo, it seems the washer should be bigger, and on the bottom of the spacer to actually hold down the mount? it seems there is nothing holding it down onto the rubber isolator besides the weight of the engine?:confused: again same for both sides.

Third, the gasket between the stern drive and the bell housing was used in conjunction with silicone.... not the biggest issue I guess. When I separated it though gear oil came pouring out and was plenty up in the bellows, which is probably why the U-Joint works so smoothly (not loose, just smooth). Is this due to a bad seal, specifically number 17 found here? ( https://www.perfprotech.com/mercury-.../70?model=4239 )

So what do yall think? The rear mounts have me most concerned because I planned to put everything back the way it came out, but if its not right then I won't be doing that.

Any other pointers or things to do while I have all this out. I plan to do water pump impeller ad a few other wear items, Note that in the floor panel pics, I actually pulled the two wood seat panels out of the larger grooves in the photo. Whoever did the glass job did not do it correctly.
 

Attachments

  • photo331644.jpg
    photo331644.jpg
    1 MB · Views: 1
  • photo331645.jpg
    photo331645.jpg
    1.2 MB · Views: 1
  • photo331646.jpg
    photo331646.jpg
    1.3 MB · Views: 1
  • photo331647.jpg
    photo331647.jpg
    1.6 MB · Views: 1
  • photo331648.jpg
    photo331648.jpg
    1.8 MB · Views: 1
  • photo331649.jpg
    photo331649.jpg
    1.6 MB · Views: 1
  • photo331650.jpg
    photo331650.jpg
    1.3 MB · Views: 1
  • photo331651.jpg
    photo331651.jpg
    1.2 MB · Views: 1
Last edited:

alldodge

Moderator
Staff member
Joined
Mar 8, 2009
Messages
42,054
The drive lube is leaking from item 20 (seal)
For the seal to start leaking, there is probably some bearing wear. Will need to take apart and see what is needed.

The front mounts are at an angle because there not supporting the motor correctly, same with the rear.

From the looks of everything, I'm seeing a full gut and rebuild of transom and stringers
 

harringtondav

Commander
Joined
May 26, 2018
Messages
2,439
"for cheap" could be a factor here. If you don't have the ability to do a major structural repair I'd salvage the engine, transom assembly, out drive and trailer for resale, junk the boat and cut your losses. Paying a shop to do the restoration would cost more than buying a better used boat.
 

isaacs

Petty Officer 2nd Class
Joined
Oct 15, 2013
Messages
153
As the wood rotted, you're engine alignment changed to the point where the bearing and seal were destroyed. I had a boat with a similar problem but mine was mostly in the transom. I just kept patching it 'till the engine (1969) finally died from lack of lead in the gas.

You have a lot of work ahead of you. As was previously mentioned, stringers and transom. Before you start make sure the rest of the hull is in good shape and plan on replacing a lot of floor. Are you going to know where the engine mounts go? Removing the engine is surprisingly easy; make sure you write down everything you disconnect/remove and take lots of pictures.
 

Rick Stephens

Admiral
Joined
Aug 13, 2013
Messages
6,118
Strip it down and start hogging out every bit of mushy wood. Big job, can be a lot of fun. The boat is not safe to operate otherwise and nothing will stay together mechanically if the underlying structure isn't solid. Been there done that. Here's a 'MINOR' rebuild from when I swapped the motors and added motor mounts for a V6. I rebuilt the transom and tied into the stringers. Replaced a little bit of rotted floor. Looks like all your stringers and floor need gutting, probably transom and most likely all the flotation foam is water logged.

trimmed off.jpg
 

Ackevor

Cadet
Joined
Sep 25, 2019
Messages
23
"for cheap" could be a factor here. If you don't have the ability to do a major structural repair I'd salvage the engine, transom assembly, out drive and trailer for resale, junk the boat and cut your losses. Paying a shop to do the restoration would cost more than buying a better used boat.

If I remember it was like $1300-1500 with trailer. My first boat and figured it would be the one to use for learning repairs and such.

You have a lot of work ahead of you. As was previously mentioned, stringers and transom. Before you start make sure the rest of the hull is in good shape and plan on replacing a lot of floor. Are you going to know where the engine mounts go? Removing the engine is surprisingly easy; make sure you write down everything you disconnect/remove and take lots of pictures.

That is something to think about. I have never undertaken a repair such as this, but I do have enough materials and probably the capability to do the stringers and deck. I plan to core the transom once I pull the engine. If the transom is too far gone I may go that route. Its unfortunate because the hull is in excellent shape. I have been looking up used boats and there is nothing around me right now that is within $4-6k and the size I am looking for (20-22ft).

I labeled everything disconnected with tape and took photos, so reassembly should covered. I will have to take plenty of measurements to know where new mounts go if I get that far. What is the best reference point to start from?

My gut says the transom may be ok as it shows no signs of stress or rot, but I cant get down to where it usually starts and really check yet. I am honestly shocked it got me out into the lake last year and didnt tear apart on me.
I rebuilt the transom and tied into the stringers. Replaced a little bit of rotted floor. Looks like all your stringers and floor need gutting, probably transom and most likely all the flotation foam is water logged.


Rebuilding the transom is what has me worried the most. I fear I would not get the location of holes etc correct. I will be cutting out chunks of the foam today and see how much water is present. a couple hundred bucks for new foam isnt too bad honestly. If I can DIY this for under $2k I would still be happy. But it all adds up in the end.
 

Rick Stephens

Admiral
Joined
Aug 13, 2013
Messages
6,118
The holes aren't too bad, especially since you won't be removing the fiberglass hull side of the transom. It becomes your template. There is also a template available for a few dollars that you can use to lay out the holes. Once I fitted my wood, I marked the wood through the fiberglass hoes and then took the wood back out and precut everything on sawhorses, including the relief cuts for the steering arm. Then peanut buttered up the transom and wood and slid everything together, Clamped with 2x4s inside and out. To get it parallel and let it set up.

The hardest part of the whole job was getting the old wood out of the transom and away from the fiberglass.

Here's what it looked like with the wood removed in the center. You can see the cutout is easily available as a guide.

cutout.jpg
 

Ackevor

Cadet
Joined
Sep 25, 2019
Messages
23
The holes aren't too bad, especially since you won't be removing the fiberglass hull side of the transom. It becomes your template.


For some reason this never crossed my mind! Thank you! I should definitely be able to tackle this either way. But if I have to do the transom Its probably not going to be done this season, which mean I need to find something to get the family in the water this summer, even if its a kayak ha! Thanks again for your input and photos.
 

harringtondav

Commander
Joined
May 26, 2018
Messages
2,439
Check out the restoration group in this forum. Lots of know how. I suspect once you start digging you will be replacing stringers and bulkheads. So cradle your boat. More than the trailer so the hull holds it's shape. Measure to excess as you demo so you know the rebuild rebuild dimensions.

"Frisco Boater" has a You Tube series "Big Mistake" where he guts a boat to the bow and does a full rebuild.

Also a forum member Mechanicalmike08 did a full resto and photo documented it in the forum.
 

Ackevor

Cadet
Joined
Sep 25, 2019
Messages
23
Figured I would post an update. The foam and transom are soaked, and as everyone else suspects, all the wood in the boat is probably trashed. Transom is not rotten so It must have wept in from the stringers from the engine mounts but it all has to come out anyway. I will just start a new thread in the restoration forum with my progress etc as I cannot find anything used that is worthwhile right now. Besides, they will likely have the same problems, this way I can make it mine.

Thanks for the tips and input everyone.
 

Rick Stephens

Admiral
Joined
Aug 13, 2013
Messages
6,118
Have fun on the rebuild. A labor of love since it isn't a very economically sounds investment. I enjoyed doing it. Never been a sound investor either.
 
Top