Replacing Trim Pump on DPS-A Drive

ggc

Cadet
Joined
May 27, 2020
Messages
15
Duoprop DPS-A Drive pn 3883609 My current pump runs but does not raise or lower drive. It was a little low on fluid so I added about 2-3 oz. to top off. No different. I have tried to run both directions to bleed but no change in sound or operation.

So I have a new VP pump to install. There us a very good thread on this and I have most of the install figured out except for one thing.

Is there a good way to replace the old wiring harness with the new one. I can barely reach the connector in the inside transom plate and cant see it. Not sure what I would need to take off for reasonable access, maybe the steering. Some have suggested cutting the old leads on the outside (pump is mounted on one side of the gimbal housing outside transom) and soldering the new wires. Probably a good plan and the easiest but if the new pump does not work it could not be returned.

Another suggestion is to get to the wires where they mount to the motor and replace there. But VP instructions say dont do that and that leads are sealed at bump which they are.

My current plan is to push the old harness grommets inside and see if I can pull enough slack to get to the connector and remove old blade terminals and replace with new. The new pump harness has 2 wires (blue and green) with a new grommet on each wire and very long blade terminals to go into the old connector.

If I cant figure out how to do this without removing the engine Its the soldering gun for me.

Any suggestion or trick for doing this will be appreciated.
 

ggc

Cadet
Joined
May 27, 2020
Messages
15
I should have said I will cut the old leads which gives me plenty of slack. Unfortunately, when installing the new leads the terminals have a grommet that is attached to its barrel, so the terminals extend only for the terminal length past the transom. I could try pushing the grometts in and pulling the harness inside a foot or so.

Anyone tried this
 

Attachments

  • photo333212.jpg
    photo333212.jpg
    1.2 MB · Views: 1

ggc

Cadet
Joined
May 27, 2020
Messages
15
Ok, I have figured this out and will go ahead and post the answer in case some other VP owner decides to diy the trim pump.

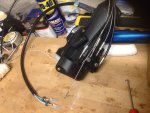
First the replacement pump has two power leads, one green/white and one blue/white. they are attached to the motor and well sealed. The two leads are about 18" long and are routed in a plastic tubing to protect them from damage. See photo attached above.

The wiring harness passes through the transom/gimbal plates just behind the pump motor. On the inside of the transom the leads enter below a red metal shield, so you cant directly see it until it exits the top of the red shield and ends at a plastic connector which is on top of the engine just below the back of the plastic spark arrestor cover. The connector is a Delphi Weather pack or similar.

The original pump motor harness ends in a connector which has two large flat blade terminals (9.5 mm wide) with a round green silicone rubber gasket crimped on each terminal. The connector is attached to a mating female connector which goes to the relays and trim controls. In order to remove the old motor leads you will need to separate the two connectors and then remove both terminals from the male connector.

Release the two connectors using a small flat blade screwdriver to pry up on the locking arm from the back of the female connector (i think. look for two connected plastic arms which extend into the housing on the other connector. Dont break the arms or the connector would need to be zip tied or replaced pn 3883773 (about $4 plus shipping) They come apart very easily once you are prying on the correct part. Mark the connector so you know to which side of the connector the green and blue wires should be inserted.

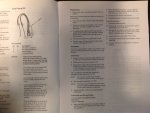
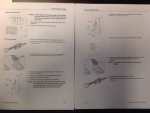
Refer to the VP manual for your drive. Look for the section on installation of the Transom Shield Assembly. (see attached for a couple of relevant pages) It shows how to remove the 2 blade terminals from the connector because installing the trim pump is included. First use a oair of needlenose pliers to remove the red plastic terminal support from inside the connector. Then use a small flat blade screwdriver to pry up a small plastic locking arm which locks each of the 2 terminals in place. Remove both terminals from the connector body.

Tie and tape a string onto the two terminals (or even better just cut off the terminals) and wrap the harness with tape tightly so the can be pulled through the transom. Use diagonal cutters to remove the 3 or 4 zip ties which secure the trim motor harness to 2 other cables. One is probably the trim sender harness.

Have a second person pull the old harness back through the transom slowly. Dont pull it to hard or you may separate it from the string and things get complicated. Slow and careful. When the harness has passed through the transom and you have one end of the string, remove it from the old harness and tape it tightly to the new one. Pull the new harness back through the transom shield, insert the terminals into the plastic connector (click click), replace the plastic terminal support you removed and snap the connectors back together. For the rest of the install refer to the very good post titled "How To: Volvo Penta SX-A/DPS Trim Pump Replacement" and the instruction manual that comes with the pump.

See photos attached for instructions which may be helpful. Good luck.
 

Attachments

  • photo333358.jpg
    photo333358.jpg
    1.1 MB · Views: 2
  • photo333359.jpg
    photo333359.jpg
    908.7 KB · Views: 2
Top