Bought my first boat to tinker on. Looking for advice

JASinIL2006

Vice Admiral
Joined
Feb 10, 2012
Messages
5,632
I used both a 4.5" grinder and a full sized grinder. The full sized grinder was just too heavy for prolonged use, especially when contorting to reach all the corners of the transom. The 4.5" grinder with a 60 grit wheel did the trick. I went through two of them... I think at the time they were about $20 each. There is no point in buying expensive; the fiberglass dust wreaks havoc on the motor and bearings.
 

TripleJGraffis

Petty Officer 1st Class
Joined
Jan 18, 2024
Messages
397
So here's a few pics from my work yesterday.
 

Attachments

  • 20240204_153150.jpg
    20240204_153150.jpg
    2.6 MB · Views: 30
  • 20240204_153158.jpg
    20240204_153158.jpg
    3.5 MB · Views: 31
  • 20240204_153206.jpg
    20240204_153206.jpg
    3.1 MB · Views: 31
  • 20240204_153219.jpg
    20240204_153219.jpg
    3.3 MB · Views: 30
  • 20240204_153231.jpg
    20240204_153231.jpg
    2.4 MB · Views: 30

todhunter

Canoeist
Joined
Sep 15, 2020
Messages
1,299
Click the link in my signature to see my restoration beginning to end with lots of pics. It took me 18 months.

Harbor Freight tools are your friend.

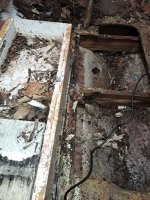
I used a Black & Decker 4.5" grinder to do my entire boat, and it survived and I still use it today. $35 on Amazon. Use 40-grit flap discs - I was getting 10-packs on Amazon for ~$20, and used about 25-30 discs on my boat.

An oscillating multi-tool is also a big help. Here is the one I bought. I got cheap blades on Amazon (~15 for a 10-pack) - fiberglass will dull them pretty quick, so don't buy high dollar blades.

For dust control, I recommend a decent shop vac and a cyclone dust separator - I used a Ridgid shop vac and a Dust Deputy. I tried going without the Dust Deputy at first, but after having to unclog / replace filters every 30 minutes, the Dust Deputy was worth its weight in gold.

You'll want a new Tyvek suit at least each day, I'd say. I dreaded getting back into a used suit - you can feel the fiberglass on the outside poking through to the inside. I condensed my grinding down to 3 or 4 LONG days to reduce the necessary PPE.

You've got a good attitude, so read up, watch YouTube videos, and get ready to itch.
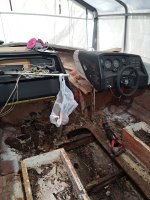
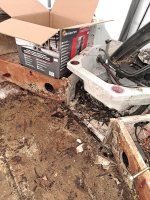
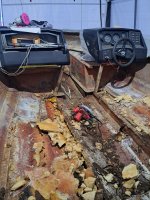
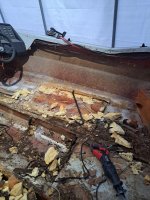
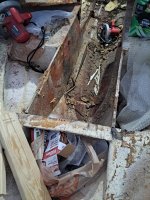
 

Lou C

Supreme Mariner
Joined
Nov 10, 2002
Messages
12,429
I do have to admit, while I think I "shouldn't" shop there, some of the tools they sell are perfectly fine for part time DYI guys like most of us, I got 2 really nice aluminum racing floor jacks and a couple pairs of jackstands for my automotive work.
 

TripleJGraffis

Petty Officer 1st Class
Joined
Jan 18, 2024
Messages
397
I will look into getting one of those tools. I'm the meantime... you won't see much of me on here for the next week as I am in Colorado on vacation. Talk to you all soon!
 

stresspoint

Lieutenant Junior Grade
Joined
Sep 19, 2022
Messages
1,034
When it comes time to start grinding/sanding......Are we talking about an actual grinder? I do have a Ryobi Grinder, but wouldn't that be too rough on the fiberglass? I also feel that a drill with a sanding disc attached will take forever to sand down, but will leave a nice flush surface. What do you guys use?
use whatever tool gets the old stuff out , show no mercy :) seen a mate use a chainsaw which i thought was over kill , but got the job done , as said don't cut through the hull and we say that because its sooooo easily done accidently in hast." personally never done it but have come close on more than one occasion :)".

with the foam a wire brush on a drill does the job quick and easy , no idea on the plastic sheeting /tarp ??? .

as posted , don't mess about with a partially gut and strip, do it all in one hit if its that bad
attack it like you own it when gutting , just don't forget to support the hull with a cradle of some sort before moving on too far, as when you cut those stringers out, there is only a thin layer of glass between you and fresh air , so when you lay the new stringers in it will pull and deform the boat bottom , that you don't want as it affects the boat ride and handling.
 
Last edited:

todhunter

Canoeist
Joined
Sep 15, 2020
Messages
1,299
Regarding a cradle - I just did mine on my bunk trailer (2 bunks per side, 4 bunks total) with no additional supports. Immediately after pulling the cap, I marked the hull in increments of 1 ft from bow to stern and measured widths at each mark, then drew a sketch of the boat and wrote those measurements down. Each time I went to glass in a structural component to the hull, I would make sure the hull wasn't splayed open beyond the measurements. If it was splayed open, I used ratchet straps to pull it back into shape (actually about 1/2" tighter to account for spring-back) and left them in place until the glass was cured. This method worked well for me and I had no issues getting the cap back on.

Just food for thought. Building a cradle is definitely the safest option, but wanted to throw out an alternative.
 

stresspoint

Lieutenant Junior Grade
Joined
Sep 19, 2022
Messages
1,034
continued from last post :.
the area at the bow under where the storage boxes are is a nightmare to get at " don't chop that fiberglass which makes up the boxes its part of the cap "" , .
removing the cap is the only way to get under there to the bad wood/floor , so get to where you can see reasonable wood still that you can still access with rollers and fiberglass mat and make a join , its only about 2 feet of bad wood and IMHO its not worth the hassle of cap removal :).

cheated that on my Maxum as i saw that i could tab the floor to the box area the wood was still for the most part in good nick , i pity the person in 20years time that decides to remove the cap for a rebuild as that cap in that area is glassed solid to the floor.
 
Last edited:

Scott Danforth

Grumpy Vintage Moderator still playing with boats
Staff member
Joined
Jul 23, 2011
Messages
49,021
I have used both a gas powered and electric chainsaw to clean out various bits for using seacast

I have chucked up an 4" diamond saw blade in a 4.5" angle grinder as well as cut-off wheels. now that was a whirling blade of death.

the oscillating tool probably worked the best. the harbor freight circular saws were a one-time-use device.
 

stresspoint

Lieutenant Junior Grade
Joined
Sep 19, 2022
Messages
1,034
I have used both a gas powered and electric chainsaw to clean out various bits for using seacast

I have chucked up an 4" diamond saw blade in a 4.5" angle grinder as well as cut-off wheels. now that was a whirling blade of death.

the oscillating tool probably worked the best. the harbor freight circular saws were a one-time-use device.
i have to admit it was a sight to see when my mate went ape shyt with the chainsaw .
surprisingly enough the end result of the gut out was quite impressive and done in a very short time .
the dust was also heavy rather than the fine stuff that comes from grinding etc.
 

TripleJGraffis

Petty Officer 1st Class
Joined
Jan 18, 2024
Messages
397
Back from vacation started hacking away at getting all the crap out. It really sucks when you do this alone. I got pretty winded after a couple hours of cutting.. ripping....prying and struggling. Decided to call it quits for the day and clean up all the garbage that I've tossed out of the boat since day 1. Still have managed to not go through the hull... so bonus there! I did get close today with my skill saw.... blade slipped a little while cutting and seems to only have grazed the top side of the hull. Lots of debris but I'm 95%certain it's going to be ok. In pulling out the seat bases and pulling foam....I noticed that there was more plastic tarp under there with moisture trapped underneath. Looks like whoever last completely guttted this boat laid down plastic tarp first ... then glassed it into the side of the boat then poured foam after putting the deck in. Still uncertain if this method will be a benefit or hindrance to me work. Most likely the latter. While pulling foam...I am discovering water pooled towards the stern. That's about it for now. Will update you with more as I can.
 

Attachments

  • 20240215_162026.jpg
    20240215_162026.jpg
    3 MB · Views: 25
  • 20240215_162029.jpg
    20240215_162029.jpg
    2.8 MB · Views: 23
  • 20240215_162042.jpg
    20240215_162042.jpg
    2.7 MB · Views: 25
  • 20240215_162052.jpg
    20240215_162052.jpg
    2.4 MB · Views: 25
Top