1978 18ft Mariner: Getting Ready for June 2021 Splash..!!!

Watermann

Starmada Splash of the Year 2014
Joined
Jan 12, 2013
Messages
13,753
I can't say that adding glass would be the same as braces that isolate that side spray rail chine. These boats flex and I can see that glass letting go. Adding the braces seems like a pain but the factory did it to solve this issue.

This is what you're faced with not knowing will happen if or more likely when.cracked.jpg
 

Watermann

Starmada Splash of the Year 2014
Joined
Jan 12, 2013
Messages
13,753
On the recommendation to replace the rubber seal for both the driveshaft and the shift rod....would you be referring to the rubber seals just beneath the driveshaft and shift link covers on the LU?
In removing the impeller i expected to see a plastic key, however there was no plastic key. Instead there was a pin with chamfered ends that fit nicely into the keyway slot on the shaft: The OMC kit that I will be installing has two plastic keys, one white the other black: The white key is slightly larger: Would you know how I should determine which key is the correct fit?
Thanks again for helping this project move forward..!!!
The driveshaft seals are under the waterpump housing. On the Mercs I have the driveshaft seal comes in the lower section of the waterpump housing but OMC has a different set up on the older motors that you have to remove to replace the seals.

There should be one impeller key that fits in the slot of the driveshaft. Remember those kits come for various models and some parts are not for your model. Put the parts in first like gasket and wear plate, then impeller over the driveshaft, hold the key in the slot and slide the impeller over to make sure it fits properly. (I've never seen one of those keys that look like that in your pic, can you post a pic of the slot in the driveshaft?). Once on lightly grease the vanes of the impeller and inside of the housing cup. Put on the gasket. Slide the cup over the driveshaft and when it contacts the impeller start turning the driveshaft clockwise while pushing down on the housing until the impeller slips inside. This will orient the vanes in the proper clockwise rotation position.
 

ShoestringMariner

Lieutenant Commander
Joined
Apr 18, 2015
Messages
1,563
Watching with interest. My Brother bought one of these last year. I believe he’s starting his refurb this spring. Looking forward to seeing yours come together.

A few thoughts if I may;

You can rent knock down cherry pickers if you don’t want to buy one of the fold up ones. A deer/game hoist that mounts to your vehicle trailer hitch are pretty cheap and work well for lifting motors up to ~300lbs.

A woodworking bandsaw works well for cutting styrofoam SM sheet if you don’t want to make a Hotwire cutter. Nothing is faster than score & snap for straight cuts on that product
 

mattsteg

Petty Officer 2nd Class
Joined
Mar 25, 2019
Messages
139
A few thoughts if I may;

You can rent knock down cherry pickers if you don’t want to buy one of the fold up ones. A deer/game hoist that mounts to your vehicle trailer hitch are pretty cheap and work well for lifting motors up to ~300lbs.

A woodworking bandsaw works well for cutting styrofoam SM
Or an electric knife or a bread knife for foam.
 

benfish909

Petty Officer 2nd Class
Joined
Jan 4, 2021
Messages
122
as for support, I would not recommend trying to glass in some structure. Eventually it will give way and make room for water to penetrate. Then you have the same hull flex that you have now plus trapped water. Poly resin does not stick to AL like it does on wood or fiberglass hull. If you are worried about tackling the task of doing solid rivets below the water, it’s not as hard as it sounds in your head.
 

BigMega

Cadet
Joined
Dec 22, 2020
Messages
27
I can't say that adding glass would be the same as braces that isolate that side spray rail chine. These boats flex and I can see that glass letting go. Adding the braces seems like a pain but the factory did it to solve this issue.

This is what you're faced with not knowing will happen if or more likely when.View attachment 333960
 

BigMega

Cadet
Joined
Dec 22, 2020
Messages
27
....Whoever said that "a picture is worth a thousand words" must have been looking at this picture: And whenever I hear the words.."not a matter of if...but when..( and it originates from a person with knowledge....I pay attention:)
HERE'S A MAJOR TRUTH THAT I LEARNED ON THIS FORUM:
what ever you thought you had to do...you'll be doing more..! (LOL if that ain't true...!!
I did a somewhat deep dive into Adhesive Bonding for Aluminum and was satisfied that the repair can be done successfully with epoxy: Here's an excerpt...:Aluminium is an almost ideal candidate for adhesive bonding because it has a high surface energy which enables the organic adhesives to easily wet it (Petrie, 2007). The long term mechanical performance of the adhesive bonded joints is dependent on the chemical nature of the adhesives and the environment in which they are expected to perform. As such, the selection of the adhesive is based on the strength required, the type of stress involved (whether peel or shear, static or dynamic) and the operating environment. Most notable for joining aluminium are the epoxy adhesives, which can be formulated to cure rapidly or slowly at room temperature (O’Brien, 1991, p. 846). The high temperature performance and moisture resistance of these adhesives can be enhanced by curing at elevated temperatures. The cleanliness and preparation of the surface are particularly important for these types of adhesives."
I will publish the entire article in a separate posting: It's a very worthwhile read..!
I wish I had the time to do a rivet job....I wouldn't hesitate: But I am up against a self imposed Splash date in mid June and a seemingly impossible number of things that need doing: It's a compromise..


BigMega

Cadet
Joined
Dec 22, 2020
Messages
27
The driveshaft seals are under the waterpump housing. On the Mercs I have the driveshaft seal comes in the lower section of the waterpump housing but OMC has a different set up on the older motors that you have to remove to replace the seals.

There should be one impeller key that fits in the slot of the driveshaft. Remember those kits come for various models and some parts are not for your model. Put the parts in first like gasket and wear plate, then impeller over the driveshaft, hold the key in the slot and slide the impeller over to make sure it fits properly. (I've never seen one of those keys that look like that in your pic, can you post a pic of the slot in the driveshaft?). Once on lightly grease the vanes of the impeller and inside of the housing cup. Put on the gasket. Slide the cup over the driveshaft and when it contacts the impeller start turning the driveshaft clockwise while pushing down on the housing until the impeller slips inside. This will orient the vanes in the proper clockwise rotation position.
The body of the pin fits perfectly in the keyway on the shaft: Note the angle on the keyway fits the conical ends of the pin...? I've watched youtube etc. and haven't come across this arrangement anywhere. And removing the impeller required a sawzall ( I got a bit too close to the shaft and took a little nibble) still needs to be filed:
 

Attachments

  • IMG_1488.JPG
    IMG_1488.JPG
    1.4 MB · Views: 0
  • IMG_1489.JPG
    IMG_1489.JPG
    1.3 MB · Views: 0
  • IMG_1490.JPG
    IMG_1490.JPG
    1.2 MB · Views: 0
  • IMG_1373.JPG
    IMG_1373.JPG
    1.5 MB · Views: 0

BigMega

Cadet
Joined
Dec 22, 2020
Messages
27
Reference the below link for a parts diagram. I figured your engine based on the model number in one of your earlier pictures. Not sure what the difference between J70ELCIH or J70ELCIM, but parts and diagrams seem to be the same.

https://www.marineengine.com/parts/johnson-evinrude-parts.php?year=1981&hp=70

Parts you should be able to get here on Iboats to help support them since they provide the forum.


As for the parts you have, looks like the woodruff keys in the kit are the wrong ones. The original should still be usable and I would use it.

As for parts I would replace (Reference from parts diagram):
#28: Prop shaft seals
#39: Drive shaft seals
#42: Oil Bolt O Ring seals
#49: Shift Seal

https://www.marineengine.com/parts/johnson-evinrude-parts.php?year=1981&hp=70&model=J70ELCIH&manufacturer=Johnson&section=Gearcase+-+20"+Transom

SHSU
 

BigMega

Cadet
Joined
Dec 22, 2020
Messages
27
Watching with interest. My Brother bought one of these last year. I believe he’s starting his refurb this spring. Looking forward to seeing yours come together.

A few thoughts if I may;

You can rent knock down cherry pickers if you don’t want to buy one of the fold up ones. A deer/game hoist that mounts to your vehicle trailer hitch are pretty cheap and work well for lifting motors up to ~300lbs.

A woodworking bandsaw works well for cutting styrofoam SM sheet if you don’t want to make a Hotwire cutter. Nothing is faster than score & snap for straight cuts on that product
Wow...a game hoist mounted to the trailer hitch: I didn't even know such a thing existed. I'll definitely be checking that out...TNX
Another way to cut foam sheets: Bosch T313AW3-6 inch course cutting knife edge
 

mattsteg

Petty Officer 2nd Class
Joined
Mar 25, 2019
Messages
139
....Whoever said that "a picture is worth a thousand words" must have been looking at this picture: And whenever I hear the words.."not a matter of if...but when..( and it originates from a person with knowledge....I pay attention:)
HERE'S A MAJOR TRUTH THAT I LEARNED ON THIS FORUM:
what ever you thought you had to do...you'll be doing more..! (LOL if that ain't true...!!
I did a somewhat deep dive into Adhesive Bonding for Aluminum and was satisfied that the repair can be done successfully with epoxy: Here's an excerpt...:Aluminium is an almost ideal candidate for adhesive bonding because it has a high surface energy which enables the organic adhesives to easily wet it (Petrie, 2007). The long term mechanical performance of the adhesive bonded joints is dependent on the chemical nature of the adhesives and the environment in which they are expected to perform. As such, the selection of the adhesive is based on the strength required, the type of stress involved (whether peel or shear, static or dynamic) and the operating environment. Most notable for joining aluminium are the epoxy adhesives, which can be formulated to cure rapidly or slowly at room temperature (O’Brien, 1991, p. 846). The high temperature performance and moisture resistance of these adhesives can be enhanced by curing at elevated temperatures. The cleanliness and preparation of the surface are particularly important for these types of adhesives."
I will publish the entire article in a separate posting: It's a very worthwhile read..!
I wish I had the time to do a rivet job....I wouldn't hesitate: But I am up against a self imposed Splash date in mid June and a seemingly impossible number of things that need doing: It's a compromise..
Note that there are innumerable ways for this to not end well. Surface prep needs to be immaculate, and you have so much flexing, thermal expansion, etc. going on.
 

64osby

Admiral
Joined
Jul 28, 2009
Messages
6,799
I personally would have no issue with using 3M 5200. The reason I state this several years ago my son's 2003 Ford Escape had a rust issue in the right rear wheel well A know issue for this model. I cut out all the rust and primed the area. Then I cut some stainless panels to fit the entire area. Using the 5200 and some self drilling fasteners the area was rebuilt. The fix worker great. A year later his Escape was hit and totaled by a Chevy 3/4 ton PU in the right rear corner. There was a lot of damage, bent up steel, broken windows, bent control arms.

With all the damage the stainless patch remained in place. There was no separation of the primed steel from the stainless patch.IMAG2368.jpg
 

Attachments

  • IMAG1692.jpg
    IMAG1692.jpg
    1,014.4 KB · Views: 11
Last edited:

BigMega

Cadet
Joined
Dec 22, 2020
Messages
27
Note that there are innumerable ways for this to not end well. Surface prep needs to be immaculate, and you have so much flexing, thermal expansion, etc. going on.
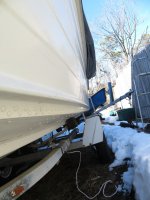
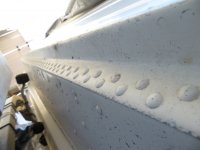
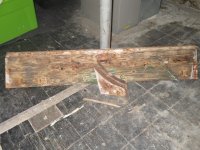
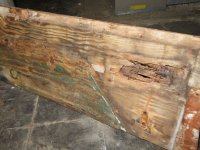
A broad thank you to everyone weighing in on this issue: I appreciate every bit of insight that each of you have offered: The weather broke today and I was able to pull back the tarp and evaluate the condition of the chine and rivets: Not only are the chine rivets in great condition, there wasn't a loose or missing rivet anywhere: This SC was a fresh water boat: If what I hear tell is correct: "Fresh water boats have their wood rot away..and salt water boats have the hull rot away" Judging from this boat, I would have to agree: Literally every piece of wood was rotted to mulch: When the wood transom was jack lifted off the boat and layed on the ground, I went to pick it up by hand and was shocked at how much it weighed. The main piece by itself weighed 36 pounds and looked like swiss cheese and mulch.
Here's an adhesive that I bought for a different project: It's very expensive but claims to be able to bond aluminum without any surface prep..

SCIGRIP® SG5000 Series Methacrylate Adhesives are high strength two-component products for bonding metals, plastics and composites. Also excellent for repairing fiberglass molds. They offer a unique combination of convenient 1:1 mix ratio and ability to adhere to a wide variety of materials. Most metals, including steel and aluminum, can be bonded without surface pretreatment.

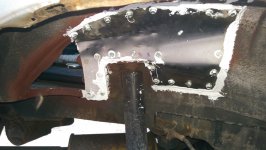
For the boat I will be using Woven Roven and Carbon Fiber and West System Epoxy to strengthen the riveted chine: I'll be posting pics of the upgrade in the future: All work on the boat has ceased during the cold: Should be able to get started on the floors and transom when the weather warms sometime in April: I can't wait to get back to it...
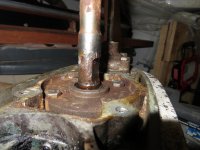
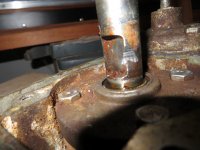
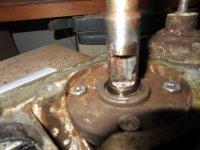
Engine is coming along nicely...All cylinders checked out at 120...

as for support, I would not recommend trying to glass in some structure. Eventually it will give way and make room for water to penetrate. Then you have the same hull flex that you have now plus trapped water. Poly resin does not stick to AL like it does on wood or fiberglass hull. If you are worried about tackling the task of doing solid rivets below the water, it’s not as hard as it sounds in your head.
Hello Benfish....The PO fiberglassed the floor to the sides with Poly and mat...and yes water penetrated and took out all the wood: I can confirm that poly is a poor adhesive ...I pulled the glass off easily where the floor met the sides: I really have no concerns at all about working with rivets; I'm looking for 5 solid seasons in a safe boat....which I will likely donate to a boat charity . I've had a mountain of experience working with Epoxy and I feel very confident that I can achieve a high strength bond on the aluminum: As far as stress is concerned that shouldn't be a factor: I will be following the original engineering changes from Starcraft, but doing them with Epoxy: Even if not as effective as rivets, it still has to be better than leaving the boat without any upgrade..Your insights are appreciatefd..!
 

Attachments

  • IMG_1126.JPG
    IMG_1126.JPG
    78.2 KB · Views: 11
  • IMG_1525.JPG
    IMG_1525.JPG
    428.4 KB · Views: 11
  • IMG_1526.JPG
    IMG_1526.JPG
    935.1 KB · Views: 10
  • IMG_1527.JPG
    IMG_1527.JPG
    1.7 MB · Views: 9
  • IMG_1528.JPG
    IMG_1528.JPG
    1.7 MB · Views: 11
Top