1976 Mariner Rebuild

PonyBoy71

Cadet
Joined
Mar 27, 2019
Messages
15
OK Hypno. We are rebuilding the same boat and I have been AWOL since June. I was excited to see your build thread and look forward to using you as motivation to continue forward with mine. I will also take a look at mine for this anomaly.
 

PonyBoy71

Cadet
Joined
Mar 27, 2019
Messages
15
Nope. Mine does not have the extra 300 rivets. No pic because it is raining here...again. Happy Friday!
 

HypnoCraft

Petty Officer 3rd Class
Joined
Aug 30, 2018
Messages
94
Very interesting about the bracing!

After more stripping I have found 3 or 4 areas of corrosion that have pin holes to fix. one area that is quite bad is around a brass through hull intake that the PO put on it... so that will probably be a large exterior patch area. There are also some areas that have been epoxied/Sikaflex or 5200'd to fill holes that I may have to address.

I don't have any pictures of the corrosion yet, but here is a little progression on the stripping of the bottom. I am almost 3/4 done the exterior!

Pulling it off the trailer:

Click image for larger version  Name:	20191227_130141.jpg Views:	3 Size:	1.05 MB ID:	10823347

Rolled:


Stripped:
 

Attachments

  • 20200101_140724.jpg
    20200101_140724.jpg
    863.5 KB · Views: 4
  • photo323834.jpg
    photo323834.jpg
    1.1 MB · Views: 4

Prarie Guy

Seaman Apprentice
Joined
Sep 10, 2017
Messages
43
Hi that does seem really odd about the bracing my 76 SS has bracing as well but lacks the additional couple hundred rivets yours seems to have.
 

Attachments

  • photo322451.jpg
    photo322451.jpg
    452.6 KB · Views: 6

HypnoCraft

Petty Officer 3rd Class
Joined
Aug 30, 2018
Messages
94
Hi that does seem really odd about the bracing my 76 SS has bracing as well but lacks the additional couple hundred rivets yours seems to have.

very interesting. I have noticed that the bracing that has all the extra rivets going through it looks a bit hammered and what not. I think maybe one of the rivets behind the brace was leaking so the PO decided to re rivet all the way through? I'm not sure.

Today I touched up the bottom side I stripped. I am going for 95% not 100% silver. I can always go back and strip off the bits left one day once its done. The goal for now is to get the majority of the paint off to be able to assess damage and re-rivet/seal holes.

I have also removed the terrible handy work of someone. As I said they put a brass through hull and it has caused crazy corrosion. I am going to cap it off with an aluminum plate because I don't need a live well or deck hose. If I do decide to have a live well or wash hose I would prefer to buy a diaphragm pump and pump water from the ocean/lake into my boat rather than having a hole in the bottom of my boat.

20200104_154906.jpg

20200104_155018.jpg
 

Watermann

Starmada Splash of the Year 2014
Joined
Jan 12, 2013
Messages
13,753
Yeah that ugly mess is where it should be now, laying in the in the dirt. :rolleyes:
 

HypnoCraft

Petty Officer 3rd Class
Joined
Aug 30, 2018
Messages
94
Yeah that ugly mess is where it should be now, laying in the in the dirt. :rolleyes:

Haha, yes what an ugly mess.

Sorry for the long period of no posts. I am back in school for my last semester. I am still getting things done, just not as fast. So far I have completely finished stripping the outside of the boat. I have also purchased a stainless crimped wheel to clean all the corrosion from the inside.

I have started to wire wheel down the keel area on the inside of the boat and have found that almost the whole keel has at least some pitting and in areas it is quite deep (2 or 3 pin holes have been found). I believe I will be fixing this issue in two different ways. First for light pitting and possibly even deep pitting I will make an epoxy/aluminum dust putty and use it to fill in and fair all the pitting. I am not sure if that will be strong enough so I will have to think about that further. I may switch out the epoxy for marine tex. The second solution I will be using is exterior aluminum patches that will be riveted onto areas where there are pin holes with sikaflex/4200/5200 as well as the interior epoxy. The only issue is if it on the keel I will not be able to get a patch in the area, so for those cases I will likely have to use the marine tex/epoxy and try my best.

As far as being able to fix possibly pitting underneath the bracing I haven't put much thought into it and I am on the fence about just brushing it under the rug unless a problem arises. The pitting seems to only be along the keel since that is where water would hold.

Another thing that I have been working on is emptying out the bracing off the garbage that was within the braces. The one problem I have with that process is that there are rivet ends that are stuck within the bracing as the drain ports are not big enough to let them out. My idea to get them out is to drill 2 1/4"ish holes in each brace to allow rivets to be tweezered out through the holes. I also haven't put to much thought into it, bit I don't think it would compromise the structure of the braces all that much.

Untitled.png
The holes will be drilled on each side of the center of the brace shown with the red dot.

Sorry I don't have any update pictures. Next post will have some
 

Watermann

Starmada Splash of the Year 2014
Joined
Jan 12, 2013
Messages
13,753
Don't be drilling any more holes in your ribs, use compressed air or a pressure washer on one end to blow the big chunks out. Or don't even worry about it, my 79 SS has no limber holes under the ribs.They found out the holes just get plugged up and become useless in no time at all.

See how in later years they bridged over the ribs to avoid putting holes in the ribs and solid riveted the deck support stringers in the hull.

y4mMccSXXT9Leju_IgJLDh9JZWmP4NPiHqJ710CMpiTzHpJyKiy_xlf2pZwcq1ti5pH9wenevttXKqA3QZk00dXHG9mbhWN9hJuEI7lNa9hhWfXDXM5BgKhIHRBISMhXLfFUSS71JgbQJQnYIZsqeniR3aPKmS-r1cVc1saWWdd3SXOdIcT3EAO5mb4caWILJqqaOHTalftcfjvvYItekLEfA
 

HypnoCraft

Petty Officer 3rd Class
Joined
Aug 30, 2018
Messages
94
Very interesting! I wont be boring holes in the ribs then. I have managed to spray out all the rivets anyways now.

I started off by deciding I would wire wheel the whole interior, but that seems like it would take quite awhile and if there is no pitting then I would be rubbing off the protective aluminum oxide coating. So I am just doing the keel and brown or off colour areas.

I have been wire wheeling along the keel with a SS cup brush. The pitting is pretty bad, but I think filling it all with G-flex or some sort of epoxy will be just fine. I am concerned about the pitting that is probably under the ribs, but I will forget about it for now and if a problem arises I will figure out a solution when it leaks. Most likely I would just pop 4 rivets off the rib and then sikaflex on an exterior aluminum patch and rivet it on with the 4 holes.

I have been thinking of how I will get the corrosion our of the pits themselves so that the epoxy will adhere properly. Apparently a vinegar solution may do it? I was also looking into using alumaprep which is an aluminum etch used in the aircraft industry.

20200130_142744.jpg
20200130_144302.jpg

20200130_142758.jpg
 

Watermann

Starmada Splash of the Year 2014
Joined
Jan 12, 2013
Messages
13,753
We have corrosion and pitting experience around here but only a few of us are active members. The corrosion is alkaline so it takes acid to neutralize it. Removing the stuff from deep pits is a tough nut to crack if there's a large section. I used cleaning vinegar in conjunction with the wheel by soaking the area, let it stand and go to town. The deep pits I used a pick to ream it out of the hole.

Others that have had more areas of deep pitting have used some type of stronger acid, I believe classiccat was one of them, lets see what he has to say about this other corrosion removal method. I know he subbed to one of your threads when I pointed out those very substantial rib end braces.
 

HypnoCraft

Petty Officer 3rd Class
Joined
Aug 30, 2018
Messages
94
I did a quick read through his whole thread. it looks like he was going to use hydrochloric acid but decided to use phosphoric which makes more sense. I believe what I am going to do is media blast the pits with ground glass/quick clean with phosphoric acid and rinse and then immediately fill the pitting areas.

Today I pounded out the rivets from the knee and took the knee off. boy oh boy am I glad I did. It's almost like someone decided to fill the knee with concrete. It was completely packed with mud/clay/nuts/bolts/etc. The skin underneath is also quite thin so I will be putting a large patch over the stern aft the keel. Check it out! it's almost comical.

Click image for larger version  Name:	20200207_150121.jpg Views:	1 Size:	522.0 KB ID:	10830649

Click image for larger version  Name:	20200207_150126.jpg Views:	1 Size:	725.3 KB ID:	10830650

Click image for larger version  Name:	20200207_150130.jpg Views:	1 Size:	421.6 KB ID:	10830651

Click image for larger version  Name:	20200207_150144.jpg Views:	1 Size:	456.8 KB ID:	10830652
 

SHSU

Lieutenant Junior+Starmada Splash Of The Year 2019
Joined
Mar 8, 2017
Messages
1,665
Catching up on your thread. Looks like a fun one!!

Taking the knee brace off is a good idea to see whats underneath. I didn't like how the drain was offset, so when I redid mine I moved it behind the knee bracket so I could get all the water and junk to drain out.

As for the corrosion, looks like you are doing what you need to combat that, but you will need to go over the pin holes and patch them as well.

On another note, you going to fix your trailer up before you paint the hull? I ask as moving the boat after you have done paint work and such is no fun... Every little scratch hurts at that stage. LOL
 

HypnoCraft

Petty Officer 3rd Class
Joined
Aug 30, 2018
Messages
94
Catching up on your thread. Looks like a fun one!!

Taking the knee brace off is a good idea to see whats underneath. I didn't like how the drain was offset, so when I redid mine I moved it behind the knee bracket so I could get all the water and junk to drain out.

As for the corrosion, looks like you are doing what you need to combat that, but you will need to go over the pin holes and patch them as well.

On another note, you going to fix your trailer up before you paint the hull? I ask as moving the boat after you have done paint work and such is no fun... Every little scratch hurts at that stage. LOL

Thanks, its been fun so far. I also had a thought about switching the drain plug to the center because I need to redo it anyways because there is a hole beside it.

I will definitely be putting patches on all the pin holes I can actually access. non accessible ones like possibly under the keel I am not sure what I will do. I may end up removing the keel but that is doubtful.

As far as the trailer... I have actually purchased a trailer from someone for 800 bucks. its a galvanized dual axle trailer that justtt fits the boat. I will be sure to post pictures soon. I havent fully set it up but it will eventually have 4 or 5 keel rollers and then 2 bunks to support the sides lightly. As far as actually painting the hull, I think I am leaving it bare aluminum. most boats in the ocean around here are aluminum that's unpainted. One day I may decide to paint the hull but for now its just going to be bare.
 

Watermann

Starmada Splash of the Year 2014
Joined
Jan 12, 2013
Messages
13,753
Oh boy was that ever a mess under that knee brace! The knee looks to be in one piece too, that's amazing.

You're that far, you may as well pull that Z channel on the transom and get all the corrosion and crud out from behind it too.
 

classiccat

"Captain" + Starmada Splash Of The Year 2020
Joined
Dec 20, 2010
Messages
3,405
I did a quick read through his whole thread. it looks like he was going to use hydrochloric acid but decided to use phosphoric which makes more sense. I believe what I am going to do is media blast the pits with ground glass/quick clean with phosphoric acid and rinse and then immediately fill the pitting areas.

Today I pounded out the rivets from the knee and took the knee off. boy oh boy am I glad I did. It's almost like someone decided to fill the knee with concrete. It was completely packed with mud/clay/nuts/bolts/etc. The skin underneath is also quite thin so I will be putting a large patch over the stern aft the keel. Check it out! it's almost comical.

Oh man, you read through my whole thread. I'm very sorry for any PTSD it may have caused! :eek: :lol:

thanks for the mention Watermann ...sorry it took me 2 weeks to log on.

I used acid very sparingly when I did...and it was more for marine tex adhesion than it was for corrosion removal...2 part process of phosphoric acid (West Systems Part-A) followed by a chromate conversion (West Systems PartB).

I used physical means to get rid of all of the white stuff. Buried somewhere in my thread thread is an awesome dremel bit that only removed material "sideways". Corrosion in alot of spots actually worm-holed laterally and you didn't always see it from the surface.

Good luck with the build!
 

HypnoCraft

Petty Officer 3rd Class
Joined
Aug 30, 2018
Messages
94
So, it's been a very long time since an update. Between school ending and the pandemic starting its been pretty hectic. Anyways... I have been working on it whenever I have time. Here's an update.

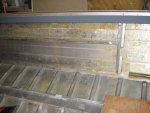
Last I remember, I removed the Z-brace for the tansom and started cleaning everything up. I sand blasted all pits that I could see until no white was left, washed them down, and then applied G-flex with some fumed silica to fill in all the corrosion. Also, I removed all of the rails and the bow piece.

20200507_111515.jpg


The bow structure needs to be rebuilt, but I will do that after I make sure I can float the boat without water coming in.

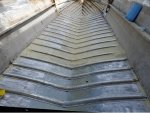
In general it has just been a lot of wire wheeling/striping wheel to remove carpet glue and whatnot. I also have recently started to remove all corroded rivets and have been making up the roughly 10 small aluminum patches I will need in order to cover the through hole corrosion I filled with G flex. I will also be completely patching over the bottom of the boat from the transom out to 4 feet towards the bow. The corrosion on the stern piece was a bit much for me to just make small patches.

All patches will be 1/16" 5052.

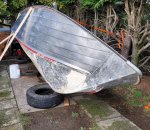
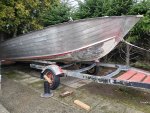
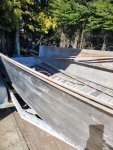
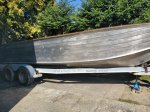
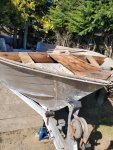
Here are some updated pictures with the boat on the new trailer. Not sure if i have posted them before so here they are again.

20200229_151125.jpg

Second is... I have fully covered corrosion issues with G-flex, the ones I can see anyways. Around the stern the corrosion was considerable. I am fairly sure that the aluminum that is above the keel piece and below the braces will have holes in it. Has anyone run into this problem? How would I go about fixing these holes without taking off each brace or taking off the whole keel piece? I haven't thought about it too much yet as I am hoping it down leak from there, but I have a large suspension it will.


Sorry I have been gone so long guys, I will post more regularly now!
 

Attachments

  • 20200430_153418.jpg
    20200430_153418.jpg
    1.2 MB · Views: 7
  • 20200315_125140.jpg
    20200315_125140.jpg
    1.4 MB · Views: 6
  • 20200315_125153.jpg
    20200315_125153.jpg
    1.5 MB · Views: 7
  • 20200315_125134.jpg
    20200315_125134.jpg
    1.5 MB · Views: 9

HypnoCraft

Petty Officer 3rd Class
Joined
Aug 30, 2018
Messages
94
Sorry for the double post, I had one other question before i go guns blazing adding patches. Is it okay to put small patches like 2x2" or 2x4" or should they all be quite large to distribute forces when the hull flexes? I think 2X2 should be fine but I am not 100% sure.
 

Watermann

Starmada Splash of the Year 2014
Joined
Jan 12, 2013
Messages
13,753
As far as deck supports go, not sure about using plywood, I would use AL supports under there.

You can't make a patch too big but they can be too small, they reinforce and limit any future leaks.If there's an area that needs one large patch to cover all the damage then do it that way rather than patchwork the area with small ones.
 

SHSU

Lieutenant Junior+Starmada Splash Of The Year 2019
Joined
Mar 8, 2017
Messages
1,665
Any work is good work. Took me 2 1/2 years to finish mine.

When you say patch, are you just securing with 5200 or using rivets/fasteners as well to secure the plate?


SHSU
 

HypnoCraft

Petty Officer 3rd Class
Joined
Aug 30, 2018
Messages
94
Any work is good work. Took me 2 1/2 years to finish mine.

When you say patch, are you just securing with 5200 or using rivets/fasteners as well to secure the plate?


SHSU

Thank you both for the answers. I have quite a bit of free time now, so the plan is to have this boat in the water this summer, maybe not in a fully finished state but at least useable.

For the patches they are 1/16" 5052 and will be put on using below waterline sikaflex and solid 3/16" rivets.


As far as the possibility of the skin above the keel plate leaking, the best thing I can think so far to fix the problem if it occurs is to fully seal the keel plate so that it is water tight, and then weld in a screw in aluminum bung plug into the lowest point of the keel plate and that would now also be part of the interior of the boat. This would mean I wouldn't need to tear anything apart which is always a win win. Something like this...

Capture.PNG
 

Attachments

  • Capture.PNG
    Capture.PNG
    215.6 KB · Views: 4
Last edited:
Top