First post. Help with an old Islander project

Unrooly1

Seaman Apprentice
Joined
Nov 16, 2019
Messages
33
Hello ladies and gentlemen. You don"t know me but I feel I know a bunch of you guys as I've been reading this forum and gleaning a lot of help on this old 1979 Islander project I'm working on .
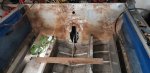
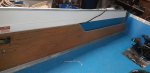
I bought the boat back in the spring and have just moved it inside the shop to begin a full restoration. So far I have removed the plywood from the transom and have most of the floor plywood removed. Engine and all Mercruiser bits are out as well.
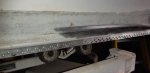
I want to start replacing a bunch of rivets in the next couple of days and have everything I need for the smaller rivets that join the sides to the bottom, but I haven't been able to determine the size of the larger rivets that are used at the stringers and heavier structural parts. would anyone be able to share the size ?
My other question concerns the cuddy windshield. Mine is a single piece of poly or lexan that needs to be changed. Shouldn't this be tempered glass ?
 

Unrooly1

Seaman Apprentice
Joined
Nov 16, 2019
Messages
33
Thanks, that is exactly where I found the info for the smaller rivets. It's the larger rivets that I haven't found the correct size for, Once I drill out the rivet the stem size is missing, I can match the head size and the length without any problem its just the stem width that I am trying to get exact.
 

Watermann

Starmada Splash of the Year 2014
Joined
Jan 12, 2013
Messages
13,753
Welcome aboard Unrooly1 :wave:

The body diameter of the solid rivets in the hull bottom are for sure 3/16". The only place 5/32" are used in on the gunnels in places.

Looking forward to seeing some pics of your Islander.
 

Unrooly1

Seaman Apprentice
Joined
Nov 16, 2019
Messages
33
Thanks for the welcome Waterman.I resolved my rivet dilemma, I realized that whatever size hole I drill will end up being the body diameter size.
I'm still wondering if the cuddy windshield is supposed to be one piece of plexi or two separate pieces of tempered glass.
As far as pictures go, this boat is in such horrible shape that I would rather put up pictures after it starts looking better. Shouldn't be too long before it starts going back together.
 

Unrooly1

Seaman Apprentice
Joined
Nov 16, 2019
Messages
33
I think I figured out how to put up pictures
 

Attachments

  • photo325813.jpg
    photo325813.jpg
    29.2 KB · Views: 4
  • photo325814.jpg
    photo325814.jpg
    31.6 KB · Views: 4

Unrooly1

Seaman Apprentice
Joined
Nov 16, 2019
Messages
33
torn down
 

Attachments

  • photo325815.jpg
    photo325815.jpg
    305.4 KB · Views: 3
  • photo325816.jpg
    photo325816.jpg
    204 KB · Views: 10
  • photo325817.jpg
    photo325817.jpg
    338.4 KB · Views: 3
  • photo325818.jpg
    photo325818.jpg
    54 KB · Views: 3
  • photo325819.jpg
    photo325819.jpg
    239.2 KB · Views: 3
  • photo325820.jpg
    photo325820.jpg
    285.1 KB · Views: 10

classiccat

"Captain" + Starmada Splash Of The Year 2020
Joined
Dec 20, 2010
Messages
3,405
Welcome aboard Unrooly1 :wave:

The body diameter of the solid rivets in the hull bottom are for sure 3/16". The only place 5/32" are used in on the gunnels in places.

Looking forward to seeing some pics of your Islander.

The double-seam might be 5/32" as well...at least they were in my '75 SS...and appear to be smaller than the shelf rivets in his shot:
fetch


Welcome Unrooly1 !!

We like those before pics...makes one appreciate the amount of work you've done.

The boat is already lookin' mighty fine! :thumb:

fetch
 

Unrooly1

Seaman Apprentice
Joined
Nov 16, 2019
Messages
33
I am the worst for taking pictures, but thanks for the kind words.
Engine is back in , hull is completely soda blasted and the paint prep work is nearly finished. Hoping to paint it next week so that I can get it all back together and launch it as soon as the ice is out.
 

Unrooly1

Seaman Apprentice
Joined
Nov 16, 2019
Messages
33
Hey guys, how does the hose (duct) for the blower terminate ?
This is the first I/o that I have messed with and don't know if the hose just lays in the bilge area or if it needs some sort of boot. I realize the importance of the blower so I want to get this right.
 

Watermann

Starmada Splash of the Year 2014
Joined
Jan 12, 2013
Messages
13,753
The blower hose should be in the lowest point in the bilge as fuel vapor is heavier than air. To weight the open end you can make a few wraps of gorilla tape on the end and find a way to zip tie midway so it can't be pulled out as easily.
 

Unrooly1

Seaman Apprentice
Joined
Nov 16, 2019
Messages
33
That's about what I figgered, thanks.
Just one piece of the list that is everything else that needs to be finished.
 

Unrooly1

Seaman Apprentice
Joined
Nov 16, 2019
Messages
33
So, this is the boat on the day that I bought it 50 weeks ago.
It was in a temporary shelter that didn't handle the weight from an ice storm and collapsed on the boat breaking some glass and re-shaping the aluminum roof. Raccons had moved in destroying the seats and cuddy cushions and one must have become trapped in the boat because his body was still in it.
 

Attachments

  • photo329842.jpg
    photo329842.jpg
    95.4 KB · Views: 3

Unrooly1

Seaman Apprentice
Joined
Nov 16, 2019
Messages
33
Boat was full above the floor with water and submerged smelly raccoon.
Got it home, pulled the plug and let it dry out for the summer.
I pulled it into the shop early November and after giving it a good talking too nearly every day since, it came out of the shop yesterday looking like this.
 

Attachments

  • photo329846.jpg
    photo329846.jpg
    88.2 KB · Views: 10

Watermann

Starmada Splash of the Year 2014
Joined
Jan 12, 2013
Messages
13,753
Love the look of the older Islander, really nice work bringing her back. Looking forward to seeing her on the water cutting a wake.

fetch
 

Unrooly1

Seaman Apprentice
Joined
Nov 16, 2019
Messages
33
with top
 

Attachments

  • photo330004.jpg
    photo330004.jpg
    76.7 KB · Views: 2
  • photo330005.jpg
    photo330005.jpg
    166.4 KB · Views: 2
  • photo330006.jpg
    photo330006.jpg
    74.6 KB · Views: 2
  • photo330007.jpg
    photo330007.jpg
    77.4 KB · Views: 9
  • photo330008.jpg
    photo330008.jpg
    151.1 KB · Views: 2

Unrooly1

Seaman Apprentice
Joined
Nov 16, 2019
Messages
33
Does anyone have a good method to clean the clear plastic in the side curtains ?
I've tried Spray Nine and it is only slightly better, not close to clear yet
 

classiccat

"Captain" + Starmada Splash Of The Year 2020
Joined
Dec 20, 2010
Messages
3,405
that plastic may be susceptible to UV damage but perhaps a canvas shop can give you some recommendations?

here's a how-to guide from Sailrite: How to Clean & Care for Your Clear Vinyl
Really nice job on this rebuild and keeping things original! :thumb:

You don't see too many of these old islanders brought back to life in their original form.

fetch
 
Top