1972 Starcraft Holiday 21'

bchaney

Petty Officer 1st Class
Joined
Jul 3, 2018
Messages
246
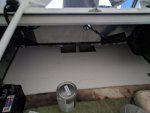
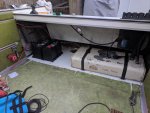
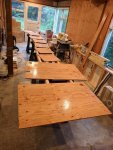
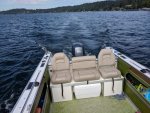
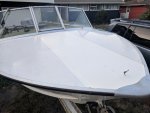
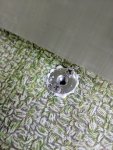
Well I finally got some time to work on the boat during the past few weekends, though progress is still pretty slow. We are renovating our kitchen so a lot of my free time has been sucked up by that project, but I really want to get the boat out on the water ASAP. I epoxied in my floor patch and put down a couple coats of thin epoxy on top to help seal up the exposed floor area, then after curing I laid down 2 coats of Valspar oil-based porch paint. I plan to use the same epoxy and paint for the plywood panels on the bench.

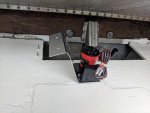
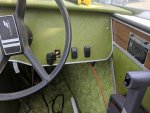
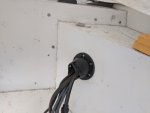
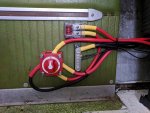
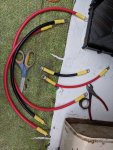
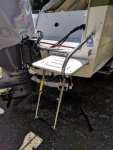
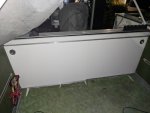
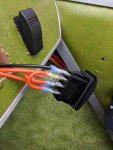
I installed a couple of studs in the floor where I plan to mount the bracket for a bilge pump. After the paint is dry I'll install my new dual battery trays and slide the gas tank back into place. Need to find some stainless brackets to hold the tank, the existing ones were all rotted out. After that I'm hoping to get the wiring done, I have stockpiled all of the supplies and now I just need to install them. I found a local tool rental shop that has crimpers big enough for my 2 gauge battery cables. Going to install new lights, horn, 12v outlet, and all the required wiring and switches and fuses.

Click image for larger version  Name:	 Views:	1 Size:	203.0 KB ID:	10749451


Attachments

  • photo313925.jpg
    photo313925.jpg
    108.8 KB · Views: 4
  • photo313926.jpg
    photo313926.jpg
    218.3 KB · Views: 4

Watermann

Starmada Splash of the Year 2014
Joined
Jan 12, 2013
Messages
13,753
Yeah the weather is shaping up for some good boating and fishing, time to get her ready.
 

bchaney

Petty Officer 1st Class
Joined
Jul 3, 2018
Messages
246
I got a bunch of work done on the boat this weekend, it was a great way to spend some of Father's Day (thanks to my wife for allowing me to spend time on the boat). I made up an aluminum bilge pump bracket, mounted it to the floor and ran the wires up to the dash switch. I also got the new tubing plumbed up to the pass-thru in the hull. I installed a couple new battery trays I got from iboats as well - I like the latches on them much better than the crappy plastic one that was being used before. I installed some new fuel tank hold-down straps so everything is now secured under the splashwell. I mounted a battery switch, ground block, and megafuse holder on the starbord gunwale and hooked up a few things. I also filled all the holes that I could find in the floor and transom with the open tube of 4200 that I had.

I cut holes in the dash for my 3 new switches (bilge, horn, lights), though they didn't turn out as clean as I hoped - the oscillating tool is a bit hard to control for precise cuts and the switches don't have much of a flange to cover gaps. Eventually I'll figure out a way to clean that up. I also pulled the outboard controls out to install a cable boot in the splashwell and add a grommet in the gunwale for them to pass thru. There was no cable boot before, a slit 20oz soda bottle was zip tied to the cables to protect them from the sheetmetal edge, and the outboard controls were laying in the gunwale storage pocket so I wanted to clean up both of these areas.

I got a horn mounted up under the bow, I'm hoping it will be loud enough under there so it can stay a bit protected from the elements. I also have a fuse and ground block mounted up under the dash. Most of the remaining work needed to get her seaworthy is just wiring between the components that I have mounted and securing all the wiring. I'm going to try to get all of the larger cables cut and stripped before I rent the large crimper so that I can get all the big crimps done in with a 1 day rental.

After talking to my wife I've realized that a swim ladder is more urgent than I thought, so I started looking online last nite. I think the one linked below will work but I need to take some measurements to verify. The transom on this boat isn't very big so it seems like the ladder options are limited. Eventually I want to build a platform on top of the splashwell to make it easier to get from the transom back into the boat.

https://www.amazon.com/Garelick-EEz-.../dp/B0000AZ7KC


Click image for larger version  Name:	IMG_20190615_110623.jpg Views:	2 Size:	166.1 KB ID:	10756734Click image for larger version  Name:	IMG_20190615_114828.jpg Views:	1 Size:	191.6 KB ID:	10756732Click image for larger version  Name:	IMG_20190615_131829.jpg Views:	1 Size:	192.0 KB ID:	10756726Click image for larger version  Name:	IMG_20190616_194433.jpg Views:	2 Size:	240.6 KB ID:	10756735
 

Attachments

  • IMG_20190615_110623.jpg
    IMG_20190615_110623.jpg
    166.1 KB · Views: 6
  • IMG_20190616_175135.jpg
    IMG_20190616_175135.jpg
    231.8 KB · Views: 7
  • IMG_20190615_165809.jpg
    IMG_20190615_165809.jpg
    207.6 KB · Views: 8
  • IMG_20190616_194433.jpg
    IMG_20190616_194433.jpg
    240.6 KB · Views: 8
  • IMG_20190616_194433.jpg
    IMG_20190616_194433.jpg
    240.6 KB · Views: 7
  • IMG_20190616_195328.jpg
    IMG_20190616_195328.jpg
    101.2 KB · Views: 7

Watermann

Starmada Splash of the Year 2014
Joined
Jan 12, 2013
Messages
13,753
Bilge pump set up looks perfect :thumb:

You mounted your beautiful trumpet horn under the bow cover?
 

bchaney

Petty Officer 1st Class
Joined
Jul 3, 2018
Messages
246
Yea I hope it's loud enough under there.

What do you think about mounting a ladder to the side of the boat? I know the transom is stronger but it would be so much easier to get in from the side rather than having to climb over the splashwell.
 

Watermann

Starmada Splash of the Year 2014
Joined
Jan 12, 2013
Messages
13,753
The only problem with a ladder over the side is what do you do with it when underway? Takes up room and has to be put over before going in the water, if you fall overboard that may be a problem.
 

bchaney

Petty Officer 1st Class
Joined
Jul 3, 2018
Messages
246
Thanks to GA_Boater for changing the thread title. I figure I'll just keep track of all work on the boat in this thread, not just bench seat construction as originally intended/titled.

Good points on the ladder topic WM, I will stick with the transom mounted one for safety. I ended up ordering the slightly different ladder linked below. The transom is at about a 15 degree angle so that ladder with 4 legs would’ve had to be modified so that the lower legs were about 4” longer than the top ones for the ladder to sit vertically. This one only has 2 mounting points and comes out at an angle so it should be a simpler install. I am a bit concerned about the torque on the transom at those mounting points but the reviews are good and it has a 350-400lb weight limit so I’m going to give it a try.

https://www.amazon.com/Garelick-1968.../dp/B01CZ2YBMI

I got some more work done this weekend. My wife was out of town so I was on full-time baby duty, but I was able to sneak out with the baby monitor during naps and after she went to bed. Luckily it stays light out until 9:30ish these days and my in-laws came over to help out for a couple hours too. Friday nite I cut and stripped all of the large wires so I could rent the big crimp tool Saturday morning. After adjusting the crimper tension I was able to get some good, tight crimps. I added adhesive-lined heat shrink tubing to keep the connections sealed as much as possible. I connected all of the cables as well as smaller gauge wires for the horn, rear light, and switches.

I tested the bilge pump and horn, they are working as expected. The horn is LOUD in the boat - I guess it echoes rearward from the closed bow. I will have to get someone to stand out in front of the boat a ways to make sure it's also properly audible from outside.

I got some large cushion clamps to help secure all the wiring in the gunwale above the pocket. There are a bunch of threaded studs there that I attached the clamps to. That area looks much better with the wires and cables hidden instead of hanging all over the place. I also replaced the 2nd cable boot where the steering cable and fish finder transducer run - the existing one was cracking and rusting.

There are more things that I plan to do soon (repaint bow anchor walkway, install front light, install 12v outlet, install splashwell sliding doors and bench seat, etc.), but I think she is officially seaworthy now that we have a second battery, working bilge pump and horn. My wife wants me to install the ladder before we go out so I'll try to do that this week. I have the hardware, just need to decide on a location.

Click image for larger version  Name:	IMG_20190622_151506.jpg Views:	1 Size:	274.8 KB ID:	10760515Click image for larger version  Name:	IMG_20190622_154531.jpg Views:	1 Size:	250.9 KB ID:	10760516Click image for larger version  Name:	IMG_20190623_192034.jpg Views:	1 Size:	165.5 KB ID:	10760518
 

Attachments

  • IMG_20190623_191830.jpg
    IMG_20190623_191830.jpg
    201.3 KB · Views: 2
  • IMG_20190622_154531.jpg
    IMG_20190622_154531.jpg
    250.9 KB · Views: 2

Watermann

Starmada Splash of the Year 2014
Joined
Jan 12, 2013
Messages
13,753
Some good ideas you have going there, the ladder though requires a swim platform or step, attached to the transom, so where are your feet going to go on the rungs, it's up against the transom? It's a better plan to get a platform with the telescopic ladder with it. https://www.amazon.com/Pactrade-Mari...6PBEK28H05Z4Q3
 

bchaney

Petty Officer 1st Class
Joined
Jul 3, 2018
Messages
246
Yea I will have to look at the ladder again, you are right it looks like there won't be much toe room at the top step. The Amazon description and the manufacturer's website both say that it's designed to mount directly to the transom tho. I looked at swim platforms but I think the transom is too small to fit one.

I started sealing up the plywood for the sliding doors and bench last nite, put a second coat on the first side this morning. I'm getting some bubbles in the epoxy, they seem to appear in the pot while I'm mixing, I guess due to the chemical reaction. I'm using a 3/8" nap roller to spread it onto the wood. I don't remember having this issue when I used the same US Composites epoxy on the floor under the splashwell.

Click image for larger version  Name:	IMG_20190625_063909.jpg Views:	1 Size:	240.4 KB ID:	10761011
 

Watermann

Starmada Splash of the Year 2014
Joined
Jan 12, 2013
Messages
13,753
I installed this one on a 1965 Holiday for friends. Same one in the link I posted above.

step.jpg
 

bchaney

Petty Officer 1st Class
Joined
Jul 3, 2018
Messages
246
Yea those I/O tubs have a much taller transom. I think my OB transom wood is only 12-14" tall. The wood doesn't extend below the floor which is good for avoiding transom rot due to bilge water, but bad for mounting a ladder.

image_304381.jpg
 

Watermann

Starmada Splash of the Year 2014
Joined
Jan 12, 2013
Messages
13,753
Oh boy yeah that huge bath tub SW eats up nearly the whole transom.
 

bchaney

Petty Officer 1st Class
Joined
Jul 3, 2018
Messages
246
Well I finished up the important wiring and she's seaworthy again! We've taken her out twice so far and everything is working great. I ended up returning that swim ladder and getting a platform with ladder. The ladder would've been a simple install but I decided it's worth the extra effort to make a platform work just because it'll be much more useful especially with the baby. My Dad and I test fit the platform and the mounting hole locations are a bit too far apart in height, which was my original concern due to the short transom. After throwing around a few ideas we found the bracket linked below on iboats which is shorter in height so it'll mount entirely on the transom without any holes being close to edges. I'm just waiting for the bracket to arrive now.

On our first trip out we realized that the top that came with the boat must be missing pieces. It can easily fold forward, there is nothing keeping rearward tension on it as you may be able to see in the pic below. I tried tying a rope to a rear cleat but it still doesn't prevent the other bows from moving in ways they shouldn't. I will probably end up getting a universal style bimini top eventually, I just haven't ordered one yet because I've been spending a lot of cash on the boat lately.

https://www.iboats.com/shop/jif-mari...22%20x%2014%22

https://www.amazon.com/Garelick-Eez-.../dp/B000KOUCRW

Click image for larger version  Name:	IMG_20190629_170101.jpg Views:	1 Size:	58.8 KB ID:	10769608Click image for larger version  Name:	IMG_20190629_170133.jpg Views:	1 Size:	82.6 KB ID:	10769609Click image for larger version  Name:	IMG_20190630_092640.jpg Views:	1 Size:	90.2 KB ID:	10769610
 

bchaney

Petty Officer 1st Class
Joined
Jul 3, 2018
Messages
246
The swim platform bracket arrived but the angle on it didn't match the transom so I made up a shim from some extra starboard material I had from my transducer mounting block. I got the platform mounted up and all holes sealed with 4200. We tested it out on the lake yesterday and it worked great - very stable and it was so much easier to get back into the boat from the water. Mom and baby were very happy to be able to swim safely.

I also installed a 12v outlet on the side of the dash to power a pump to blow up some tubes or paddleboard (or other accessories like phone chargers), though we didn't get a chance to use it. We spent too much time boating from place to place and didn't have much time left to just relax before the baby was ready for a nap. Next time we are going to have everyone meet us at the launch instead of on the dock near their house but at the other end of the lake from us.

I've also been working on the new bench seat over the past few weeks. I have all the panels for the bench and sliding doors cut and sealed up with epoxy. I drilled most of the holes before I sealed them up for added protection. The US Composites epoxy I used blushes so it's taken a bit longer to finish since I have to clean off the oily residue after each coat. I'm hoping to paint the panels this week so that they can be assembled/installed this weekend. I also need to paint the walkway on the bow of the boat - all of the vinyl was cracking and peeling so I removed it and scraped off most of the remaining adhesive residue. I used a can of Goof Off to help loosen things up but that stuff was nasty and not easy to remove.

IMG_20190714_205055.jpg ​​​​​​​
 

Attachments

  • IMG_20190720_122020.jpg
    IMG_20190720_122020.jpg
    103.8 KB · Views: 10
  • IMG_20190720_122020.jpg
    IMG_20190720_122020.jpg
    103.8 KB · Views: 11
  • IMG_20190714_203042.jpg
    IMG_20190714_203042.jpg
    57.9 KB · Views: 10
  • IMG_20190714_203042.jpg
    IMG_20190714_203042.jpg
    57.9 KB · Views: 10
  • IMG_20190720_122002.jpg
    IMG_20190720_122002.jpg
    114.9 KB · Views: 10
  • IMG_20190720_122002.jpg
    IMG_20190720_122002.jpg
    114.9 KB · Views: 9
  • IMG_20190720_122031.jpg
    IMG_20190720_122031.jpg
    83.2 KB · Views: 9
  • IMG_20190720_122031.jpg
    IMG_20190720_122031.jpg
    83.2 KB · Views: 10

Watermann

Starmada Splash of the Year 2014
Joined
Jan 12, 2013
Messages
13,753
Looks like you're on your way to having a great summer on the water! :thumb:
 

ShoestringMariner

Lieutenant Commander
Joined
Apr 18, 2015
Messages
1,563
I love the retro green interior on that boat. I missed out getting a beauty green SS with white seats and top. Very sharp.

Your wiring job looks very pro, exactly what I want mine to be. Can you share more details about the special crimping pliers?
 

bchaney

Petty Officer 1st Class
Joined
Jul 3, 2018
Messages
246
Thanks. I will probably replace the seats with something white/tan eventually. Maybe when I replace the flooring. I don't mind the green but there's a lot of it - I think it would look OK with a more neutral color floor and seats. Not sure when I can get to that tho.

I used a couple sets of crimpers for the job. For the smaller
​​(12ga and smaller) crimps I used the titan ratcheting crimper linked below. For the 2 and 4 awg battery cables I rented a large hand crimper from a local tool rental store. Link to rental tool below - the one I got didn't look exactly like that but worked fine. All of the terminals, lugs, and adhesive lined heat shrink tubing were from Ancor and I am happy with the quality.

Titan Tools 11477 Ratcheting Wire Terminal Crimper Tool for Insulated Terminals https://www.amazon.com/dp/B0069TRKJ0..._nVmuDbJJH62X4

https://www.aurorarents.com/equipmen...y=67&key=CRITL
 
Last edited:

ShoestringMariner

Lieutenant Commander
Joined
Apr 18, 2015
Messages
1,563
Thanks. I will probably replace the seats with something white/tan eventually. Maybe when I replace the flooring. I don't mind the green but there's a lot of it - I think it would look OK with a more neutral color floor and seats. Not sure when I can get to that tho.

I used a couple sets of crimpers for the job. For the smaller
​​(12ga and smaller) crimps I used the titan ratcheting crimper linked below. For the 2 and 4 awg battery cables I rented a large hand crimper from a local tool rental store. Link to rental tool below - the one I got didn't look exactly like that but worked fine. All of the terminals, lugs, and adhesive lined heat shrink tubing were from Ancor and I am happy with the quality.

Titan Tools 11477 Ratcheting Wire Terminal Crimper Tool for Insulated Terminals https://www.amazon.com/dp/B0069TRKJ0..._nVmuDbJJH62X4

https://www.aurorarents.com/equipmen...y=67&key=CRITL

Thanks. I picked up one of those ratcheting crimpers at a local auto parts place a few weeks ago. I was wondering if you used the same. I think I can rent the heavier ones too now that you mention it. White seats on green looks really sharp but I find they are hard to keep clean.
I wish someone had NOS stock on seats as the new ones out there these days are narrower and don’t have the flared shape as the starcraft seats.
 

bchaney

Petty Officer 1st Class
Joined
Jul 3, 2018
Messages
246
Lots of updates. I painted all the plywood panels and front walkway on the boat. The sliding doors were installed to cover the area under the splashwell. The panels were installed on the bench and the bench installed in the boat. I ended up putting tee nuts in the floor and bolted the bench to the nuts, so I could theoretically remove the bench for a trip if needed, though it's pretty heavy in its fully assembled form. There are some minor things I still need to do with the bench - the front panels need to be reinforced a bit and the hinged storage compartments don't open as far as I had hoped.

Since the bow is now painted I installed a new LED front light and reinstalled the anchor bracket. Now I just need an anchor - I am considering a Lewmar Delta but am hesitant to pay for it. I finished wiring up the lights to the DPDT switch and they are working as expected. Planning to take a night cruise with the admiral before the summer is over. I also cleaned up the wire routing under the dash/bow now that all the wiring is done.

Planning to take the boat out 2 days this labor day weekend so I wanted to get it as ready as possible. Have a great weekend guys!

Click image for larger version  Name:	IMG_20190808_212755.jpg Views:	1 Size:	148.9 KB ID:	10793840Click image for larger version  Name:	IMG_20190827_192645.jpg Views:	1 Size:	384.9 KB ID:	10793842
 

Attachments

  • IMG_20190828_195907.jpg
    IMG_20190828_195907.jpg
    210.4 KB · Views: 9
  • IMG_20190829_145422.jpg
    IMG_20190829_145422.jpg
    262.5 KB · Views: 9
  • IMG_20190730_201744.jpg
    IMG_20190730_201744.jpg
    164.8 KB · Views: 8
  • IMG_20190808_212755.jpg
    IMG_20190808_212755.jpg
    148.9 KB · Views: 8
  • IMG_20190829_104027.jpg
    IMG_20190829_104027.jpg
    303.3 KB · Views: 8
  • IMG_20190827_192645.jpg
    IMG_20190827_192645.jpg
    384.9 KB · Views: 8
Top