1978 Starcraft Supersport 16' OB Restoration

thull

Petty Officer 2nd Class
Joined
May 26, 2012
Messages
142
I'm gonna need some help knowing how to disassemble the steering systems. I've only ever had tillers before this. The system looks a bit intimidating.
 

Attachments

  • photo303047.jpg
    photo303047.jpg
    111.9 KB · Views: 7
  • photo303052.jpg
    photo303052.jpg
    159.2 KB · Views: 6
  • photo303058.jpg
    photo303058.jpg
    138.6 KB · Views: 6

Watermann

Starmada Splash of the Year 2014
Joined
Jan 12, 2013
Messages
13,753
On the rivets, I'm thinking your haven't seen this rivets thread. My SS had similar rivet issues, I replace 100's of them that were bad with heads that popped right off.

In time lots of you questions you have will be answered after you start the tear down and when rebuilding there are things you just have to use your imagination for or steal the ideas from another build.

Nice score on the porter cable ;)
 

MTboatguy

Fleet Admiral
Joined
Jul 8, 2010
Messages
8,988
Yup, good score on the drill, the only thing I have ever found in one of my boats was a couple of rotted out life jackets!

:eek:
 

thull

Petty Officer 2nd Class
Joined
May 26, 2012
Messages
142
Watermann - Did you tap out the old rivets that were already missing heads or did you drill them out?
 

Watermann

Starmada Splash of the Year 2014
Joined
Jan 12, 2013
Messages
13,753
I tried to use a punch to pop them out but it didn't work out so well and I ended up using a drill. Like I said in the tutorial do yourself a favor and get a good pilot point drill bit.
 

thull

Petty Officer 2nd Class
Joined
May 26, 2012
Messages
142
I made a frame out of PVC to hold up the boat cover. I have to store it outside since we only have a tiny one car garage.
 

Attachments

  • photo303215.jpg
    photo303215.jpg
    39 KB · Views: 5
  • photo303216.jpg
    photo303216.jpg
    249.3 KB · Views: 5

thull

Petty Officer 2nd Class
Joined
May 26, 2012
Messages
142
I haven't been able to do much to the boat yet. I spent most of my free time trying to do things necessary to get it through the gate and in the back yard. I only have 1" of clearance each side. That's AFTER I removed the trailer guide posts, which I was bummed to lose because I've always wished I had them on previous boats.
 

Attachments

  • photo303767.jpg
    photo303767.jpg
    91 KB · Views: 0

thull

Petty Officer 2nd Class
Joined
May 26, 2012
Messages
142
I spent a couple days removing 8 ft x 8 ft of podacarpus bushes.
 

Attachments

  • photo303768.jpg
    photo303768.jpg
    147.4 KB · Views: 2

thull

Petty Officer 2nd Class
Joined
May 26, 2012
Messages
142
This is where the bushes used to be.
 

Attachments

  • photo303769.jpg
    photo303769.jpg
    129.4 KB · Views: 1

thull

Petty Officer 2nd Class
Joined
May 26, 2012
Messages
142
I had to "borrow" all the pavers from the fire pit and lay them in a path to be able to get the boat in and out of the yard, because it just sinks in the soft sand and is impossible to push with my trailer dolly.
 

Attachments

  • photo303770.jpg
    photo303770.jpg
    125.6 KB · Views: 1

thull

Petty Officer 2nd Class
Joined
May 26, 2012
Messages
142
Next I need to put up another section of privacy fence to replace the bushes, and then build a metal shed kit to hold all the boat stuff I'm about to remove. We've needed the shed for a while anyway, to store the riding mower and some stuff from our tiny one car garage. The boat is just a good excuse to finally do it.
 

BWR1953

Vice Admiral
Joined
Jan 23, 2009
Messages
5,853
Bummer about the tight fit. Maybe you could find a way make the guide-ons easily removable?

Good job on the brush removal.
​​​​​
 

Watermann

Starmada Splash of the Year 2014
Joined
Jan 12, 2013
Messages
13,753
Having room for one boat is a start, wait until you catch MBS and end up with 3 or more!
 

thull

Petty Officer 2nd Class
Joined
May 26, 2012
Messages
142
Can a wise and experienced restorer on here pontificate on the pros and cons of using epoxy resin to seal the floor and transom wood vs the old timers formula? I think I've determined epoxy costs more, and is stronger, and can be used to glue transom halves together. Does epoxy require just one coat. That would be a huge time and labor saver if accurate.
 

Watermann

Starmada Splash of the Year 2014
Joined
Jan 12, 2013
Messages
13,753
If time was a factor in restoring old tin then nobody would do it since it can take years.

The OTF and Spar is fool proof, that can't be said of the fiberglass epoxy resin as I've witnessed many threads where the stuff did not set correctly and had to be scraped off or kicked off to soon making the pot a solid tub of garbage. Spar has UV ray protection so if exposed to the sun epoxy must be covered with another product. Either product will protect the plywood when properly applied and the boat is cared for afterwards and not left for the elements to ravage over the years.

No, one epoxy coat is not enough.
I would trust Tite Bond III over epoxy resin any day to laminate the transom layers.
 
Last edited:

thull

Petty Officer 2nd Class
Joined
May 26, 2012
Messages
142
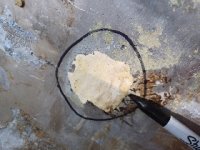
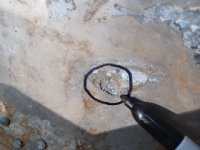
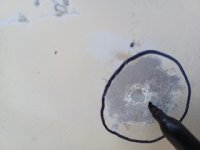
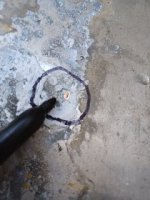
So, I was in over my head on how much time I had to spend on this boat and sold it to another sick individual who shared the love for fine, old tin boats. I'm working on another boat, a 1983 Lund vhull, also aluminum, and I have some corrosion repair from wet foam to do. Does anyone mind if I ask some tin hull repair questions here for the Lund? These scenarios are all below waterline. I plan to use Marinetex to fill pits on the inside, but while waiting for that stuff to ship, will the JB weld I have on hand be ok to get started? For pits that have gone through the hull, can I fill them with the either product with a piece of tape on the outside, then sand outside after it cures? Is a rivet ever warranted in the corrosion hole? Im using Gluvit (on the way) for seams and rivets; does it go right over the epoxy repair (once cured)? I read not to use a steel wire wheel to remove corrosion, but then what do I use? The brass wire wheels for the Dremel are only 3/4" diameter, and they're the only pure brass wire wheels I can find. All others seem to be either SS or brass-coated steel, which seems like it'd wear off in no time and you'd be using plain steel anyway.
 

thull

Petty Officer 2nd Class
Joined
May 26, 2012
Messages
142
Some pics. The one with the blob of white stuff is the PO's old repair of a hole. I'm going to put an AL patch smothered in 5200 and attach with rivets. How do I bend the patch to the curve of the hull? Pound it into shape against the hull?
 

Attachments

  • 20230306_154315_resize_50.jpg
    20230306_154315_resize_50.jpg
    71.7 KB · Views: 9
  • 20230306_154304_resize_70.jpg
    20230306_154304_resize_70.jpg
    63.2 KB · Views: 9
  • 20230306_154256_resize_80.jpg
    20230306_154256_resize_80.jpg
    46.2 KB · Views: 9
  • 20230306_154234_resize_71.jpg
    20230306_154234_resize_71.jpg
    20.5 KB · Views: 9
  • 20230306_154340_resize_31.jpg
    20230306_154340_resize_31.jpg
    75.8 KB · Views: 9
  • 20230306_154328_resize_47.jpg
    20230306_154328_resize_47.jpg
    72.7 KB · Views: 10

BOYS & TOYS

Petty Officer 2nd Class
Joined
Mar 1, 2008
Messages
141
Some pics. The one with the blob of white stuff is the PO's old repair of a hole. I'm going to put an AL patch smothered in 5200 and attach with rivets. How do I bend the patch to the curve of the hull? Pound it into shape against the hull?
To bend thin aluminum to a gentle curve just put some pieces of wood on the floor and step on in until it fits.
That hull corrosion looks bad in the pic. A patch with 5200 and solid rivets is a good repair in the right situation.
 

Sharpie223

Petty Officer 2nd Class
Joined
May 24, 2021
Messages
152
I am patching similarly right now. I just clamped my patch plates in a vise and bent and checked until they matched the hull. If it isn't perfect, the patch sandwich should force everything to conform anyway. Then I bent the edges in slightly so that when I install, the edges will be sure to contact the old metal.

After I wire wheeled my pitting to bright metal, I filled and faired with jb weld prior to patch plates. I don't know of this really does much but I figured filled pitting is better than unfilled, even with a 5200 sandwich.
 
Top