PlayDoh’s 16 SS resto underway

Watermann

Starmada Splash of the Year 2014
Joined
Jan 12, 2013
Messages
13,753
Sounds interesting, I'm a horrible body and fender man. On my boats I've always settled for smoothing out the dents making them just less noticeable to the eye so they don't pop out being what the eye is drawn too.

My V5 had not even one dock ding, she was 100% dent free on the hull but the gunnel suffered some out of water impact.

Some before and after pics would be great, maybe a tutorial and tools used.
 

PlayD0h

Petty Officer 1st Class
Joined
Apr 23, 2009
Messages
326
I ordered what should be all the rivets I will need. Ordered from ‘Rivets-online’. I ordered the 3/16 2117T4 solids 3/8, 7/16 & 1/2. 3/16” dome all aluminum pop-rivets in .126-.250 and .252-.375 grips. Some 3/16” large flange in .501-.625 .625-.750 & .876-1.0 grips for the deck. I’m thinking I’m going to use 5/8” wood, but I’m covered if I go with 3/4”.
3/16” counter sunk in .251-.375 grip and some 5/32” in .126-.187 even though its likely I won’t need those since I’ve drilled everything out to 3/16” pretty much.

Once again WaterMan, thank you for the Rivet post. I would have had to spend hours searching and measuring and likely would have spent more time and money without your help.

I might drill out the 1000 solids I’ve already put in, yet I’ve only done half a dozen at most. Yet there all painted over so not sure if I actually will. I really wanted the 2117 solids for my knee brace plate, and after more thought I think they are in fact a better choice.
 

PlayD0h

Petty Officer 1st Class
Joined
Apr 23, 2009
Messages
326
Making progress. Built a cradle for the boat on castor wheels. Seriously cleaned out the insides of the ribs, which was quite the task. Compressed air, shop vac and metal rods and a few hours got the job done.
Im waiting for the weather we’re now getting to start putting on the gluvit, and that’ll be soon.
I cut the deck and got the first coat of S1 Epoxy penetrating sealer on. 3-4 on top and 2-3 on bottom will be my min goal. Stuff reeks bad and I didn’t seal off the garage to house door till after my first coat, which was enough to fumigate the house.
I measured and cut the stern and middle deck pieces and used the old one as a template for the bow pieces. Made the all the cuts with a 10 or 14 tooth / inch jigsaw blade. A scroll blade for the rib notches and made a couple corrections to the template for a better fit.
Next is the stringers and additional cross bracing. I decided not to put a ski locker in, and am looking at a ski-post mount. I’m doing Dozer’s doubler technique
under the seats and under the butt joints of decking. I went with 5/8” fir ( GS1 -Good one side
I have my dents and creases worked out 99% and very little oil-canning. Luckily with the side shelf pieces it will secure the oil canning possibility.
 

Attachments

  • photo308966.jpg
    photo308966.jpg
    109.5 KB · Views: 0

Candutch

Chief Petty Officer
Joined
May 8, 2015
Messages
637
Good to see you're back at it Paul. Everything should start flying back together now. It's nice once all that initial tear down and cleaning is done and you can start doing the fun stuff. If you are still planning on putting in a deck and want to see how I did mine let me know. I plan on pulling the boat out to my trailer in BC end of May.
 

PlayD0h

Petty Officer 1st Class
Joined
Apr 23, 2009
Messages
326
Thanks Candutch. I’m planning on putting the deck in fairly soon. I have one more coat of epoxy to go on the ‘doublers’, yet there not cut yet so it’ll probably take me a week to gluvit the hull, cut then glue and screw the doublers.
I’m thinking of adding some cross-braces to the stringers to give them a little more support. A lot of the stringer to rib rivets were broken on mine, and the person used SS mandrel rivets which I’d presume are stronger than the all Aluminum ones I’m using.
Im dreaming of getting a TIG welder and would consider giving the stringers a little tack weld. Overkill I’m sure but I’m not sure there’s a down-side. I’d like to fill the holes in the Transom skin with welds too, since I’m still debating on how to deal with them.
The PO had a kicker mount and one of the bolts went through the transom and was exposed in the splash-well. There’s also a mediocre swim ladder on the other side (port) that I’d like to upgrade. My kids are old enough to want to tube and I just don’t like the notion of using the transom to pull anything including a 50 pound kid. Yet a ski pylon seems like more than I can afford or really need.
I need to go through your posts and study your stern casting deck, although I’m confident I can engineer one myself. My partial plan is to either cut the splash-well and connecting my stern casting deck / storage / possible rear folding bench seat to the remaining 3/4’s of the splash-well. Yet I don’t like the idea of cutting the original Splash-well and would rather build one and save the original Splash-well.
Again the TIG would be instrumental for that project. And others, but the cost of TIG’s and how little Is use it make it hard to justify. Oh and Ild like to TIG up the beefed knee-brace. I’m going to see if I can maybe rent one for a month or so.
 

Watermann

Starmada Splash of the Year 2014
Joined
Jan 12, 2013
Messages
13,753
Filling holes with a welder is not a bad idea but using welds to fasten structure is a bad idea, they will crack out sooner or later, welds on a riveted boat is risky business. Repairing a splashwell would be a good use of a welder because you can see it but below deck I wouldn't, rivets have that ability to take the flexing where a weld will crack out in the thin rivet boat AL.
 

PlayD0h

Petty Officer 1st Class
Joined
Apr 23, 2009
Messages
326
Filling holes with a welder is not a bad idea but using welds to fasten structure is a bad idea, they will crack out sooner or later, welds on a riveted boat is risky business. Repairing a splashwell would be a good use of a welder because you can see it but below deck I wouldn't, rivets have that ability to take the flexing where a weld will crack out in the thin rivet boat AL.

My idea was rivets and a weld, and these are stringer to rib where there’s no risk of leaks and the ribs are pretty thick. The only reason I thought of it was because the majority of the rivets were broken. Maybe the AL/SS rivets while stronger might break more compared to an all AL? The whole grade 5 vs 8 bolt logic, brittle vs malleable.

I was was wondering if I should try to adjust the stringers to try and perfect how level they are, but I’m leaning against it after thinking about it. It’s likely impossible to make them ‘perfect’ over the entire length. On the stern deck sheet there maybe an 1/8th out and the wood has no problem laying flat. The foremost, notched deck sheet that came out was decently curved. I improved the notches, and by using the deck ‘doublers’ and 5/8th epoxied vs 1/2 plain wood, should vastly improve the decks strength.

Im looking at gluvit’ing the hull this weekend. Going to use a dental pick to clean spray foam around rivets and seams that the nylon brush couldn’t get at. And I want to lean the hull while laying down gluvit, so 2-4 applying times will take some time.

Thanks for the tips WM
 

Watermann

Starmada Splash of the Year 2014
Joined
Jan 12, 2013
Messages
13,753
The most common reason the deck support blind rivets are broke off at the ribs was because of rotten wood, loose large flange rivets at the rib ends and side panels. It all ties in together but ribs slightly flex constantly and can break where rivet holes are or where welding has occurred. So why take more chances.
 

PlayD0h

Petty Officer 1st Class
Joined
Apr 23, 2009
Messages
326
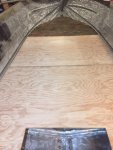
I put some gluvit on today. I have the hull tilted quite a bit yet this stuff is a lot thicker than I was expecting. I’m not sure I would have bothered tilting if I knew. Oh well, it won’t hurt.
I feel like the gluvit isn’t going to deal anything, but it will be relatively cheap insurance. I bought the quart can yet I’ll be lucky if I use 1/3rd of it. I’m wondering if multiple coats are possible, or advised.
While the temp in the garage was 55°, the hull was cold to the touch. So I put the heater on, hanging from above and blowing heat into the hull. I used the EPS insulation sheets and some wood & cardboard to keep the heat in. That warmed it up good.
I’ll do the other half side tomorrow, since it doesn’t look like it’s going to set up firm enough not to run yet.

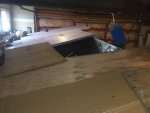
Good call on the broken rivets WM, that makes sense. I’m going to cut the EPS to fit near snug, which should support the stringers in the even some break again.

I havent gone through the site to check this myself, but I noticed that there are 2 holes on most of the stringer to rib & deck spots. Yet there are only 1 rivet hole at the ends of the ribs. That suggests that either they didn’t rivet there from factory, or the rebuilder didn’t put them in. I’m leaning to the later, but I don’t remember if I drilled them out there, and the wood is gone. A couple of those holes are on the very edge of the rib, but most are good.
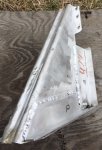
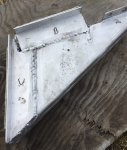
I thought of adding a slim strip of Aluminum on the stringers to prevent issues of drilling another hole that bridges the 2 previous, or is otherwise weakened by the other holes. I have a good assortment of rivets, so I might be able to do that. Although they did mess up my order and shorted me on one of the longer LF rivets ordered.
Any advice on how to drill holes in a way to avoid issues from previous holes? I’m not sure using paint or something to mark the holes in the stringers when the deck is laid on top, then removed and drilled, would work. And I can’t think of any thing else, and it will be next to impossible to check the rivets after the deck is down. Maybe not impossible, but a hassle for sure. GoPro on a stick is about all I can think of to inspect.
I have to get my knee brace finalized and welded soon. My transom wood has been at the foot of my bed for a couple months now and the wife can’t stand it, lol. I have a few cups of S1 epoxy sealer left, and might put another coat on the whole thing after it’s cut and the deck rivets are in.
I’m planning on over drilling the transom holes and then filling them with Marine Tex, and redrilling to proper size, as others do. I wonder if doing the same to the deck rivet holes would be time well spent?

also does anyone have the seat pedestal position measurements handy? I know it’s not a set position but I’d imagine most people use the same location with an inch or so. I was thinking of adding a small aluminum plate on the underside of the deck, and doubler, to act as a gusset. That’s likely overkill and not needed, but I’m also considering the same for a ski-pylon mount. I hate the idea of using the transom for pulling anything, even though I don’t plan on pulling anything more than pre-teens on a tube.
 

PlayD0h

Petty Officer 1st Class
Joined
Apr 23, 2009
Messages
326
[No message]
 

Attachments

  • photo310438.jpg
    photo310438.jpg
    526.6 KB · Views: 1

Watermann

Starmada Splash of the Year 2014
Joined
Jan 12, 2013
Messages
13,753
I can't help with measurements on the location of the pedestals but the way I did my SS was to lay in all the decking, the consoles and position them with the seat attached to get the distance for me. You could also use a 5 gal bucket if you don't have the seats yet. :lol: I also added a seat slide as well to have that perfect adjustment.

I used 3/4" ply for a backer on the underside, glued and screwed. Of course the decking ran length ways in the V5 models.

y4mGOUuutpBUtd9b7FnjsSS1AiaNRJ86X-ICDgcNRSQwQNOB_dtL86zM2nWoLk_sydMma3h9ohJ4-q37EWVXxxNyK9ZM2C-u_WFslID1vwensvivIfArAkQvJaTOxRV-6-Q_Kfg9LmxtQw33PUt9J-thhb43Jb5Y5fgkKvAScJozkvW_inxMqjdfFHmtoN_if2bdULmjSHJPyiGSgPlHNCEZw


Finding those original rib end holes has been the bane of all of us that came before you. The rib ends are not a critical area that sees any flexing type stress so an extra hole there is not really an issue, at least to me. I've not seen any ribs have cracks on the ends due to where the deck rivet holes are, just in the belly of the boat and not too many of those on SC boats. I used the longer LF rivets and moved the new holes inward a short distance just to miss the original holes as to not have an over sized hole for the new rivet.
 

PlayD0h

Petty Officer 1st Class
Joined
Apr 23, 2009
Messages
326
If anyone is considering those ‘low heat’ (400-600°) aluminum ‘braising’ rods, don’t waste your time. It’s really just aluminum solder, and all it does is stick to the Aluminum no stronger than a glue would. I filled a hole in a test piece and you can fairly easily knock out the plug. The YouTube videos are misleading, yet I knew it wasn’t likely going to work for my needs. $10 was worth the shot.
Ive considered adding a sheet of aluminum on the inside of the transom, 5200’d in place and just Marine Tex over the unwanted holes. It’s that or welding. Either I bring the boat to the welder, or rent / buy one. I will be attempting to cover the exposed wood of the transom at least, with a sheet of aluminum.
I have enough wood to add doublers to the entire deck from the console back, so seat location won’t really matter I suppose. I want 4 pedestals for travel, and 2 for casting, and don’t mind moving a seat, yet I plan on getting 4 travel and 1 casting, maybe 2. Aside from driver and passenger, I’d like the mounts to be flush and seats removable. I didn’t expect buying seats to be as complicated as it is.
There seems to be only 3 or 4 manufacturers and the whole travel seat needing to be rated has me thinking I’m going to want to buy them at a store.
Any recommendations on seat brands and style? I’m hoping to spend around $500 on the whole lot, with the 4 travel being required to start with. I don’t need air ride, but adjustable and sliding would be good.

I want my interior exactly like the new SC renegade, to the point I’ve considered trying to buy one with a 30 trial period, lol. That or I’ll need to strap on the GoPro and spend an hour or so with a tape measure at the boat shop where they have them for sale. I don’t think they’d mind me blueprinting for a while.
 

Watermann

Starmada Splash of the Year 2014
Joined
Jan 12, 2013
Messages
13,753
The helm ABYC ratings applying to pedestals is where to be most concerned, not sure I've seen any ABYC ratings on folding seats but good quality is normally around 100 per seat.

ABYC_PAGE_web.jpg
 

PlayD0h

Petty Officer 1st Class
Joined
Apr 23, 2009
Messages
326
I snagged a TIG welder today. $1200 regular on clearance for $650 at Princess Auto (Canadian Harbor freight). I need a regulator, foot pedal and bottle. Oh and learn how to TIG, lol.
My knee-brace will be aircraft worthy when I’m done, and filling transom holes. That and my splashwell / casting deck. My power bill might be through the roof though, lol.
 

Watermann

Starmada Splash of the Year 2014
Joined
Jan 12, 2013
Messages
13,753
Oh man that is super, I'd love to have a TIG but like you would have to learn how to use it. Although it couldn't be too tough to master if you have experience with the other types of welders. Right now I just want me a little cheapo buzz box wire feed for welding steel, tired of borrowing for odd jobs.
 

ShoestringMariner

Lieutenant Commander
Joined
Apr 18, 2015
Messages
1,563
I snagged a TIG welder today. $1200 regular on clearance for $650 at Princess Auto (Canadian Harbor freight). I need a regulator, foot pedal and bottle. Oh and learn how to TIG, lol.
My knee-brace will be aircraft worthy when I’m done, and filling transom holes. That and my splashwell / casting deck. My power bill might be through the roof though, lol.

Wow, I had no idea PA had AC/DC TIG’s. Great price.
Pedals are great except when you have to stand. Do they have finger scroll controls available?
 

PlayD0h

Petty Officer 1st Class
Joined
Apr 23, 2009
Messages
326
Oh man that is super, I'd love to have a TIG but like you would have to learn how to use it. Although it couldn't be too tough to master if you have experience with the other types of welders. Right now I just want me a little cheapo buzz box wire feed for welding steel, tired of borrowing for odd jobs.

I got an old Lincoln buzz-box (tombstone) for $100 years ago. It’s AC Stick, so not very versatile. But 220 amp and I haven’t had anything I can’t weld yet. Mig is nice if your doing lots of welding, or you spend big bucks. Or rent, since there’s quite a bit that can go screwy, like wire feed / jams. Shielding gas, regulators, or flux-core, that adds up.
You can get a rod for anything, even gouging. You can get a new basic mig, without regulator for $150 here when their on sale, yet you can only weld thinner Steel. I can weld 5” thick hardened steel. Yet they both have their place.
Dont forget to add in the price of 10 gauge wire and breaker if you aren’t set up yet.
 

PlayD0h

Petty Officer 1st Class
Joined
Apr 23, 2009
Messages
326
Wow, I had no idea PA had AC/DC TIG’s. Great price.
Pedals are great except when you have to stand. Do they have finger scroll controls available?

I don’t think it has finger scroll, but it has tons of settings that would make one not necessary. Ignition amperage and time set auto welding amperage, up slope and down slope. You can even have the frequency change mid weld.
If your interested in one, you better act fast. Their on clearance and they pop up in online stock when a store finds one left, or sells the floor model. It will say sold out, or just completely unavailable anymore. Then hours later have 3 in stock.
Foot pedal is on sale for $100 now also. I’d guess if you got a different whip, that was compatible and had finger scroll you would just plug that into the Remote port on the welder. Heck you could probably make one if your techy enough.
 

ShoestringMariner

Lieutenant Commander
Joined
Apr 18, 2015
Messages
1,563
I don’t think it has finger scroll, but it has tons of settings that would make one not necessary. Ignition amperage and time set auto welding amperage, up slope and down slope. You can even have the frequency change mid weld.
If your interested in one, you better act fast. Their on clearance and they pop up in online stock when a store finds one left, or sells the floor model. It will say sold out, or just completely unavailable anymore. Then hours later have 3 in stock.
Foot pedal is on sale for $100 now also. I’d guess if you got a different whip, that was compatible and had finger scroll you would just plug that into the Remote port on the welder. Heck you could probably make one if your techy enough.

LIKE BUTTON ENGAGED.

I would but play play money doesn’t come easy for me and Very luckily I can use one at work..

but thanks for the tip, I will share that with the guys at the guys at the shop
 

PlayD0h

Petty Officer 1st Class
Joined
Apr 23, 2009
Messages
326
I welded on 4 of the 6 outer brackets to the knee brace. Their not gorgeous welds but sound. My knee brace could double as a 747 wing bracket when I’m done with it, lol.
 

Attachments

  • photo311755.jpg
    photo311755.jpg
    441 KB · Views: 4
  • photo311756.jpg
    photo311756.jpg
    291.7 KB · Views: 4
  • photo311757.jpg
    photo311757.jpg
    685 KB · Views: 4
  • photo311758.jpg
    photo311758.jpg
    1.2 MB · Views: 3
Top