California Chieftain Repair and Resto 1974 18'

Candutch

Chief Petty Officer
Joined
May 8, 2015
Messages
637
:welcome: to the Starmada Dylan. Great boat you have there, my next one will be a Chief OB if I can ever find one. Tons of great info here for your rebuild and more knowledge than you can imagine. Ask lots of questions and above all enjoy the experience of a restoration.

Looking forward to watching your restore progress.:canada:
 

Fat Helen

Seaman Apprentice
Joined
Jan 29, 2018
Messages
32
Hi guys,

I've been trying to get my hands on some rustoleum or even klean strip aircraft stripper but it cannot be found in the stores around here. Bay area in California has some weird air quality regs that don't allow stores to carry the good stuff.

Came home from Wal-Mart with some Klean Strip pro stuff but it really only strips one layer of paint at a time. It's doing it's job but takes a bit more elbow grease and product to get it done. I'll see if I can place an order for the good stuff online.

Thanks for the tips,

-Dylan
 

Watermann

Starmada Splash of the Year 2014
Joined
Jan 12, 2013
Messages
13,753
I've had really good luck using the Jasco, as long as the temps are up over 80 these strippers works really well.

026452100037.jpg
 

oldhaven

Chief Petty Officer
Joined
Aug 30, 2015
Messages
568
This will be fun to watch, as I was in the same place you are 3 years ago. Lot's of good information in the Starcraft forum and for outboard Chief particulars mine is about the same as yours so check out my project thread if you haven't already. it includes some pictures of how I dealt with transom corrosion. It appears that you are already more of an expert than I was when I bought mine.

Ron
 

Fat Helen

Seaman Apprentice
Joined
Jan 29, 2018
Messages
32
I had some good weather this last Saturday and got a fair amount of stripping done. Like most of you have mentioned temperature is key for these products to work well. With the ambient temperature around 70 and the boat in direct sun the stripper did a much better job at getting through all the layers of paint and primer.

Temps have since dropped so I'll turn my attention to sourcing wood for the transom, deck, and bulkhead. Hopefully with the long weekend I'll have time to lay some pieces up.

Hello there Ron, glad to see I have you following my restoration. I've read through your project thread many times and love how your Chief turned out. I really like how you dealt with your transom and I already have ideas of potentially doing something similar.

Thanks for the help.

-Dylan
 

Fat Helen

Seaman Apprentice
Joined
Jan 29, 2018
Messages
32
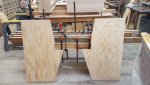
Had some help and made good progress over the long weekend. Got most of the inside and gunwales stripped down to bare aluminum during the one warm day we had. Once it cooled down I finally got to do something constructive rather than destructive. Transom pieces have been laminated together and cabin walls are cut out. All seemed to turn out great.

Latest discovery was the deformation at the port bow rub rail. I knew the PO had hit something hard because the rub rail was pretty smooshed. Once I took it off I could see where the hull meets the bow cover is off about 5/8". Awkward to get to from the inside so I may try and pull it from the outside and rivet back in place. Ideas are welcome. I'll keep working on pounding the rub rail itself back into shape but if anybody has found luck with a replacement I'm open to suggestions. Something similar to the originals has been hard to come by online.

Have a good week gentlemen.

If you want to see some real craftsmanship check out the last photo I've posted. My brother redid the gunwales on a kevlar mad river canoe he bought off craigslist. Six coats of urethane later and she is shiny!

-Dylan 20180219_195436_001.jpg20180219_184918.jpg
 

Attachments

  • 20180219_184933.jpg
    20180219_184933.jpg
    1.2 MB · Views: 0
  • 20180219_184953.jpg
    20180219_184953.jpg
    1.3 MB · Views: 0

Watermann

Starmada Splash of the Year 2014
Joined
Jan 12, 2013
Messages
13,753
The hull repairs can take a bunch of your time but the rub rails are nearly impossible to repair and even tougher to find not to mention get your hands on. The RRs aren't riveted on, they're attached by 2.5" long SS slot head machine bolts with nuts on the inside. My SS had been smashed in the same area but Starboard side.

That canoe has some serious shine going on alright!
 

oldhaven

Chief Petty Officer
Joined
Aug 30, 2015
Messages
568
From the looks of that shop you shouldn't have any trouble with the woodwork on the Chief. Those cabin bulkhead panels look great.
 

Fat Helen

Seaman Apprentice
Joined
Jan 29, 2018
Messages
32
Quick question before I go spending more money. What is the recommended thickness of the deck? My local supplier has a 5 ply marine product that's 1/2" but what came off the boat was 5/8". Would I be compromising rigidity too much by going with 1/2"?


-Dylan
 

Watermann

Starmada Splash of the Year 2014
Joined
Jan 12, 2013
Messages
13,753
I used 1/2" 5 layer ply on my Chief, added some supports where needed using angle AL especially at the deck joints. You can also have added support by adding the flotation foam in way that it adds support. It will still have some spring to it but I wasn't building a flight deck.
 

Fat Helen

Seaman Apprentice
Joined
Jan 29, 2018
Messages
32
Spent the weekend removing windscreens and stripping paint. Above the gunwales is almost bare and the inside is coming along. Hoping for a sunny week soon so I can make good progress on the sides. Slowly but surely the paint is falling off.

Looking forward to putting things back together rather than taking them apart.

20180225_174003.jpg
 

MD28

Petty Officer 1st Class
Joined
Sep 1, 2016
Messages
222
Keep it up! Paint removal is the worst part I think.
 

nrf414

Chief Petty Officer
Joined
Feb 16, 2008
Messages
573
I agree with MD. So far my least favorite part. We know Watermann it's trailer work. The good stuff is coming!!
 

Watermann

Starmada Splash of the Year 2014
Joined
Jan 12, 2013
Messages
13,753
Amen, yeah paint stripping is a close second for being the worst but hey at least you're working on the boat.
 

Fat Helen

Seaman Apprentice
Joined
Jan 29, 2018
Messages
32
Spirits are high today! With the cool weather hindering paint stripping I got to work on the transom. A little sanding to get a nice fit and in she went. First thing that has actually gone back on the boat since the start of this project. Time to seal it up and put it in for good.

-Dylan 20180227_173019.jpg20180227_173441.jpg
 

Watermann

Starmada Splash of the Year 2014
Joined
Jan 12, 2013
Messages
13,753
Mark the though holes while the transom is in there and drill them with it out on a flat surface, A drill guide makes for super straight holes which is very important for the motor mount holes. You can also get sealant down into the holes too.
 

nrf414

Chief Petty Officer
Joined
Feb 16, 2008
Messages
573
Spirits are high today! With the cool weather hindering paint stripping I got to work on the transom. A little sanding to get a nice fit and in she went. First thing that has actually gone back on the boat since the start of this project. Time to seal it up and put it in for good.

-Dylan

Looks great!!! It is a definitely good feeling seeing parts going in instead of coming out
 

Fat Helen

Seaman Apprentice
Joined
Jan 29, 2018
Messages
32
Minimal progress on the boat itself but I did get my 90 hp yamaha put back together. It had been apart for a few months while I replaced gaskets and seals. I had a fuel leak coming from the bottom of the crankcase which required changing all the oil seals that go around the drive shaft. The wear and tear of dropping and reinstalling the lower unit had tore some of the seals in half. It was a nice victory to not have fuel running down the midsection once I got it running. Music to my ears hearing that two stroke rumble again. One less thing to worry about (and spend money on).

It's been a great learning experience tearing this motor apart and putting it back together. Pretty confident do-it-yourselfer at this point.

More paint stripping soon once the weather warms.

Happy boating,

-Dylan

20180305_174249.jpg20180306_181941.jpg
 

nrf414

Chief Petty Officer
Joined
Feb 16, 2008
Messages
573
Nice stand!! Been thinking about building one too. Just don't have a need right now but would be nice to store my kicker on when not in use
 

Fat Helen

Seaman Apprentice
Joined
Jan 29, 2018
Messages
32
Been keeping at it removing paint when the weather permits. The inside hull has most of the paint gone but really needs a once over before it can be called good until gluvit and paint time. What's everybody's technique in getting to this step? Still some haze and film from the paint that i'd like to get rid of.

Headed back from work today and saw a Chieftain being towed to its new home. I had been keeping an eye on it on craigslist for awhile. Someone must've have really wanted it because they drove the 800 mile round trip to Los Angles to get it. Looked to be in good shape too. Maybe I wont be the only Chief on the water come splash time!

Best,

-Dylan
 
Top