1984 Starcraft 16ft Glutton for Punishment [Splashed July 2019]

Status
Not open for further replies.

66Holiday924

Chief Petty Officer
Joined
Aug 21, 2017
Messages
525
Awesome work! It's going to be a good feeling to know how well you put everything together when you're using the boat someday. Those cleats are cool!
 

SHSU

Lieutenant Junior+Starmada Splash Of The Year 2019
Joined
Mar 8, 2017
Messages
1,665
Had my little Admirals (daughter) 4th Birthday this weekend!!! So didn't get a lot done. Really pushing to try and get this done as she wants to go to the beach.

Spent time polishing up the rod holders that I kept from the tear down. You can see the before and after. Didn't use the wire brush in the back, that is just there from some other part I did
DSC04151.JPG

Install of the horn
DSC04154.JPG

Installed the USCG placards and HID tag. I put one up here since I got two when I ordered them
DSC04155.JPG

Install of the rod holders. They were a B@+*^ to install. I didn't take any pictures of it, but I cut up some aluminum stock to use as backing underneath. If they need to be replaced, i think I might just buy another project boat..... Bedded as usual with 5200. Was going to use 4200, but my tube that I had opened last week had already cured. They weren't kidding about 24 hours was all the time you had. Stored like I did with my 5200, still didn't keep.
DSC04158.JPG

Other side with rear Nav Light mount installed
DSC04159.JPG

Cable boot installed with 5/32 rivets and rear HID installed as well
DSC04160.JPG

Hoping to get to my gas fill cap tonight and the windows later this week.

Until next time

SHSU
 

SHSU

Lieutenant Junior+Starmada Splash Of The Year 2019
Joined
Mar 8, 2017
Messages
1,665
Soooo, got back out of the hospital again after an 11 day stay this time.... Think we have my issue under control and I can continue to slowly recover. Before going back in and since coming back out have been able to do a little, so here are the updates I have:

Thanks astor / oldrem
I was able to get the rub rail ordered and it arrived. Was a perfect fit. Plus I ordered 36' and they sent me 43'!!! So I have plenty left over. I was able to insert as oldrem suggested with a putty knife and it went like a breeze.

DSC04164.JPG

Was able to test fit and install the windshield as well. I had to add a 1/4" spacer at the end to account for the 3/4" ply I used for the decking. Was able to get it to fit and windows aligned with a little trimming here and there. Happy overall with how they came out

DSC04169.JPG

Got a rubber gasket from the big box store and used that to help cover the gap at the bottom.
DSC04183.JPG

Added 5200 to seal the bottom and prevent any water from getting underneath
DSC04184.JPG

Used the old dash as a template and cut out the new dash from 1/2" BCX. The driver side I glued (TightBond III) an extra backing to it for the steering wheel/additional support. The screws were later backed out and filled with epoxy. I gave it a coupld soak coats of 50% acetone/50% Fasco Epoxy to seal up the wood. Will be covering it with Rustoleum Marine Topside paint.

DSC04185.JPGDSC04186.JPG

Dash temporarily installed with cardboard cutouts to show where I will be putting gauges and general setup. Left to Right: 3" Tach, 4" Steering, Top Row: 2" Fuel gauge, 2" Temp gauge, Bottom Row: 1" AMP/Volt Meter; 1" USB charger. Right of all of that will be where switches will be installed in a panel I will make up, but the cut outs give me a general idea of how much room I will have.

DSC04190.JPG

Added some fishing pole holders on the splashwell as well. Used 2 pieces of 1/2" UHMW to maker backer so I could screw fuel filter and other things back into it.
DSC04188.JPGDSC04189.JPG

Well, that is where I am at now. Slowly making progress and hope to have her in the water this Summer!!! Will keep ya'll posted. Until next time....

SHSU
 

Attachments

  • DSC04180.JPG
    DSC04180.JPG
    89.1 KB · Views: 11

oldrem

Commander
Joined
Nov 7, 2013
Messages
2,002
Sorry to hear you've been ill, but glad to hear you're recovering. Looking good.
 

sopwithcamel74

Petty Officer 1st Class
Joined
Aug 15, 2018
Messages
203
Really nice work, man. Hope you're feeling better soon; can't wait to see that dash completed!
 

66Holiday924

Chief Petty Officer
Joined
Aug 21, 2017
Messages
525
Very nice work! Do what the docs say, get well and keep up on the excellent job you are doing!
 

SHSU

Lieutenant Junior+Starmada Splash Of The Year 2019
Joined
Mar 8, 2017
Messages
1,665
Part 1 of 2

Back at it again. Slow progress, but progress is progress.....

Built the front seat section cushions that I put the snaps in earlier for (Will talk about that later).....
Took a pool noodle and cut it in half. Used a solo cup to make a crude jig.
DSC04205.JPG

​​​​​​​Epoxied some 3/4 BCX plywood scraps and then hot glued the half foam to it. Covered that with some outdoor vinyl and secured with 5200 and SS staples.
DSC04208.JPG

Installed. The snaps did not work.... They would hold the cushions in place, but once anyone leaned on them they popped off. So I took some SS screws and lagged them through with a 1/4 spacer and 5200. They aren't going anywhere and not sure why I didn't do that in the first place.

Side note too, you will notice the front seating platform has been covered with the Shark Nautolex and tested in place. It is removable and has a seat mount for fishing. More on that later
DSC04216.JPG

Starting electrical. Removable waterproof connectors for future flood lights. Waterproof connector, covered in liquid electrical tape and then covered in regular electrical tape. One per corner, so four in total
DSC04218.JPG

Installed the passenger console using 3/16 rivets and 5200. Also the two SS cup holders. Driver side is just temporarily installed. Waiting until I cut holes for all equipment with the drill press before I permanently install.
DSC04219.JPG

I didn't have anything to cover the hole I had for the fuel hose. So I thought about it for awhile and then realized I could take some of the extra 5/8 fuel tube I had, cut it in half and then run it along the edge. As usual, used SS screws and 5200. It will help protect the edge of the Nautolex in that area
DSC04221.JPG

The spacer plate I made for the throttle control, I covered with thinned Fasco Epoxy and then Rustoleum Marine Top paint. But didn't like the idea of using 5200 with the bolts I was going to have to put through it. So found some extra plastic 1/4 shim spacers and installed them in the spacer plate. Secured in place with JB weld. That way overtime the rubbing from movement wont be rubbing on the wood spacer but plastic shim. Not a critical area, but something that I had so figured I would do it.
DSC04223.JPG

Cut an electrical outlet hole for the on board charger in the front of the passenger console
DSC04225.JPG

Installed with SS bolts and 5200
DSC04243.JPG
 

SHSU

Lieutenant Junior+Starmada Splash Of The Year 2019
Joined
Mar 8, 2017
Messages
1,665
Part 2
The electrical outlet allowed a little to much movement when trying to plug in... So i modified the adapter with some JB Water Weld to make a perfect mold. No movement now
DSC04244.JPG

Prepping the adapters for the Fuel/Water filter. You will notice I had to modify/cut down one of the adapters so I could screw it in. Did 90 degree fittings so they will point down and not out and then curve down.
DSC04229.JPG ​​​​​​

Screwed into the filter mount. Used some permeaex gasket sealant on the threads
DSC04231.JPG

Installed on the mount added earlier. You will notice that I also changed the angle of one of the adapters as the fuel line would have run into the livewell tank if I had left it. Also added the control box for the Trim/Tilt control box
DSC04239.JPG

Connected the extension wire I had pre-installed for the on board charger. I debated on cutting the leads and doing a "proper" butt connection but decided I didn't want to void the warranty by cutting the wire. So I twisted through, covered in liquid electrical tape, and then covered with multiple layers of electrical tape. Also created the connections to hook the front two batteries in parallel
DSC04245.JPG

The battery connection I was going back and forth on how to connect everything together. People have different opinions on how to create a good connection, and ring connections stacked on top of each other isn't a preferred or recommended method. So thinking it over, figured I would use standard battery terminal connector but use the screws as ring points. So all rings would have direct connect to the battery terminal in some way. As usual, waterproof connector covered with electrical tape
DSC04247.JPG

Final wiring in place for the on board charger. It isn't the prettiest, but had to leave plenty of extra wire so I could remove the battery and put it back underneath all while connected. Nice thing is you will never see it except for here and in my head...

DSC04252.JPG

Testing/using the on board charger. Also the cleat works great as a tie off point for the extension cord
DSC04255.JPG


Little Admiral testing the bow seating area and new cushions. Was quite happy to sit down for a couple hours while I worked and watched a couple movies
DSC04249.JPG

Also testing the front seat mount as well. Both areas passed her high standards!!!!
DSC04256.JPG

I started to move stuff around in the garage so I can get to the motor, as I am not far off from needing it again. It has been sitting for almost 2 years now, so I am excited to get it back out after all the work I did on it early on.

So that is all I have for now. Until next time

SHSU
 

sopwithcamel74

Petty Officer 1st Class
Joined
Aug 15, 2018
Messages
203
Lots of great stuff there. Big fan of the battery terminal connectors; I bought a few pairs for my refit.

By the time I get started, my on-board charger warranty will likely have already lapsed :Cry: I'll probably opt to cut back my cord a bit. Also considering going with in a fixed outlet for ultimate convenience.

Keep it coming!
 

Watermann

Starmada Splash of the Year 2014
Joined
Jan 12, 2013
Messages
13,753
Lots of smalls add up big time, your SS is really taking shape and looks great! I bet the Lil Admiral is going to love getting out on the water in that safe, better than new boat :thumb:
 

poorboy1990

Cadet
Joined
May 11, 2019
Messages
19
Great looking boat. I have had fun reading through your posts. It has given me some great ideas to do with my rebuild.
 

SHSU

Lieutenant Junior+Starmada Splash Of The Year 2019
Joined
Mar 8, 2017
Messages
1,665
Got some time since I last post to do some more work over a couple days.

Decided it was time to get the motor out, so started moving some stuff around in the garage. Eventually got the lower unit off and out for inspection again. Last time I ran it I was getting water in the lower unit even after adding all the seals. So pulled it off to inspect and give it another good look. Didn't take any pictures of it, but filled a trashcan full of water and stuck the lower unit in with an air hose to an oil port. In the end, I found out I didn't tighten all the bolts.... I was worried about stripping them out back when I was rebuilding the motor. Tightened them back up and happy with the results.

Click image for larger version  Name:	DSC04257.JPG Views:	1 Size:	103.5 KB ID:	10747453

I figured while I had the lower unit off, I met as well re position the motor on the stand I had built. I don't have a good pic, but when I was rebuilding it I put it on the stand backwards. So the braces were not pointed in the right direction. I left it like that for 2 years. Finally decided to change it.
Click image for larger version  Name:	DSC04258.JPG Views:	1 Size:	122.0 KB ID:	10747454

Didn't take any pictures of it, but hooked up the engine to start it and test it out before doing more work. Spent about 20 minutes sitting trying to start the motor. Starter was working fine, it was getting gas, I could see exhaust, but she wouldn't fire.... I was getting a little frustrated, when I remembered I had added kill switch wiring, kill switch not installed yet. So I unhooked the wires, and she fired up and caught first try!!! So I was very happy at that point and glad that everything was working and it was just a simple wiring issue.

Also decided that it needed another paint job after sitting idle for two years... Decided I would just use Rust Oleum Professional Enamel primer and paint this time. I used a degreaser for Autozone to get all the grease off and then wiped it down with vinegar and acetone. Before using the primer. Forgot to get a shot after just the primer, but you can still see it through the first coat I put on of the black.
Click image for larger version  Name:	DSC04263.JPG Views:	1 Size:	114.2 KB ID:	10747455

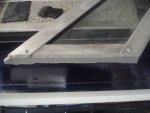
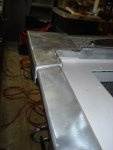
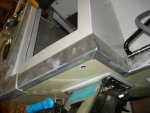
Got the bow cap, stern caps and transom cap back from my welder. Happy with how they turned out
Click image for larger version  Name:	DSC04264.JPG Views:	1 Size:	102.5 KB ID:	10747456
Click image for larger version  Name:	DSC04268.JPG Views:	1 Size:	87.1 KB ID:	10747457
Click image for larger version  Name:	DSC04267.JPG Views:	1 Size:	68.5 KB ID:	10747458

Installed a high speed pickup over the intake. I had to drill out the pickup bracket to fit over the existing intake. I used 3/16 blind rivets with 5200 as usual
​​​​​​
Click image for larger version  Name:	DSC04272.JPG Views:	1 Size:	58.1 KB ID:	10747459

Bow cap and anchor chocks installed. Used bolts and 5200 for the bow chocks so they wont be going anywhere
Click image for larger version  Name:	DSC04273.JPG Views:	1 Size:	107.7 KB ID:	10747460

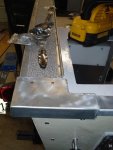
Drilled the holes for the driver console. I changed my mind on how I was going to do it. Moved the Tach/Fuel/Temp gauge to the far left, steering wheel, then USB Charger/Volt Meter and finally the open spot for the switch cover
image_313661.jpg

I decided to clean the garage out as well... I couldn't sleep one day and started working on it at 0530. The admiral commented that it was funny to look outside at 0700 and find your entire garage on the front lawn.


image_313662.jpg
 
Last edited:

SHSU

Lieutenant Junior+Starmada Splash Of The Year 2019
Joined
Mar 8, 2017
Messages
1,665
Part 2

With the garage "clean".... My brother came over and helped me mount the motor. As you can tell, OSHA would be very happy with our setup...

DSC04282.JPG

First time in 2 1/2 years the boat has had a motor on her!!!! I was super excited and she is finally starting to looks like a real boat

DSC04284.JPG

Also, proof of concept occurred with the clean garage. I was able to prove to the wife that the boat and her vehicle could fit in it at the same time!!!! Now it was for only 20 minutes.... But it still counts :lol:. She will be in there permanently after I am done with the project and I can take down the tables I have setup to work on...

DSC04285.JPG

Back to the boat, made the motor mount bracket with 2 inch aluminum stock. Copied the idea from several other iBoater's I have seen on the forums.

DSC04287.JPG

Also made the brackets for the bottom bolts as well.
DSC04290.JPG

Did the final install of the driver console. Used 3/16 blind rivets and 5200 as usual. Currently test fitting all the components again after sealing (Painting) the cut holes. You will also see the switch panel that I fabricated. There are 10 switches with a kill switch and livewell timer. Will get into specifics when I hook up the wiring
DSC04291.JPG

Close up of front of panel. Used scrap 1/8th aluminum I had from cutting out the livewell holes in the splashwell.
DSC04294.JPG

You can see the diagram I marked into the back to center/align my holes
DSC04295.JPG

Well, that is what I have thus far. Not nearly as many pictures as I wanted to show ya'll but little admiral borrowed the camera and I couldn't find it for awhile... All good though, in the end progress has been made. Hope to have her in the water here shortly.

Until Next Time

SHSU
 

classiccat

"Captain" + Starmada Splash Of The Year 2020
Joined
Dec 20, 2010
Messages
3,405
Congrats on getting the lower unit issue sorted...and the motor mounted...and the admiral briefly getting to see her car parked in the garage :lol:

It's really coming together SHSU! :thumb:
 

Watermann

Starmada Splash of the Year 2014
Joined
Jan 12, 2013
Messages
13,753
Won't be long now!

Interesting caps you had made, I was wondering how a guy could fab some up other than sand casting.
 

SHSU

Lieutenant Junior+Starmada Splash Of The Year 2019
Joined
Mar 8, 2017
Messages
1,665
Won't be long now!

Interesting caps you had made, I was wondering how a guy could fab some up other than sand casting.

I had given my welder the below plans and some templates for the bow. He came over a couple times to measure and test fit the piece before final welding/assembly. If I used a "normal" shop I doubt they would have come over and taken the time that my guy did. So really happy with how they turned out.
IMG_3735.JPG
IMG_3734.JPG

Pictures of finally assembly. You will notice the aft caps are slightly different then the design. My welder suggested cutting out some of the railing to make it sit more flush (Circled in red). So I did that it and it really did make it sit much tighter as you can see.
DSC04301.JPG

Final fitting included at least two stainless steel bolts with lock nuts and 5200. Read on other people's threads their caps falling off in the middle of the lake because a rivet gave way. Didn't want to leave that to chance. You can also see where I rolled (beat with Mallet) the edge to slightly follow the transom angle.
DSC04305.JPGDSC04306.JPG


SHSU
 

Attachments

  • DSC04302.JPG
    DSC04302.JPG
    71.6 KB · Views: 10
  • DSC04304.JPG
    DSC04304.JPG
    81.7 KB · Views: 10
  • DSC04303.JPG
    DSC04303.JPG
    94.6 KB · Views: 9
Status
Not open for further replies.
Top