1984 Starcraft 16ft Glutton for Punishment [Splashed July 2019]

Status
Not open for further replies.

66Holiday924

Chief Petty Officer
Joined
Aug 21, 2017
Messages
525
For the bolts, I tried my local Ace as well and couldn't find what I needed. So will have to order them online :grumpy:. Something else I will have to wait for to come in....

I found 316 stainless bolts for my transom online at bolt depot. They were at delivered quickly.
 

SHSU

Lieutenant Junior+Starmada Splash Of The Year 2019
Joined
Mar 8, 2017
Messages
1,664
I found 316 stainless bolts for my transom online at bolt depot. They were at delivered quickly.

Yep that is where I got mine. Unfortatnely, I think i cross threaded one of the nylon lock nuts and sheared the head off the bolt trying to remove it.... Had to order another bolt and nut to finish the job, but order a second one too just in case.
 

SHSU

Lieutenant Junior+Starmada Splash Of The Year 2019
Joined
Mar 8, 2017
Messages
1,664
Other plans got postponed so got to do some work this weekend.


Installed all the bolts (except one). Squirted 5200 into the hole before liberally adding it to each screw to make sure I got it all over the interior of the transom to protect it. I would not want to be the person that tries and take this boat part.....
DSC03801.JPG

Did the same to the Transom U bolts.
DSC03824.JPG

Next steps are figure where my access hatch needs to go to get at the fuel lines. Then I will cut hole before I epoxying the plywood. Once that is done, I think I can actually start laying the vinyl i bough 2 months ago!!!!!
 

Attachments

  • DSC03813.JPG
    DSC03813.JPG
    71.7 KB · Views: 11
  • DSC03814.JPG
    DSC03814.JPG
    79.6 KB · Views: 10
  • DSC03816.JPG
    DSC03816.JPG
    64.5 KB · Views: 10
  • DSC03823.JPG
    DSC03823.JPG
    87.9 KB · Views: 10
  • DSC03818.JPG
    DSC03818.JPG
    105.7 KB · Views: 8
  • DSC03811.JPG
    DSC03811.JPG
    69.3 KB · Views: 8
  • DSC03810.JPG
    DSC03810.JPG
    87.8 KB · Views: 9
  • DSC03808.JPG
    DSC03808.JPG
    51.6 KB · Views: 9
  • DSC03805.JPG
    DSC03805.JPG
    61 KB · Views: 9
  • DSC03804.JPG
    DSC03804.JPG
    81.4 KB · Views: 9
  • DSC03797.JPG
    DSC03797.JPG
    80.5 KB · Views: 10
  • DSC03822.JPG
    DSC03822.JPG
    72.9 KB · Views: 10

MD28

Petty Officer 1st Class
Joined
Sep 1, 2016
Messages
222
Very good and thorough work. When it’s all done you can be confident that you did it right the first time.
 

66Holiday924

Chief Petty Officer
Joined
Aug 21, 2017
Messages
525
That's quite the weekend! I'm enjoying the pictures. What style head did you get for your transom bolts? I ordered two extra bolts, nuts, and washers. I've worked with me before and I know how it goes... Something will get lost, stripped, or snapped. Looking good. I'm really liking the fuel tank!
 

Watermann

Starmada Splash of the Year 2014
Joined
Jan 12, 2013
Messages
13,753
Looking real good, nice to have things going back in isn't it. :thumb:

It's tough to cross thread a nyloc, I would imagine they sent you a nut that was the wrong thread pitch. When I get fasteners at the hardware store I always thread the nuts on the screws just to make sure.
 

baldwibr

Petty Officer 2nd Class
Joined
Sep 1, 2017
Messages
128
Wow! :faint2: That's some very nice work!! I'm like 66Holiday924 , I always buy extras because I know how those things go. I over-torqued a bolt on the transom when I replaced mine and it cost me a lot more in gas than to just have an extra 2 on hand.

I really like how clean and thorough your work is. :thumb:​​​​​​​
 

SHSU

Lieutenant Junior+Starmada Splash Of The Year 2019
Joined
Mar 8, 2017
Messages
1,664
Thanks guys on the compliments. Hoping she holds up for many years to come

@66Holiday924 I got 1/4" coarse threaded Philip Truss Headed at 2 1/2 inches in length. When I ordered the bolts I thought about getting a spare, but I have so many spare parts I am trying to limit it.... Learned my lesson on that one :facepalm:

Watermann Yep, really happy to be putting it back together. I thought it was weird too that I cross threaded it, but figured if there was a way to screw it up I would somehow figure it out . :lol:
 

nrf414

Chief Petty Officer
Joined
Feb 16, 2008
Messages
573
Thanks guys on the compliments. Hoping she holds up for many years to come

@66Holiday924 I got 1/4" coarse threaded Philip Truss Headed at 2 1/2 inches in length. When I ordered the bolts I thought about getting a spare, but I have so many spare parts I am trying to limit it.... Learned my lesson on that one :facepalm:

Watermann Yep, really happy to be putting it back together. I thought it was weird too that I cross threaded it, but figured if there was a way to screw it up I would somehow figure it out . :lol:

I did the same thing at first. I was so happy to be putting things back in when I drilled the holes for the transom.bolts it was a slightly undersized hole and I didn't realize it. Took a break after snapping one and stripping 2 others and then realized I needed one size larger bit. Redrilled, then it was gravy train all the way.

Looking good my friend keep up the good work!!
 

sliver240

Seaman Apprentice
Joined
Apr 23, 2014
Messages
42
Great work! SS Nuts and bolts gall really easy, especially if you try to use power drivers. I learned that the hard way... I only use hand tools now. Keep pounding along and you will be done before you know it!
 

M2HB

Petty Officer 1st Class
Joined
Oct 7, 2017
Messages
206
Yep that is where I got mine. Unfortatnely, I think i cross threaded one of the nylon lock nuts and sheared the head off the bolt trying to remove it.... Had to order another bolt and nut to finish the job, but order a second one too just in case.

If it was a stainless steel nylock nut and bolt, they can lock up as tight as can be if you don't lube them. I have them lock up about 10% of the time without some anti seize lube. I learned that trick years ago. The problem is, I till forget to do it and when I forget, it is always the bolt that I have to remove in a tight location that won't budge.
 

SHSU

Lieutenant Junior+Starmada Splash Of The Year 2019
Joined
Mar 8, 2017
Messages
1,664
M2HB I will have to remember that for the future

sliver240 Ya, I have a weakness for my impact hammer..... My dad keeps telling me it just gets me into trouble, which it does, but for some reason I just love the thing. LOL


Alright, now I am going to need some advise from yall. Was able to get out this weekend and do some mulling over on my next steps. Not sure how I want to prepare my flooring.

Option 1: Pre drill all rivet holes, epoxy, then install in boat. After installed, apply vinyl in one sheet

Option 2: Epoxy, apply vinyl on each sheet (wrapping it under), drilling rivets holes and installing. (Rivets would be exposed)

If there is a third option, let me know.

Also, did ya'll drill and install rivets on the ribs on the sides (Not just the stringers)? Not sure if its needed for structural stiffness.
 

66Holiday924

Chief Petty Officer
Joined
Aug 21, 2017
Messages
525
My project just got expanded to replacing a floor board. I can give you my $0.02 and tell you what I am going to do. The floor takes a lot more beating than the transom does. It gets wet, rained on, walked on, baked by the sun, chemicals and fuel spilled on it, etc. Water, fuel and other chemicals end up caught between your flooring and the wood and do a number on it. With that in mind I am going to:

Treat the wood the same as I am going to do the transom. I'm going with the Old Timer Formula followed by varnish as was recommended for the transom. I am going to treat both sides of the floor. Paint the bottom of it to try to stop damage from mildew. Then I am going to place it, drill holes and rivet it in place. The OTF, being thinned out and applied to the thinner floor wood, ought to soak in and just about treat it all the way through. With that in mind, after my holes are drilled, I am still going to either seal the rivet holes with OTF or caulk them in with 5200, 4200, or 4000. I'll use the caulk if I happen to have caulk open that day, might as well. I would definitely seal the rivet holes with something though. Then my flooring (carpet) will go over top and cover the rivets. Having carpet in my boat there is a 100% chance that the rivet holes will be exposed to water, fuel and chemicals. You might feel differently if you're covering with vinyl.

My boat had rivets at the tips of the ribs. I'm not putting them back in. My boat has a trim piece that ties the side panel into the floor. That piece has a dual purpose. Besides trim, it helps secure the flooring in along the perimeter of the boat. So I think the rivets are not original and redundant. I might put a piece of nitrile rubber in there to eliminate any possibility of vibration. I don't know if your boat has the perimeter floor trim piece. I am going to put a piece of nitrile rubber under the fuel tank also. Just in case there is a leak, fuel don't get caught between the tank and the floor. I was reading Watermann 's Rivets Rivets Rivets page the other day and it was very helpful. There is a way to countersink the rivets if you want to have your flooring go over top of them. If I were using vinyl I would want the extra layer of protection and I would go over top the rivets.

Hey you asked... lol
 

MNhunter1

Ensign
Joined
May 12, 2014
Messages
979
I've used Nautolex now on two different decks. One was over counter sunk rivets, the other over rivets that were not counter sunk. I would definitely do the counter sunk rivets if I were doing another deck.

What I would do... Seal the deck with Helmsman Spar. I feel as though epoxy would provide for better protection, but is somewhat over kill for the deck, especially under the vinyl. If you have the epoxy on hand, go ahead an use it, but I find it more cost efficient and easier to use Spar on the deck and any wood other than the transom. I have used epoxy in place of Spar for the better finish if I was planning to paint over it however.

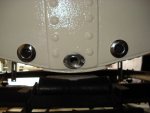
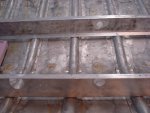
Drill, countersink, and rivet the deck in place after sealing and before the vinyl. Coat each large flange rivet with a nice dose of 3M-5200 when installing. The 3M-5200 will seal up the holes so no need to pre-drill before sealing the wood. Additionally, it's much easier to line up and hit your mark on the stringers and rib ends with one go, rather than hope everything comes together the second time around. Do one deck section at a time, then when the entire deck is installed, go back over the counter sunk rivets with 3M-5200 or Marine Tex to fill in the voids.

Lay the vinyl in one run with 3M80, contact cement, or the Nautolex adhesive.

I would recommend placing rivets in the rib ends in addition to the stringers. It really ties down the floor, tightens everything up, and from everything I can tell, this was standard practice. Granted, the side boards will aid in some security, but they do nothing for the bow or anything under the splashwell. I feel as though you'd be unnecessarily compromising the inherent structural stability of the system (deck, side panels, gunnels, consoles, etc) that were engineered to work together. It's a little extra effort in a much larger undertaking.

I'd only wrap each deck section and install independently if I anticipated ever having to remove the deck in the future.
 

Watermann

Starmada Splash of the Year 2014
Joined
Jan 12, 2013
Messages
13,753
The decking issues have been pretty much gone over, pre drilling holes no way, no how that is a recipe for disaster.

LF rivets through the pre wrapped panels and dip the rivet body in 5200 will seal the water out.

One run and counter sinking rivet heads is more work but most guys now opt for this. I covered the rivet heads too with left over marine tex.

On my SS I did both, base deck is one run and the raised casting decks are wrapped panels.
 

SHSU

Lieutenant Junior+Starmada Splash Of The Year 2019
Joined
Mar 8, 2017
Messages
1,664
Ok so now I am confused. I seem to have recommendations for both/no clear answer.... LOL


So kind of seams most guys recommend option 2. Sealing plywood then sealing rivets and holes with 5200 and then vinyl over that..... Is that what ya'll are thinking????
 

66Holiday924

Chief Petty Officer
Joined
Aug 21, 2017
Messages
525
So kind of seams most guys recommend option 2. Sealing plywood then sealing rivets and holes with 5200 and then vinyl over that..... Is that what ya'll are thinking????

Pretty much. I wouldn't Pre-drill the holes though. I would secure in place.
 

classiccat

"Captain" + Starmada Splash Of The Year 2020
Joined
Dec 20, 2010
Messages
3,405
the build is coming along great SHSU!

Since you have epoxy on hand..and if you have filler (i.e. colloidal silica), another option is to predrill oversized holes and fill with epoxy plugs. Then drill your rivet holes once the plugs are cured.

If you're fastening over the vinyl (pre-wrapped the boards), it would look like this:
iwVqeG8.jpg


If you're laying the vinyl after securing, you can always recess the plug, then go back over the recessed rivet heads w/ epoxy + filler. This route would of course require a larger plug to accommodate the rivet head.
 
Status
Not open for further replies.
Top