Transom woes.

starry-eyed

Seaman Apprentice
Joined
Sep 19, 2016
Messages
36
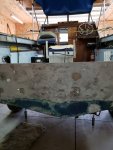
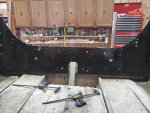
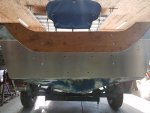
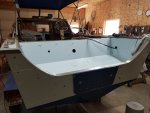
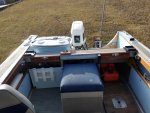
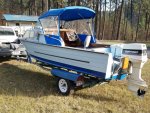
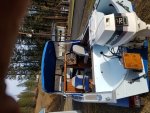
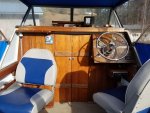
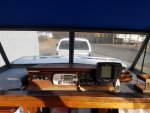
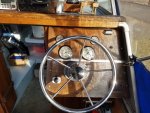
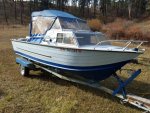
A little more accomplished today and nearing time to bond the new transom plate to the original stern. I was reading "Another Maine Starchief" by Oldhaven and he made reference to vertical supports located on each side at the fore end of the splash-well extending from the gunwale to the floor. My boat does not have these (they may have been removed by a PO) and I am wondering if anyone would post a pic so I can see what they look like. As I have turned the corner from tear-out to re-construction, I am looking ahead to sequence what needs to be done to put t all back together and make any improvements as I move forward.
 

oldhaven

Chief Petty Officer
Joined
Aug 30, 2015
Messages
568
Check out Post 38 pictures in my Starchief thread. If you don't have them it would not be hard to fabricate a substitute. They help locate the side panels in addition to being structural supports. Perhaps my '67 was the first year for that, but they are a good idea.

Ron
 

starry-eyed

Seaman Apprentice
Joined
Sep 19, 2016
Messages
36
Thanks, Ron. I just looked at the pics and cannot tell how they attach at the floor and the gunwale. I have some stainless and some aluminum channel that I can cut to fit. Your post #38 says that they attach also to the rub rail bolt and my rub rail attachment bolt is several inches aft of the front edge if the splash well. I am assuming that the braces are placed just at the front edge of the splash well.

Also, I have some electrolysis rot in the transom skin and intend on using J-B Weld for repairs. Is is available for use on aluminum? The stuff I saw today utilizes steel in the mixture and I was apprehensive to buy it. Also again, do you know what the coverage is for one tube of 5200? That stuff is expensive and I don't want to buy more than necessary but I want to be sure I have enough for the new transom plate, approx. 7' X 1' plus the upper "ears".

Please feel free to comment on my most recent 3-4 posts so I can stay on course. . . . .
 

Watermann

Starmada Splash of the Year 2014
Joined
Jan 12, 2013
Messages
13,753
I don't use the fast cure 5200 which is more spendy, I use the regular and buy a construction tube of it at a time for my projects at 16 bucks a tube I can't say that's expensive.

I used Marine Tex on my transom skin for the pitting but the steel reinforced JB hasn't been seen as a problem until you want to sand it that is. :lol:
 

starry-eyed

Seaman Apprentice
Joined
Sep 19, 2016
Messages
36
Thanks, Watermann, I will get the slower cure, the stuff I saw yesterday was $24 for a regular size (caulking tube). Will one construction tube be enough to butter the new plate?
 

Watermann

Starmada Splash of the Year 2014
Joined
Jan 12, 2013
Messages
13,753
Thanks, Watermann, I will get the slower cure, the stuff I saw yesterday was $24 for a regular size (caulking tube). Will one construction tube be enough to butter the new plate?

Yes, it just needs to cover with a light layer, over do it and that stuff will run out and be wasted.
 

starry-eyed

Seaman Apprentice
Joined
Sep 19, 2016
Messages
36
I just returned from a three week RV trip and got back on the Starchief again. Prior to leaving I filled all of the rot and unnecessary holes in the original aluminum stern and painted the interior surface with POR 15. Then, after an application of metal prep, I attached the new aluminum transom plate to the original with 5200 and a mix of clamps and bolts which was allowed to cure while away on the RV adventure.
 

Attachments

  • photo321302.jpg
    photo321302.jpg
    1.9 MB · Views: 2
  • photo321303.jpg
    photo321303.jpg
    2 MB · Views: 2

starry-eyed

Seaman Apprentice
Joined
Sep 19, 2016
Messages
36
The new transom board was treated with two coats of West System epoxy and is now ready to slide into place. All of the holes have been pre-drilled through the wood and the newly attached transom plate.
 

Attachments

  • photo321343.jpg
    photo321343.jpg
    1.6 MB · Views: 2

Watermann

Starmada Splash of the Year 2014
Joined
Jan 12, 2013
Messages
13,753
Looks good, new clean AL always does tho :lol:
 

starry-eyed

Seaman Apprentice
Joined
Sep 19, 2016
Messages
36
The work has been progressing in spurts, its hard to stay focused between RV camping and hunting season. I cut, shaped, and installed the king starboard over the freshly painted transom and 1/4 inch transom plate and thru-drilled the remaining necessary holes. The splash well has been re-installed and repainted and new gunwale end caps were installed. Its beginning to look like a complete boat again!
 

Attachments

  • photo322537.jpg
    photo322537.jpg
    640.6 KB · Views: 2

Watermann

Starmada Splash of the Year 2014
Joined
Jan 12, 2013
Messages
13,753
Nice work, really looks good and well done. Should last about forever too :thumb:
 

starry-eyed

Seaman Apprentice
Joined
Sep 19, 2016
Messages
36
FINALLY ! ! ! The trolling motor bracket has been installed onto the completed transom, everything sealed, caulked, and painted. Its been a looooong three years with many delays and frustrations, but a splash is imminent! I couldn't have done this without iBOATS and my fellow Stracrafters so a BIG SHOUT-OUT to all that guided me thru the process, especially Waterman, jbcurt00, GA-Boater, Tnstratofam, oldhaven, Scott Danforth, and No-AH. I put the ear muffs on the Johnson 70 for cooling and within a few minutes she was purring like a kitten. Next I'll clean construction dirt from the rear deck and cabin, polish the wood, test the electrics and electronics, and prepare for the SPLASH PARTY.
 

Attachments

  • photo322711.jpg
    photo322711.jpg
    808.6 KB · Views: 2
  • photo322712.jpg
    photo322712.jpg
    938 KB · Views: 33
  • photo322713.jpg
    photo322713.jpg
    780.7 KB · Views: 2

Watermann

Starmada Splash of the Year 2014
Joined
Jan 12, 2013
Messages
13,753
Fine work you've done there :thumb:

It's great to see another old Chief ready to hit the waves once again in all their glory.

fetch
 

starry-eyed

Seaman Apprentice
Joined
Sep 19, 2016
Messages
36
Prior work on the boat includes a 1/4 inch aluminum sub-deck over-laid with 1/2 inch marine plywood, a complete re-wire, replacement of the cabin bulkhead, rebuilt helm, and a radio console with new switches. I used a combination of mahogany, teak, and cherry for all of the woodwork.
 

Attachments

  • photo322757.jpg
    photo322757.jpg
    687.6 KB · Views: 2

starry-eyed

Seaman Apprentice
Joined
Sep 19, 2016
Messages
36
Here's a close-up of the radio console which includes a marine radio, a CB radio, navigation and deck light switches, a Humminbird, and several fuse blocks.
 

Attachments

  • photo322758.jpg
    photo322758.jpg
    638.5 KB · Views: 2
Last edited:

starry-eyed

Seaman Apprentice
Joined
Sep 19, 2016
Messages
36
The helm rebuild consists of new gauges (tach, speedo, volt meter, and fuel), a new wheel, and another switch panel for the horn and bilge pump, plus additional fuse blocks. I also installed a AM/FM cassette radio with speakers in the cabin.
 

Attachments

  • photo322759.jpg
    photo322759.jpg
    777.6 KB · Views: 1

starry-eyed

Seaman Apprentice
Joined
Sep 19, 2016
Messages
36
We are off to Dworshak Reservoir in North Idaho for the long-awaited splash!
 

Attachments

  • photo322785.jpg
    photo322785.jpg
    923.4 KB · Views: 1

starry-eyed

Seaman Apprentice
Joined
Sep 19, 2016
Messages
36
She floats and goes, it must be wake Wednesday! A beautiful day for a boat ride......
 

Attachments

  • photo322786.jpg
    photo322786.jpg
    829.8 KB · Views: 1
Top