1988 Rogue 2420

Status
Not open for further replies.

tpenfield

Moderator
Staff member
Joined
Jul 18, 2011
Messages
17,704
I just sent a couple of PM's. Even though the shape is a bit different on the new piece, having the old vinyl will be helpful.
 

tpenfield

Moderator
Staff member
Joined
Jul 18, 2011
Messages
17,704
Scott Danforth

It looks like you will have 4 pieces . . . 3 are basically the same . . .

The 4th is the more elaborate piece, as per below . . . . (Right?)
.
Stitch101.png
.
then the larger piece with the more elaborate stitching . . .
.
stitch102.png
.
Let me know if I have got this right.
 

Attachments

  • stitch100.png
    stitch100.png
    22.6 KB · Views: 0

Scott Danforth

Grumpy Vintage Moderator still playing with boats
Staff member
Joined
Jul 23, 2011
Messages
47,499
Ted, it will be 2 and 2 mirrored panels.

the pic showing the 3 is the two new panels above the side consoles and the old one (slightly different angles)

the large aft bolster panels will also be mirrors.
 

tpenfield

Moderator
Staff member
Joined
Jul 18, 2011
Messages
17,704
Ok, so 2 of the small as mirrors of each other and 2 of the large, also mirrored
 

Scott Danforth

Grumpy Vintage Moderator still playing with boats
Staff member
Joined
Jul 23, 2011
Messages
47,499
Ok, so 2 of the small as mirrors of each other and 2 of the large, also mirrored

exactly. the one thing that bothered me was the port panels were slightly off from the starboard panels...... I fixed that. I phucked them up the same.
 

Scott Danforth

Grumpy Vintage Moderator still playing with boats
Staff member
Joined
Jul 23, 2011
Messages
47,499
Bit of an update.......

after spending about 6 hours getting rid of a head ache (combination hang over and sinus cold)..... I was able to get back to work on the boat

the wake-board tower / radar arch bracket was a location where I was going to move one of the speakers too.

so, starting with a paper template, I glued it to cardboard

marked mounting holes and the center of where the speaker goes

then cut it out

1222191414_resized.jpg1222191516_resized.jpg

then bevel the edges with the table saw to clear the welds
1222191529_resized.jpg

glue down the foam
1222191747_resized.jpg

just need to glue in padded vinyl in the box to protect the items she tosses in.
 

Attachments

  • 1222191418_resized.jpg
    1222191418_resized.jpg
    199.3 KB · Views: 0
  • 1222191418a_resized.jpg
    1222191418a_resized.jpg
    177.4 KB · Views: 0
  • 1222191437_resized.jpg
    1222191437_resized.jpg
    179.7 KB · Views: 0
  • 1222191419_resized.jpg
    1222191419_resized.jpg
    262.1 KB · Views: 0
  • 1222191429_resized.jpg
    1222191429_resized.jpg
    196.7 KB · Views: 0
  • 1222191443_resized.jpg
    1222191443_resized.jpg
    228.2 KB · Views: 0
  • 1222191919_resized.jpg
    1222191919_resized.jpg
    219.5 KB · Views: 0
  • 1222191445_resized.jpg
    1222191445_resized.jpg
    253.5 KB · Views: 0
  • 1222191611_resized.jpg
    1222191611_resized.jpg
    246.3 KB · Views: 0
  • 1222191525_resized.jpg
    1222191525_resized.jpg
    298.8 KB · Views: 0

Scott Danforth

Grumpy Vintage Moderator still playing with boats
Staff member
Joined
Jul 23, 2011
Messages
47,499
Looks like that worked out like it was supposed to be like that :)

Thanks Micky

I have the whole concept in my head and I tend to perseverate the details for days prior executing. some times my execution doesnt go as planned.......however when it does, you get that feeling of accomplishment.

I planned on the speaker panel when I was designing the support brackets.
 

Scott Danforth

Grumpy Vintage Moderator still playing with boats
Staff member
Joined
Jul 23, 2011
Messages
47,499
Happy Festivus.....

my Upholstry guy finally showed up and delivered some bolster skins.....

Hey tpenfield , may call in that favor at a later time

laying out the foam
1223190837_resized.jpg

stapled the new skins

1223191028_resized.jpg

then add the accent pieces.

decided to add 1/4" of foam to them to give them a richer look

1223191415_resized.jpg

the new red more matches the sport red stripe.

next is the aft bolsters and the consoles. however that will wait until after Christmas.
 

Attachments

  • 1223191028a_resized.jpg
    1223191028a_resized.jpg
    328.7 KB · Views: 1
  • 1223191018_resized.jpg
    1223191018_resized.jpg
    287.4 KB · Views: 1
  • 1223191055_resized.jpg
    1223191055_resized.jpg
    355.7 KB · Views: 1
  • 1223191040_resized.jpg
    1223191040_resized.jpg
    250.2 KB · Views: 1
  • 1223191102_resized.jpg
    1223191102_resized.jpg
    261.7 KB · Views: 1
  • 1223190821_resized.jpg
    1223190821_resized.jpg
    276.4 KB · Views: 1
  • 1223191247_resized.jpg
    1223191247_resized.jpg
    288.1 KB · Views: 1

alldodge

Moderator
Staff member
Joined
Mar 8, 2009
Messages
40,722
Looks good
also looks like both threads are showing the same stuff
 

Scott Danforth

Grumpy Vintage Moderator still playing with boats
Staff member
Joined
Jul 23, 2011
Messages
47,499
Looks good
also looks like both threads are showing the same stuff

Thanks

I started the other thread because this one doesnt show up in most peoples feeds because the website only shows updates in the top forums
 

Scott Danforth

Grumpy Vintage Moderator still playing with boats
Staff member
Joined
Jul 23, 2011
Messages
47,499
A bit of progress........ and a bit of a distraction......

have the blowers mounted and plumbed

1226191113_resized.jpg1226191129_resized.jpg


have the speakers installed.
1226191301_resized.jpg

spent some time to day at Andrey's. re-set the timing on his BBC in his Cobra. helped sort out some wiring.

1227191021a_resized.jpg1227191021_resized.jpg1227191040_resized.jpg
 

Attachments

  • 1226191114_resized.jpg
    1226191114_resized.jpg
    176.2 KB · Views: 1
  • 1226191243_resized.jpg
    1226191243_resized.jpg
    205.8 KB · Views: 1
  • 1226191624_resized.jpg
    1226191624_resized.jpg
    209.5 KB · Views: 1
  • 1226191004_resized.jpg
    1226191004_resized.jpg
    318 KB · Views: 0

Scott Danforth

Grumpy Vintage Moderator still playing with boats
Staff member
Joined
Jul 23, 2011
Messages
47,499
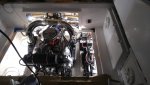
Electrical Gremlins suck.....

electrical-gremlin.jpg

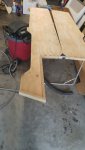
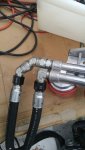
first, have my tripp lite 25 amp power supply all hooked up. plug it in and noticed the switch was on. shut it off....... and the switch fails. Need to find a switch now.

next, dig out the only 1 of 3 batteries that has somewhat of a charge left (all 3 will need to be replaced). I then install that battery

its on 10.5 volts. hook up the charger.....

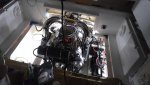
turn on the ignition switch and the two SSR's come to life and the two ignition relays at the helm click...... thinking its a good sign....

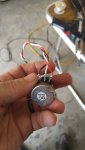
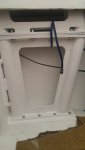
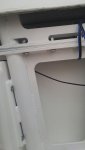
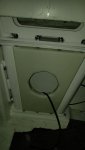
Horn switch isnt wired internally like the other 9 switches..... need to find out why.

forgot the ground connection for all the indicator lamps on the left bank of switches, and forgot the ground for the dash gauge lamps...... quickly half-ass the connection (will properly terminate in the daylight).

Have dash lights, however only on full......my PWM dash dimmer needs programming (will wait for daylight)

the only AutoMeter gauge doesnt have a red filter. will see if I can fix that in the daylight

start going down the list......
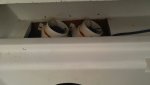
blowers..... yes
Bilge..... No (will chase in the AM)
wiper...... Nope..... forgot to plug in the motor.

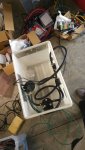
Nav lights.....nope..... chasing 32 year old gremlins in the boat wiring harness. mostly due to the very circulatory nature of the connectors that I straightened out. Turns out the nav lights were not wired to print 32 years ago....

Florida state bird then came out and I decided to head in for the night.
 

Scott Danforth

Grumpy Vintage Moderator still playing with boats
Staff member
Joined
Jul 23, 2011
Messages
47,499
Electrical Gremlins slayed.......
  • one Deutsch pin not seated properly
  • two wires crossed in the factory harness
  • SCR doesnt respond to horn, however works with a light load on (may put an indicator across the horn)
  • all ground wires connected.

need to space out the VHF radio as it hits the rack. so making a spacer in the AM.

currently plumbing the fuel filter/pump/garmin fuel sensor. mounting everything inside a 8D battery tub along with the engine filters. planning on a float switch in the bottom. If I develop either an oil leak or a fuel leak, the float switch will raise up and trigger an alarm.

the tub will also hold extra oil and chemicals on-board
 

Scott Danforth

Grumpy Vintage Moderator still playing with boats
Staff member
Joined
Jul 23, 2011
Messages
47,499
so a bit of progress at the end of 2019.....

have the filters and fuel pump mounted in the bin

1230191325_resized - Copy.jpg1231191137_resized.jpg

managed so slip in the bilge and smack my knee on the PS pump bracket......... knee vs BBC........ BBC 1, Knee 0

finished wiring the bilge LED lights.

Now need to mount the side consoles so I can throttle the motor and fire it up in the boat........that will wait a day or two. need to also get fuel in the tank.

headed out with the Admiral for dinner
 

Attachments

  • 1230191313_resized - Copy.jpg
    1230191313_resized - Copy.jpg
    356.2 KB · Views: 0
  • 1230191335_resized - Copy.jpg
    1230191335_resized - Copy.jpg
    281.1 KB · Views: 0

Scott Danforth

Grumpy Vintage Moderator still playing with boats
Staff member
Joined
Jul 23, 2011
Messages
47,499
progress update....... Saturday got a new windshield in the daily whip....... dump-truck dropping rocks vs window......... rocks 1, window 0.

0104201451a_resized.jpg

glued and stapled the side panel filler sections

0104201522_resized.jpg0106201925a_resized.jpg

the step lights from the cockpit (yes, no shoes in the boat)

0106201925c_resized.jpg

and the dash. need to get the one Autometer gauge to be red, and the water pressure gauge isnt lit.

0106201927_resized.jpg
 

Attachments

  • 0105201043a_resized.jpg
    0105201043a_resized.jpg
    277.6 KB · Views: 4
  • 0106201924_resized.jpg
    0106201924_resized.jpg
    323.5 KB · Views: 55
  • 0104201522a_resized.jpg
    0104201522a_resized.jpg
    267.8 KB · Views: 4
  • 0105201043_resized.jpg
    0105201043_resized.jpg
    304.1 KB · Views: 2
  • 0104201451_resized.jpg
    0104201451_resized.jpg
    257 KB · Views: 3
  • 0106201925b_resized.jpg
    0106201925b_resized.jpg
    377.3 KB · Views: 35
  • 0105201042_resized.jpg
    0105201042_resized.jpg
    363.9 KB · Views: 3
  • 0105201043b_resized.jpg
    0105201043b_resized.jpg
    292.1 KB · Views: 1

Redrig

Master Chief Petty Officer
Joined
Oct 13, 2009
Messages
849
Damn , nice work !

Do you by chance have any more pics of your engine / exhaust set up ? Thats some good boat porn and I would like to see more
 

Scott Danforth

Grumpy Vintage Moderator still playing with boats
Staff member
Joined
Jul 23, 2011
Messages
47,499
Damn , nice work !

Do you by chance have any more pics of your engine / exhaust set up ? Thats some good boat porn and I would like to see more

go to post #1....... there are links.
 
Status
Not open for further replies.
Top