My Winter Hobby

sam am I

Commander
Joined
Jun 26, 2013
Messages
2,169
Click image for larger version  Name:	20180114_102512.jpg Views:	1 Size:	554.0 KB ID:	10529125Click image for larger version  Name:	20180114_102425.jpg Views:	1 Size:	550.5 KB ID:	10529126
Click image for larger version  Name:	20180114_110004.jpg Views:	3 Size:	366.3 KB ID:	10529160 Click image for larger version  Name:	image_283505.jpg Views:	1 Size:	421.5 KB ID:	10529158

Wow, what a difference!!

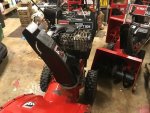
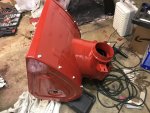
I'll have to practice safe snow blowing from now on.....Geeesh!! It was throwing heavy/wet already been plowed snow from last weeks storm by the city trucks some 35' feet from the street out at our curb and hitting the front of my house......Easy 35' to 40', amazing difference!!

Few week back was doing the same thing, it maybe hit the middle of the yard, so 20' tops before mod.

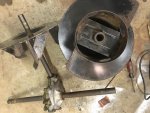
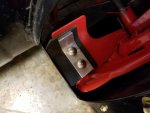
Dang, well worth the mod, cost around $25 bucks (didn't have the right alu. stock, bought a 4' stick) about, took maybe 4 hours which was primarily fabrication time. Install time if ya buy a kit would be like 1/2 hr I would guess.

Thx again tpen :thumb:
 

Attachments

  • 20180114_110004.jpg
    20180114_110004.jpg
    366.3 KB · Views: 1
Last edited:

tpenfield

Moderator
Staff member
Joined
Jul 18, 2011
Messages
17,705
New Addition to the Fleet:

I picked this machine up yesterday for $200.

1999 Toro PowerShift 824 (8 HP 318cc OHV engine, 24" bucket). They come with a full transmission and the axle can rotate backwards to change the center of balance, which shifts weight to the bucket for going through snow banks, etc.

Back in the day (1990's) this machine retailed for about $1,250-$1,500, which would probably be around $2,000-$3,000 today. These were only made for about 10 years, then Toro came out with the PowerThrow and the PowerMax lines.

Click image for larger version  Name:	image4.jpeg Views:	1 Size:	131.2 KB ID:	10532929

My plan is to refurbish/rebuild this machine so that it is 'like new'. I may sell the Toro 521, which will leave me with 2 medium-sized machines of ample power.
 

Attachments

  • image2-1.jpeg
    image2-1.jpeg
    114.5 KB · Views: 1
  • image4.jpeg
    image4.jpeg
    131.2 KB · Views: 1
Last edited:

82rude

Rear Admiral
Joined
May 8, 2012
Messages
4,082
That's an interesting design.My toro will throw from the side of the house to the back laneway which is 45to 60 feet away at the very least.Of course I replaced the belts and auger bearing last summer.How do the wheels pivot?
 

tpenfield

Moderator
Staff member
Joined
Jul 18, 2011
Messages
17,705
That's an interesting design.My toro will throw from the side of the house to the back laneway which is 45to 60 feet away at the very least.Of course I replaced the belts and auger bearing last summer.How do the wheels pivot?

The PowerShift feature can be seen in this video, where the axle pivots back, changing the balance of the machine.

I'm hoping it will snow again soon, so I can see how far the machine throws snow.
 

tpenfield

Moderator
Staff member
Joined
Jul 18, 2011
Messages
17,705
I have been running the engine to change the oil and get some carb cleaner through the fuel system on my 'new-to-me' Toro 824 PowerShift. I ran a cylinder leak test . . . only 3% leak :D not bad for a 19 year old engine.

I started to take the machine apart, which was not too difficult. Actually easier in some respects that my Toro 521 snowblower.

Here are a few pictures of the disassembly
Click image for larger version  Name:	IMG_0961a.jpg Views:	1 Size:	491.6 KB ID:	10534062

Click image for larger version  Name:	IMG_0964a.jpg Views:	1 Size:	506.3 KB ID:	10534067

I figured that the impeller bearing was bad, since the impeller shaft moves up/down a bit. What I found was the bearing was completely gone, not much remained, just the outer shell of the carrier.

Click image for larger version  Name:	IMG_0965a.jpg Views:	1 Size:	592.8 KB ID:	10534065


Here is what the bearing looks like new.
Click image for larger version  Name:	StensBearing.jpg Views:	1 Size:	36.2 KB ID:	10534066

I'm glad I did not try to use the machine before replacing the bearing. Since I have the machine apart, I'll take care of some rust as well and get a new coat of paint on it.
 

Attachments

  • IMG_0965a.jpg
    IMG_0965a.jpg
    592.8 KB · Views: 0
  • IMG_0964a.jpg
    IMG_0964a.jpg
    506.3 KB · Views: 0

82rude

Rear Admiral
Joined
May 8, 2012
Messages
4,082
Same bearing in my powermax le 826.Of course it stormed the last few days ad last night my chute deflector cable decided to give up the ghost.I believe their made of gold as the price reflected that.
 

tpenfield

Moderator
Staff member
Joined
Jul 18, 2011
Messages
17,705
Not sure why Toro has not gone to a ball bearing for the impeller. These bearings (really bushings) tend to wear out in about 10 years and require disassembly of the machine to replace.
 

82rude

Rear Admiral
Joined
May 8, 2012
Messages
4,082
And 3 hands to reassemble,lol.At least the bearing and holder was cheaper.I figured as long as I had mine apart to replace the bearing might as well put a new bearing holder in also.
 

tpenfield

Moderator
Staff member
Joined
Jul 18, 2011
Messages
17,705
I am on to prepping and painting. Lots of rust to grind off, then painting.

First with rust reformer
Click image for larger version  Name:	IMG_0972.JPG Views:	1 Size:	144.0 KB ID:	10535026


New parts are arriving . . . Impeller bushing/bearing, chute retainer clips and a new electric starter.

I should have this machine back together by the weekend (I hope) :)
 

Attachments

  • IMG_0974 2.JPG
    IMG_0974 2.JPG
    138.6 KB · Views: 0
  • IMG_0975.JPG
    IMG_0975.JPG
    139 KB · Views: 0
  • IMG_0972.JPG
    IMG_0972.JPG
    144 KB · Views: 0

sam am I

Commander
Joined
Jun 26, 2013
Messages
2,169
I got one pesky bolt that is rusted in the auger axle solid.

Heat the collar red hot w torch then try to turn the bolt?

Metal gets slick when its that hot, try picking it up and see.........:facepalm:

BTW, the new re-build is looking purty...........
 
Last edited:

tpenfield

Moderator
Staff member
Joined
Jul 18, 2011
Messages
17,705
Heat the collar red hot w torch then try to turn the bolt?

Metal gets slick when its that hot, try picking it up and see.........:facepalm:

BTW, the new re-build is looking purty...........

Yes, I think I will try lots of heat and turning at the same time. Just not sure how it got so stuck in there., as there is about 1/32" clearance in the hole that goes through the shaft. I can't turn the bolt or get the bolt to move by trying to pound it through.
 

tpenfield

Moderator
Staff member
Joined
Jul 18, 2011
Messages
17,705
Quick Update:

I tried heating the bolt and then grabbing the shaft end of the bolt with vice grips to try to turn the bolt, but it was a no go.

Subsequently, I managed to snap off the shaft end of the bolt, so not anything left to work with. Probably will have to drill the remains of the bolt until I get into the part that is within the auger shaft.

Sheared bolt end

Click image for larger version  Name:	IMG_0983.JPG Views:	1 Size:	138.9 KB ID:	10535412

there was a spacer around the bolt on the head end to fill the extra space that you see, and that spacer did come out, meaning that the stuck part of the bolt is within the auger shaft.

Right now, I just have conventional drill bit, which are not great going into steel. Just wondering what sort of bits I can get to cut into the steel better/quicker.

I tried a drill press, put the access was not good enough to get the bit lined up on the bolt. So, I'm sort of stuck using a hand drill.

If I can drill the bolt remains down to a point where they are even with the shaft, I can at least pull the auger off for sanding and painting, then go after what left of the bolt with the drill press.

All thoughts welcome on this one. :noidea:
 

Attachments

  • IMG_0983.JPG
    IMG_0983.JPG
    138.9 KB · Views: 0

tpenfield

Moderator
Staff member
Joined
Jul 18, 2011
Messages
17,705
UPDATE - success . . .

I got some cobalt drill bits and was able to drill the bolt remains to a point where they were flush with the shaft on both sides.
That allowed me to pull the auger drum off and deal with the shaft itself. The bolt was still totally stuck in the shaft.


Click image for larger version  Name:	IMG_0985.JPG Views:	1 Size:	168.8 KB ID:	10536076

Once I cleaned up the shaft a bit, I could see the outline of the bolt in the shaft.

Click image for larger version  Name:	IMG_0992.JPG Views:	1 Size:	151.0 KB ID:	10536073

Bring on the drill press . . .,

since the bolt was still immovable, I used my drill press to drill out the bolt entirely.


Click image for larger version  Name:	IMG_0994.JPG Views:	1 Size:	147.1 KB ID:	10536074

Then a reaming of the hole to bring it to the same size as the hole on the opposite shaft.

Click image for larger version  Name:	IMG_0995.JPG Views:	1 Size:	145.0 KB ID:	10536075

I'm glad that is done. On to painting . . . here is the rust reformer/primer applied to the auger pieces.

Click image for larger version  Name:	IMG_0997.JPG Views:	1 Size:	153.3 KB ID:	10536077

Next steps are a finish coat of satin black and then put the machine back together.
 

Attachments

  • IMG_0988.JPG
    IMG_0988.JPG
    149.9 KB · Views: 0
  • IMG_0985.JPG
    IMG_0985.JPG
    168.8 KB · Views: 0
Last edited:

tpenfield

Moderator
Staff member
Joined
Jul 18, 2011
Messages
17,705
Update:

I made some progress on putting the bucket and auger assembly back together. With the new bearing and greasing everything, the mechanism is really smooth.

IMG_1002.JPG

Next steps will be to fasten the bucket to the chassis, making it look like a snowblower again.
 

Attachments

  • IMG_1004.JPG
    IMG_1004.JPG
    160.5 KB · Views: 0

82rude

Rear Admiral
Joined
May 8, 2012
Messages
4,082
Ive used cobalt bits on heavy stainless steel and it goes though it like s### through a goose.
 
Top