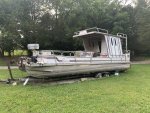
Yes! You got a great platform. I am going to be honest with you and I literally just finished my custom restore for my 1983 Playbuoy Admiral 24. It will take you some time, but just do it right the first time. If you can afford it, beef up the frame of the pontoon before you install a new deck. Either buy some Z brackets or you do like I did, score a free POS pontoon boat. That is what prompted me to make a tritoon. I also used 90% of the Z brackets off the free pontoon and added them onto my pontoon frame. The added rigidity and strength is awesome. Especially under where you have the second level. If you ever plan to add a bit more power, the additional support braces will be huge in the back. Sell off or scrape the remaining aluminum pieces you don't need to go towards you project. I combined both of the 16' pontoons into one center pontoon with motor pod, like the new tritoons. My brother in law did all the tig welding and custom work on that end. I can't tig weld.
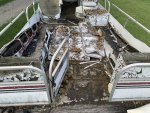
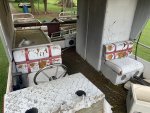
You will need to either locally source 3/4" CCA treated, marine grade plywood. Do not buy kiln dried or regular marine plywood. You are not using resin, so the bare wood will absorb water and rot like regular outdoor ply. Basic marine grade plywood has no voids and water proof glue. CCA treated ply will help longevity from constant water exposure and is a chemical preservative. I used six sheets, but you may need eight by looking at your pictures. Buy with deck screws, forget the bolts because you will hate life trying to install them and really hate yourself when it comes time to remove. Pontoonstuff has a complete decking kit you can buy. I bought the 28oz luxury carpet kit, and local lumber yard had the same plywood for a tad less because of shipping. The type of floor you go with is up to you though. Go to the local boat show and check out the pontoons. You will get a ton of ideas for you build. You are starting from scratch. But this is where I made the choice of carpet over vinyl. The vinyl was great, but Florida sun and heat sucks. The salesman said the only con was the heat absorbed by the vinyl in the sun and can get really hot without constant water on it. He said pontoon boats shouldn't require shoes or flip flops to have fun. I agreed and went with carpet. I have young girls.
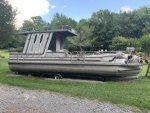
Yank off your fencing and save it. You can remove the vinyl sticker striping and either paint it or cover with a roll of vinyl wrap. If you decide to paint, do NOT use Rustoleum professional paint. Even with a great etching primer and adhesion promoter it's not durable. I did mine in gloss white and wish I wouldn't have, but I wanted to try. Surprisingly, a single stage automotive paint that I sprayed my father in law's pontoon fence with looks great from 2008.
For seating, you can go all out and buy brand new furniture OR you can go simple like I did. My brother in-law made me tig welded seat frames out of one inch aluminum square tubing. 20" deep by 50" long and 12" high. Simple teal and white cushions made with 3/4" outdoor play sealed with deck waterproofer and matching back bolsters. I was surprised that my wife like the look of the frames being open, with no covers to make it look like a box. It looks great and easily accessible to whatever you stuff underneath. As well as, dries quickly. Honestly, furniture will be the biggest expense. Just remember that your beast is not so easily kept out of the sun and weather. Unless you got a huge pole barn or enclosure. So your expensive seats will go to crap quickly.
I literally have the same Force 125. Kind of comical. I can tell you this motor has now been on three boats. First was a 1989 bass boat, then my tri hull and now this custom tritoon. She's thirsty, but she runs. I would replace the water pump impeller and housing, four NGK plugs, newer motorola (blue) ignition, fuel pump and screen, and clean the carbs with Berryman's B12 Chemtool spray. The carb kits are not cheap for this engine. Drop the bowls and clean it out really good. Buy a water pressure gauge install kit from the auto store (Bosch Gauges Nylon Tubing Kit). You don't need a gauge. At the top rear of your outboard is the thermostat, get a new one. But, look behind the cover on top and you should see a bolt. You can remove that bolt and install the water pressure compression fitting and hose there with some teflon tape. I then ran my white plastic hose down the starboard side of the block and drilled a hole in the lower cover shooting out the corner. I slid a rubber vacuum line over it and RTV siliconed the vacuum line into the drilled hole. Now you have a "tell tale" water spout like newer models. I bought a 50 gallon plastic drum and use that for my outboard water tanks at home. Hardware store has the plastic hose spigots, so you can drill a hole near the bottom of the barrel when you are done and drain the water out. Those water earmuffs are crap. Once you got her running, id run the first tank with some Seafoam cleaner in with the fuel/oil mix. Oh, change out the lower unit oil.
All in all, I think you will truly enjoy this pontoon! I can tell you it would get snatched up here in Florida. Other than getting that trailer road worthy, below is your second biggest expense. Primary is your choice for furniture/seating. The rest is cosmetic. I did see a pretty cool idea on Facebook Marketplace. This couple took standard plastic pontoon furniture bases, cleaned them and painted them white with epoxy paint for plastic. They then put on wood slats, like a wooden glider swing, and waterproofed them. You can sit on it like a swing or put outdoor pool deck furniture cushions over the slats. I would do that if I could find plastic bases locally.
Pricing examples:
PontoonStuff
Complete decking kit for 28ft pontoon = $1,384.65
(3/4" CCA treated marine ply is $105/ea)
iBoats
Sierra 18-3251 Water Pump Impeller Kit = $48
Thermostat Gasket = $9
Thermostat = $30
NGK BUHX Spark Plug = $11/ea