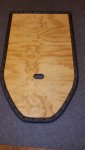
So.... I cut boards narrow enough to drop into a fully inflated m4, but I had left my factory floor in, and removed every other slat. I don't think I had it quite that narrow, I had to gently push it past the tubes... Never really had an issue with them moving side to side so I think you'll be fine
I cut mine at 27" and ended up putting 1/2" pipe insulating around all the edges and then put the carpet over all of it. It fits in when inflated but it takes a little wiggling but not forcing. I used the insulation because the wife was shopping at Walmart and found that they had 1/2" pipe insulating on clearance for $1.00 (4 pieces at 40 inch long) so she got a few packs.
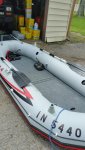
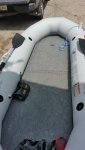
We took it out yesterday for it's maiden voyage lol. I went ahead and left the full floor (oem) in and put the plywood (carpeted) on top of it. Next time just the plywood and one slat. then after that no slats and just plywood. With the full floor and plywood she handled great. It was me and the wife, plus Minn Kota Endura Max 55; Walmart Everstart Max 29DC battery; fishing gear; metal detecting gear; one scuba tank & related gear; and misc stuff (probably about 600lbs total + or -). We were on the Tippicanoe river in decent weather (a little chop, medium current and about 10 mph wind). I ran it constantly on 50 percent power and a few good runs on 100%. total run time was about 6 hours constant running. We were against current about 75% of the time. I think if I continue using the boat on the river I will get a second battery for longer distances and time. I am guessing here, but will have to research it but I think we traveled 10 plus miles maybe more (I told a guy at the ramp where we went and he said it was a good miles each way if not more).
The boat handled a lot better than I expected. It was stable and standing up fishing was no problem. It tracked pretty well in the wind and current. We had a couple of 20 mph winds for a minute or two and it did ok but needed more power and corrections. The worse part but not bad was when hitting another boats wake and trying to keep a straight track, but compensated by full power into it. I did inflate the keel when we launched and prior to loading everything in.
With two of us off loading the boat out of the pickup(I loaded myself fully inflated and floors in, was heavy lol prior to her getting out of bed lol) and putting in the water was easy. Took about 15 minutes to mount trolling motor to the mount and battery and loading all the gear. Over all not bad at all. The taking out of the water and loading up into the truck was about 20 minutes total (that includes retrieving the truck from the parking area). With the two of us, and the battery, and gear removed, we just lifted it up and loaded it. If I was solo I think removing everything first is required (at least with both floors in, with just the plywood floor it should be good).
I am very happy with the Mariner 4, the motor setup, the handling etc... and even with two floors. Like I said the next test is with one slat and plywood floor.
We mainly ran the river to just test the boat out and enjoy the weather. We also did some fishing and I did a 15 minute dive. We caught 10 fish (one good sized Large Mouth!!!) and enjoyed the boat. It was funny, at the boat ramp people were snickering at us (they had these big bass boats) but when they saw us out there on the water they liked it. They were also mad because all but one of them were skunked on fishing lol. I jokingly told them that they spent 30 grand or so on their bass boats and didn't catch a thing and I spent around $800 on mine and we caught 10 and released probably another 10 lol. They laughed but you could see the wheels turning in their heads.
Best part is the wife really enjoyed it and is happy about me getting it.
My question for the day is: has anyone used solar power for charging the batteries? I know that I can not run the motor off of one but how about charging while running? Or is that just a waste because the solar would not make up the difference? I am thinking when I go to carrying a secondary battery I can charge the used one after I swap out the new one and maybe get enough of a charge for emergency on the secondary if needed.
I have tons of photos but I have to figure out how to resize them because they are too big. When I do I will post them.


.