1964 Evinrude Sweet 16 Boat (Small Leak)

Status
Not open for further replies.

HappyOurs1

Cadet
Joined
Jun 8, 2012
Messages
24
Recently Got myself one of these boats. Have tons of material relating to them, their construction, etc.

I have had the boat out on the water now a hand full of time testing the motor etc, I lowered the trailer as to level out the boat and found in good weather the last few days a small drop of water coming from the center hull, forward at the lowest point. I know there is foam & such, it doesn't look logged in the water as it does not even come upto the top of the red paint line.

How bad could this be to leave for a season as I know I would be required to demolish the floor to access the foam & hull to dry, repair, relace etc

Should It be patched if I can keep it dry enough for long enough? (Any suggestions on what to use?)

I am new to boats & Boating... Just dont want to see this boat go to the grave if I can do something about it. It really is in good shape otherwize.
IMAG1004.jpgIMAG1008.jpgIMAG1016-.jpg
 

HappyOurs1

Cadet
Joined
Jun 8, 2012
Messages
24
Re: 1964 Evinrude Sweet 16 Boat (Small Leak)

Wow over 100 Views and no ones point of view... or opinion. guess i will try to repair the 2 or three spots around the dripping area & hope the boat doesn't rot from the inside out.
 

Chris1956

Supreme Mariner
Joined
Mar 25, 2004
Messages
27,148
Re: 1964 Evinrude Sweet 16 Boat (Small Leak)

Sand off the bottom paint and find the crack or hole in the hull. Post a picture and we can advise on how to repair. I would recommend you fix it before any more use as you will surely water log the foam.
 

HappyOurs1

Cadet
Joined
Jun 8, 2012
Messages
24
Re: 1964 Evinrude Sweet 16 Boat (Small Leak)

Thanks for the Reply Chris1956.

The entire hull below the waterline is filled with extremely dense closed cell polyurethane flotation
Quoted from the attached safety brochure from the Flotation paragraph.

Being a bit skeptical of something printed from the 1960's (Could it still be possible to water log this type of foam?) I will snap a few photos of the area in a few hours when I get home.
c4a1a6a0e8f7560a2dbb369fffd71d5b.jpg
 

wayneinlamar

Recruit
Joined
Jun 12, 2012
Messages
2
Re: 1964 Evinrude Sweet 16 Boat (Small Leak)

I have one spot on my 68 sportsman that looks like that, waiting to see the repair advice you get on yours to help me out.
Good luck,

Wayne
 

spdracr39

Lieutenant Junior Grade
Joined
Aug 30, 2010
Messages
1,238
Re: 1964 Evinrude Sweet 16 Boat (Small Leak)

This looks like a good candidate for the restoration section. It may still float when wet but it doesn't mean it won't get water logged. marine epoxy will patch it but you already know what to do to fix it.

That is a cool boat by the way.
 

HappyOurs1

Cadet
Joined
Jun 8, 2012
Messages
24
Re: 1964 Evinrude Sweet 16 Boat (Small Leak)

I have an update on recent findings.

Weighed the Boat w/seats only, Motor, Trailer, etc. Weighed in @ 870Kg - 1918Lbs

Boat weight is a little grey. Magazine clipping http://www.popsci.com/archive-viewer?id=_iwDAAAAMBAJ&pg=136&query=evinrude%20sweet%2016
Shows 2 different weights. 810lbs Dry without motor & 1250 fitted with a 90hp motor.
My Motor Weighs 220lbs & my trailer shipping weight was 510lbs, but i would bet heavier currently fitted.

So by my estimate The whole setup should weigh in around 1540lbs - 1760lbs....... so Thinkin I was a few hundred lbs heavy I drilled a small hole through the patch area that seemed to be the source of the drip. I would say maybe 2 milk jugs of super stinky water drained out and stopped completely dripping after 20 min. Used some gorilla tape and went out for a spin to test the new prop. Came back & gorilla tape failed(it was gone), noticed about 2 - 3 litres of water in the bilge which leads me to believe my bilge area may leak slightly into the lower hull or vise versa since it was calm and no water entered the boat.

Would it be worth it to try to cut a piece of the bilge leading into the lower hull and cut the leaking patch of the lower hull out & try to set up a fan to dry out the lower hull then seal up both ends....? IMAG0355.jpg
 

jimmbo

Supreme Mariner
Joined
May 24, 2004
Messages
12,961
Re: 1964 Evinrude Sweet 16 Boat (Small Leak)

The outboard boat weighed 810lbs no motor. The 1250lbs with 90hp was refering to an inboard-outdrive model that had the 90hp V4 engine mouted to a sterndrive unit.
 

scoutabout

Lieutenant Commander
Joined
Oct 14, 2006
Messages
1,568
Re: 1964 Evinrude Sweet 16 Boat (Small Leak)

Really cool boat and I'd say worth a restoration. I love that dash panel too.

So, what we know is that all the water that's not been soaked into the foam will drain. Sadly, that floor needs to come ot and the water logged foam tossed. Big job, maybe worth it tho to save that boat. I'd definitely stop riding arond with those holes in it!
 

Chris1956

Supreme Mariner
Joined
Mar 25, 2004
Messages
27,148
Re: 1964 Evinrude Sweet 16 Boat (Small Leak)

As Scoutabout says, cut out the floor, remove all the wet foam (likely all of it is wet), fix any rotted wood you find, sand and resin some cloth on the inside of the hull to seal the holes and any cracks, foam her up and install a new plywood floor with resin and glass to waterproof it. You may use polyester resin for everything, provided there are no structural defects that would require epoxy...
 

bgc

Ensign
Joined
Jul 13, 2011
Messages
980
Re: 1964 Evinrude Sweet 16 Boat (Small Leak)

Nice Boat!
Move her to dry dock and open her up.
 

Solittle

Fleet Admiral
Joined
Apr 28, 2002
Messages
7,518
Re: 1964 Evinrude Sweet 16 Boat (Small Leak)

If you want to finish the season before tearing into it slather all around those holes with Marine Tex. It will cure in a wet environment - even underwater.
 
Joined
Mar 13, 2019
Messages
1
Hello:

I may be very late to the party regarding this question, but I have completed a full restoration/repair of 1964 Outboard model Sweet 16 which I named "Never Been Kissed".

I first tried to repair the "leaks" and found that that was a fools approach. I decided that I was going in with both feet. The approach that I took was as follows:

1. Remove everything
2. Take too many photos of every step in the process they become very valuable to us back yard mechanics
3. Place tow cross pieces under the deck to hold the hull in form while you perform the next step
4. Separate the deck from the Hull, I used a skill saw and cut the seam apart
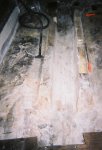
5. Mark a 3" line along the floor and the sides of the boat and draw a line under the windshield. This will be your cut line for removing the entire floorboard from the windshield back to the transom. The 3" "tab" will be your tie-in point for the new floor.
6. When you remove the floorboard, you will be amazed how much water has collected over 50 years.
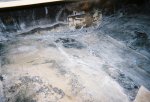
7. With a claw hammer, black trash bags and a vacuum, slow claw away all the spray in foam that you can manually. You will be surprised how many bags of foam and "air" you will create.
8. To do the finish clean up, you will need a multi tool with a scraper and a DA for final clean up on all surfaces. This is an easy but long task.
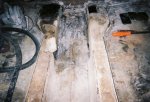
9. Inspect and remove any water damaged stringers. It is easy to repair this damage when you begin the rebuilding process. 1
0. Send the wood transom to 'Heaven".
11. After cleaning the entire interior of the hull, let the 1960's fiberglass hull dry out. You can use a 24" box fan and/or an infrared heater. You do want to "cook" the moisture away.
12. Optional Built-In Gas Tank: There is a large cavity of space between the two strings for a custom fabricated stainless steel gas tank. The tank will be about 11" wide x ~8' long and tapered from 7" deep at the bow and 4" deep under the motor well. I place the vent line in the front and placed it in front of the windshield. the fuel pick up in the stern and the fill point on the stern quarter deck. Suggestion: make the vent line as big as you can. I used a 3/8 vent line and because of the odd shape tank I would suggest making it at least a 3/4" vent line. The 3/8" vent worked great in operations but the boat was a slow fill. I believe the new tank was around 25 gallons. I then had new "milk carts" storage under the motor well for "stuff". Another suggest for the space would be a ski locker. However, I preferred the gas tank and I would store the water skis between the seats and the side "gutter".
13. On another boat restoration project, I used Coosa marine board. This stuff is 2x the strength of marine plywood at 1/2 the weight. This stuff is perfect for the Sweet 16 floorboard and transom repairs. It will never absorb water.
14. Prior to taking the seat mounting plates out of the floor, I would suggest you make a paper template that locates everything that you mount to the floor. Reason Being: As great as Coosa board is, you can mot screw into it. Either you mount threaded backing plates in-bedded into the Coosa or you thru-bolt. I chose the in-bedded mounting plate approach.
15. I used West Epoxy System 610 for 'gluing" the new floor board to the sides and on top of the stringers.
16. With the deck removed, it is easy to rebuild the transom, the bilge well, transom butt hold, and most importantly the bracket supports for the new transom tie-ins to the hull and the sides of the boat for strength and support of the transom.

The above is long but I have had the fortune to remove and replace 6 classic boats floor boards. 5 were done with marine plywood and the last one was with the Coosa board and the West Epoxy System. By far the later was the easiest, fastest and strongest of all that I had done prior. I also learned from my errors in the process.

If anyone would like more photos and information, feel free to em me at david.avedesian@newportassociates.net. I would be happy to share the many scars on my back from all the beatings that I have taken over the previous projects.

Have Fun, David
 

Attachments

  • photo309004.jpg
    photo309004.jpg
    323.7 KB · Views: 16
  • photo309005.jpg
    photo309005.jpg
    585.8 KB · Views: 7
  • photo309006.jpg
    photo309006.jpg
    568.6 KB · Views: 7
  • photo309007.jpg
    photo309007.jpg
    583.4 KB · Views: 7
  • photo309008.jpg
    photo309008.jpg
    548.9 KB · Views: 7
  • photo309009.jpg
    photo309009.jpg
    1 MB · Views: 8
Status
Not open for further replies.
Top