Three piece Volvo Penta riser gasket?

IGKNIGHTED

Seaman Apprentice
Joined
Jun 9, 2007
Messages
37
Hello everyone - I have a 1992 Excel 20 SL with a Volvo Penta 430 B engine. Engine was running great but developed a rough idle. I decided to change the spark plugs and to my dismay water came out of one of the middle cylinders. I pulled the risers or elbows which have never been changed and found a three piece gasket set including a metal plate. One gasket was stuck to the manifold and one to the riser. My question is do I have to replace all of them or just install one gasket? Seems to me the three piece set is an invitation for leaking.
 

Attachments

  • photo338371.jpg
    photo338371.jpg
    1.7 MB · Views: 1

muc

"Retired" Association of Marine Technicians...
Joined
Jul 7, 2004
Messages
2,064
The 3 gasket set is an update that we do to older engines that didn’t come that way. It is less likely to leak. Guessing that your engine overheated in the past, because that’s the only time we see the 3 gasket style leak.

The middle gasket will be marked “up” make sure it’s up.

Highly recommend Volvo parts for this job.
 

IGKNIGHTED

Seaman Apprentice
Joined
Jun 9, 2007
Messages
37
Thanks for the reply’s. I forgot to mention I bought new elbows so I’m not sure if that makes a difference in gasket usage. My concern with the three piece set up is the metal plates don’t lay perfectly flat and have some flex to them. Is this normal until they are installed and tightened down? I’ve looked for new ones but no luck.
 

Attachments

  • photo338456.jpg
    photo338456.jpg
    811.9 KB · Views: 2

Scott Danforth

Grumpy Vintage Moderator still playing with boats
Staff member
Joined
Jul 23, 2011
Messages
47,536
buy new ones from Volvo. go to Volvopentastore.com if you are in the US or marinepartseurope if you are in europe

then follow the links and buy the parts. Volvopentastore.com is iBoat's hosted VP sale site. click on genuine VP parts, then pick the right category for your motor, select your motor, go to exhaust.....
 

muc

"Retired" Association of Marine Technicians...
Joined
Jul 7, 2004
Messages
2,064
If the new elbows aren’t Volvo, I don’t know what effect they would have.
Maybe the elbows look different in person, but in the picture. They don’t look like they need replacement.
Here in Minnesota. I only replaced the middle gasket if it had any creases or scratches. The raised area in the center is important. It’s designed to capture any condensation after shutdown and keep it from running into the exhaust valves. It will evaporate or burn off next time you run the engine.

I hesitate to bring this up, because it is so easy to do wrong. But I use a very light coat of Perfect Seal on both sides of the upper and lower gaskets. It is important to stay far enough away from the small holes because you don’t want to obstruct them. Do not paint it on with the brush. Put a couple of small dabs on the gasket and use your finger to tap,tap,tap to move it around and try to get an almost transparent coat. When your done, you want to look at it and think to yourself “that’s not even enough to do anything”.
 

IGKNIGHTED

Seaman Apprentice
Joined
Jun 9, 2007
Messages
37
An update that’s not so good - I installed the new risers and gaskets and waited a day. The next day I got ready to fire it up on the muffs but decided to check the oil level first. The dipstick showed clean oil but it was over full - not good. I drained the oil from the plug in the pan and you guessed it - milkshake crud.

I changed the oil and filter and started and ran the engine for about 10 minutes and it ran great. I then changed the oil again and it looked much better.

The next day I pulled the spark plugs and to my dismay the same cylinder had some water in it.

I then did a cold compression test and all cylinders were a bit over 150 psi EXCEPT the cylinder that leaks - it was 180. I’m guessing because of the WD-40 I had sprayed in the cylinder.

I didn’t have a way to pressure test the system so I devised a back yard mechanic smoke test - I took a small smoke bomb (like you use on the 4th of July) and induced the smoke into the riser port after draining it. I then checked everywhere for smoke escaping and sure enough it eventually trickled out of the leaking cylinder spark plug hole (center cylinder starboard side).

Does this conclude the exhaust manifold is leaking or could it still be a cracked block, head or intake manifold?

This is is an old boat but very nice and clean and I hate to give up on it.
 

Attachments

  • photo339217.jpg
    photo339217.jpg
    912.8 KB · Views: 0

alldodge

Moderator
Staff member
Joined
Mar 8, 2009
Messages
40,745
If the exhaust valve was open smoke should come out.
 

IGKNIGHTED

Seaman Apprentice
Joined
Jun 9, 2007
Messages
37
I removed the exhaust manifold and don’t see any visible cracks or water marks. I do see it’s an aftermarket manifold so it must have been replaced more than 10 years ago prior to me buying it.

The manifold on the other side does have a visible crack I found while changing the spark plugs so I assume that’s the cause of the milky oil in the pan.

Why does the manifold have 5 bolts instead of 6? The cylinder that leaks just happens to be the one with 1 bolt.

Since the compression is good should I just replace the manifolds and hope they were the problem?
 

Attachments

  • photo339311.jpg
    photo339311.jpg
    689.8 KB · Views: 0
  • photo339312.jpg
    photo339312.jpg
    628 KB · Views: 0
  • photo339313.jpg
    photo339313.jpg
    895.4 KB · Views: 0

alldodge

Moderator
Staff member
Joined
Mar 8, 2009
Messages
40,745
Why does the manifold have 5 bolts instead of 6? The cylinder that leaks just happens to be the one with 1 bolt.

Don't know but that would be a VP question. Check the flatness

Since the compression is good should I just replace the manifolds and hope they were the problem?

I wouldn't replace unless they shows signs of a leak. It might be leaking in another location.
If you have a bicycle pump you can pressurize the block
 

alldodge

Moderator
Staff member
Joined
Mar 8, 2009
Messages
40,745
Plug hoses going to the exhaust manifold.
Remove hose coming from drive to thermostat housing and attach a pressure gauge and schrader valve.
Drain all water from block and then just pump it up
 

muc

"Retired" Association of Marine Technicians...
Joined
Jul 7, 2004
Messages
2,064
https://forums.iboats.com/forum/engi...ives/366271-vp
number 1 , last page has a kind of good method for testing the manifolds.

Pressure test block, drain the block and hoses like your winterizing it,disconnect one of the hoses that goes to the exhaust manifold from the thermostat housing and replace it with the end of the other exhaust hose. Now water can’t get out of the engine. Remove end of hose that goes between thermostat housing and raw water pump at the pump. Make up an adapter so you can connect your lower unit pressure tester to this hose and pressurize to 25 psi. Should hold pressure for at least one hour.
 

IGKNIGHTED

Seaman Apprentice
Joined
Jun 9, 2007
Messages
37
Thank you to all who responded - between hands-on and your advice I’ve learned a lot. That being said I didn’t try pressurizing the system yet because I’m not really sure how to do it.

I did do my shade tree smoke test again and forced smoke into the thermostat housing and watched for smoke escaping anywhere.

Just like before smoke trickled out of the suspect cylinder spark plug hole. I’m no genius but my logic says the smoke in the cooling system represents water which should never enter the combustion chamber .

Im guessing cracked block or cylinder however I’m a little confused as to why the compression readings are good. Must be heat opens the crack.

Unfortunately I already wasted my money on new risers and have new exhaust manifolds on the way. 😔
 

IGKNIGHTED

Seaman Apprentice
Joined
Jun 9, 2007
Messages
37
I rigged up an air hose to the suspect cylinder spark plug hole and I could hear water gurgling inside the intake manifold 😔 The other cylinders didn’t do that. I’m guessing intake or head gasket leaking.

I took the valve covers off and to my surprise both sides are very clean.

looks like it’s time to remove the intake and probably heads.
 

Attachments

  • photo339472.jpg
    photo339472.jpg
    929.3 KB · Views: 1
  • photo339473.jpg
    photo339473.jpg
    823 KB · Views: 1

muc

"Retired" Association of Marine Technicians...
Joined
Jul 7, 2004
Messages
2,064
If the valves were closed in that cylinder, yes you will be pulling the heads.

The shadow from the spring really threw threw me in the first picture.
 

Lou C

Supreme Mariner
Joined
Nov 10, 2002
Messages
11,837
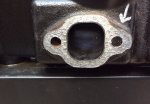
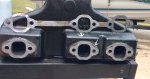
Actually an intake leak on these, is likely to put water right into the cam valley not into a cylinder. So that water would show up in the oil but not a cylinder. The only place there is a water passage on the intake manifold is right in the front, under and on either side of the thermostat housing. Normally water gets pumped into the block by the front circulating pump, then flows up to the cyl heads and finally out the front water ports into the intake manifold water passage, then if the water is hot enough the thermostat allows it to exit via the exhaust system.

If you have a leaky head gasket it is not that bad of a job, that looks like a nice original engine that's never been apart judging by the amount of undisturbed V/P red paint on it. If its a fresh water used engine likely everything will come apart. I did a similar job on mine 3 years ago, I had blown HGs that was likely from a past overheat. And I had the same symptoms, rough running, water in a cyl, tested exhaust, exhaust was not leaking. Did a few tests and found that I had exhaust gas leaking into the cooling water. If I checked for water in a cyl right after shutting it off there was none but if the engine sat for a while and cooled off then water would seep into cyl #2, and there was just a trace of it in cyl #1. I used my De Walt electric impact gun to take it apart, salt water usage but all the bolts came out and none broke.

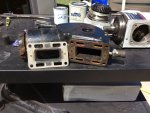
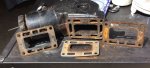
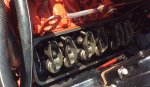
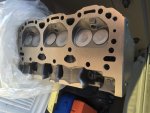
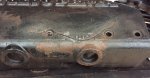
I took the cyl heads to a machine shop to get checked out. The machinist felt that I should replace them because the center cyls had cracks in the exhaust seat area and the cooling passages had been eroded by years of raw water cooling in salt water. So I installed a set of remanufactured 4.3 cyl heads with Fel/Pro marine gaskets. I also replaced the cyl head bolts because the originals were too rusted to use. One tip I can offer is get a thread chaser, you will need to clean out the bolt holes for the cyl head bolts in the block, they tend to get crud in them and you want the torque reading on them to be as accurate as possible. Not a bad job all in all, can be done with the engine still in the boat....
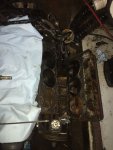
For me the hardest part was getting the intake off, the intake gaskets were baked on like kryptonite, perhaps because of the overheat 3 years before the HGs blew. That and re-surfacing the sealing surfaces of the intake, in retrospect it would have been easier to have the machine shop do it. Keep the engine clean, keep the parts organized and take pix before taking things apart...

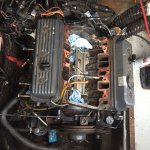
In your case I'd line up a good machine shop if you are going to do this, you might just need to have the cyl heads done (valve job, check valve guides and replace valve seals) and install with new marine head gaskets. These engines are very simple to take apart and put back together and the parts are cheap by any modern standard.
 

Attachments

  • photo284489.jpg
    photo284489.jpg
    686.7 KB · Views: 0
  • photo285857.jpg
    photo285857.jpg
    753.5 KB · Views: 0
  • photo287683.jpg
    photo287683.jpg
    1.7 MB · Views: 0
  • photo291561.jpg
    photo291561.jpg
    628.9 KB · Views: 0
  • photo321247.jpg
    photo321247.jpg
    165.4 KB · Views: 0

IGKNIGHTED

Seaman Apprentice
Joined
Jun 9, 2007
Messages
37
Cracked exhaust manifold but not the side with the leaking cylinder. Next I’ll remove the intake manifold.
 

Attachments

  • photo339543.jpg
    photo339543.jpg
    713.5 KB · Views: 1

IGKNIGHTED

Seaman Apprentice
Joined
Jun 9, 2007
Messages
37
I’m concerned about removing the distributor and reinstalling it in the exact same position- any tips?
 

alldodge

Moderator
Staff member
Joined
Mar 8, 2009
Messages
40,745
The Dizzy will drop back in same location so long as it is positioned in same spot. This also means the motor position does not change.

As the dizzy comes out it rotates, note the position as it starts to come out
 
Top