OMC Cobra Bell-crank 1988

ab59

Ensign
Joined
May 10, 2017
Messages
979
I've got my pivot loose and the transom shift cable off to replace the O ring on the cable end. I noticed that he bell-crank was not turning freely so I pulled it apart , inspected it , cleaned it again and then put it back together again. Now , when I tighten the keeper bolt it will not turn at all . I took it back apart thinking that the new O ring that I put in it ( new O ring in both the cable end and the bell crank ) might be a little to fat and removed it and get the same result . I then cleaned out the socket that the end of the bellcrank rides in thinking that it may have crud packed into ti that was not allowing the shaft of the BC to fully insert and was binding up but after making sure there was no crud it does the same when I tighten up the keeper bolt.
I'm about out of ideas here . This should turn freely after assembled but tightens up as I screw the keeper down.
Anyone have any ideas ?
 

ab59

Ensign
Joined
May 10, 2017
Messages
979
Just for anyone that may come across the same problem somewhere down the line I did get this problem resolved. I cleaned the bell crank about a dozen times and did the same for the pivot . After that was not enough I took the shift arm and polished off just enough material that the arm has free movement and is not dragging . I used a 1" upright belt sander for the job . Operates the way it should now .
I only took off micro increments of metal from the side of the arm until it moved free . just a little at a time tell it was right.
 

Lou C

Supreme Mariner
Joined
Nov 10, 2002
Messages
11,837
good to know, looks like you corrected one of OMC's quality control issues!
 

ab59

Ensign
Joined
May 10, 2017
Messages
979
OK , I have the lower shift cable on and adjusted according to spec. When I removed the bell crank locator jig at the pivot and shifted into forward and reverse the BC does not fully return to the height of the jig or in the " alignment slot " . Should I adjust this at the lower cable or the controller or upper shift cable . The lower is installed according to the two OMC jigs for the lower cable adjustment. Odd that this is not shifting back to where it was fitted to with the jig.
 

Lou C

Supreme Mariner
Joined
Nov 10, 2002
Messages
11,837
If you set the transom shift cable using the bellcrank locator jig and the cable setting tool up on the engine side, if it does not go to the same position as it should I would think it's the remote cable causing the problem. I had to do the remote cable on mine after doing the shift rod height (lower unit) and the transom shift cable. Take a look at the instructions on Midnight Wolf's OMC tools website, he has some updated instructions that can help.....

http://midnight-wolf.com/OMC_Install_Instructions.html
 

ab59

Ensign
Joined
May 10, 2017
Messages
979
Thanks Lou I saw your reference to the wolf information and have followed it up until the BC was not in the right place.
The info on the wolf sight keeps referring to a Trunion Wheel that I don't have for adjustment and I'm a little confused as to which end I should be trying to make an adjustment to. In addition the article says that you should take the controller cable loose and mark the travel and replace it if it is not an even throw to forward and reverse so I'm a little mythed at what to do.
Does it matter which end of the upper shift cable I use to make adjustments ?
 

Lou C

Supreme Mariner
Joined
Nov 10, 2002
Messages
11,837
OK to start I think the confusion is coming from the fact that you have an aftermarket upper cable there that does not have the wheel to adjust the trunnion. OMC cables had that for the remote and throttle cables. The adjustment wheel was used to fine tune the adjustment and take out the slack which might be possible with the aftermarket cable you have. If that blue piece that goes through the mount for the upper cable is threaded and can turn, you might be able to do the same thing with it, as you could with the OE cable wheel. The way it works on the OE cables, the part the wheel is mounted on, fits into that cable mount, and you can turn the wheel to move the cable in and out. I would think the maker of the aftermarket cable had to include this same feature.

Also the procedure or order of steps in doing this is as follows:

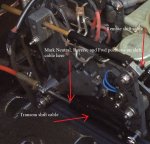
1) drive off you adjust the shift rod height. This is the basis for all the other adjustments being correct. Once right it does not change.
2) drive off you adjust the transom shift cable with the remote cable and throttle cables disconnected, using the bell crank holder and the special tool to set the length of the transom shift cable at the engine shifter bell crank.
3) now you're supposed to reinstall the drive, and make sure its in Neutral. Mark the cable where it slides into the casing with a sharpie. Now have someone spin the prop while you use the cable, to shift it into reverse. Mark that position on the cable. Then shift back to neutral. Now have someone spin the prop, and you use the cable to shift it to forward. Mark that position on the cable. The REV and FWD position marks should be equidistant from the Neutral mark on the cable. This tells you that you are getting equal throw in REV and FWD on each side of NEUTRAL. If not, then go back and re-do it.
4) Now and only now, do you adjust the remote and throttle cables....


If you verify the above with the remote cable disconnected, shift the drive back to NEUTRAL and with your remote shifter in neutral, adjust the remote cable on the engine bell crank so it has no tension on it. Then with your assistant to spin the prop, try shifting it as above to make sure you still get the same equal throw in each gear position. This is a short cut method that may not work, you may need to try to do it the way its described in Midnight Wolf's instructions. Or try to get an OE BRP remote cable. Might be a pain to snake it up to your control, but might make it easier.

Also keep in mind if your remote control is worn out with lost motion, you will never get it right. I still have my original OMC control but I have a Teleflex CH 1700 that I want to install when I get the patience to take off and repair the coaming panel on that side. I did the port side last summer (rotted wood inside) and it was a REAL PAIN.
 

Lou C

Supreme Mariner
Joined
Nov 10, 2002
Messages
11,837
this might help a bit...
 

Attachments

  • photo304804.jpg
    photo304804.jpg
    205.8 KB · Views: 3

ab59

Ensign
Joined
May 10, 2017
Messages
979
Thanks for your continued support Lou C . I have come onto another problem that must be solved before I continue. For whatever reason the " UP " solenoid just clicks and does not engage the pump or motor. Down works fine. I had this problem after re installing the engine for the second time but not before and had to jump the solenoid across to make it work. Now that no longer works and it just clicks. At one point I kept tapping the up switch and it kind of engaged for a second but made a kind of grinding noise but kicked out after a second and went back to the clicking again. Don't know how this stuff keeps failing after having worked just fine a few weeks ago but it is what it is I guess. I will remove and clean all contacts and give it one more try.
I had found some good diagrams of the wiring and solenoids on the bracket but can't seem to find the same information again but I am looking. Maybe I had the solenoid fail , I know where I can find another one if necessary but this is now taking on another two days of testing and parts chasing so here we go again . Par for the course on this one.
By the way I installed the outdrive yesterday as my information said that it the transom cable was set up with the jigs that no further adjustment would be necessary so I bolted the outdrive in . The aftermarket controller cable is easily adjusted just by lightly turning the sleeve between the attachment points ( for lack of a better term ). Seems like that could just vibrate and move pretty dang easily . Will have to fight that battle after I finish with the solenoid problem.

thanks again-------Bruce
 

Lou C

Supreme Mariner
Joined
Nov 10, 2002
Messages
11,837
Your boat is as old as mine and what happens is that corrosion catches up with it. Your problem could be one of 3 things, the trim switch on the remote control, a broken wire inside the remote control or the relay itself, or the connections to it. First start by removing all the connections and cleaning up any corrosion on the terminals (had this problem). If that's not it then remove the blue wire (up = blue down = green) and hook a volt meter between the wire and a ground. See what you get in terms of volts. If you got battery volts, then the switch on the remote control and wiring are good. If not you have to look further, could be the switch or broken/frayed wiring inside. If it just clicks and you have battery voltage at the relay, its either the terminals (corrosion) relay (corroded inside). You could try bypassing the relay by running a wire from the battery + terminal to the wiring that goes from the relay to the trim pump, bypassing the relay, this will tell you if its the relay or the pump. It also helps to go back and clean all the battery terminals, starter terminal on the solenoid fed from battery, and the wiring that goes from that positive starter stud to the trim relays, and the battery negative grounds (they ground on a stud on the bellhousing behind the exhaust). Mine was intermittent for a while and it was just the terminals needed cleaning up.
 

Lou C

Supreme Mariner
Joined
Nov 10, 2002
Messages
11,837
PS you can still get these relays from BRP, I'd pick up a couple of spares, the trim relays and the assist solenoid are all the same. Nice to have a spare when you need it.
 

ab59

Ensign
Joined
May 10, 2017
Messages
979
Thanks for your reply---I went back out and pulled the three blade plug loose that goes to the pump and it looks like one of the female side of the plug has lost a connector . Looking at the male half that goes to the pump , which blades would i need to run some jumpers to to test the pump ? would I run a ground to the top blade that is turned differently than the other two that are vertical ? I'm guessing that the horizontal blade is the ground and the other two blades are up and down but unsure at this point.

thanks----
 

Lou C

Supreme Mariner
Joined
Nov 10, 2002
Messages
11,837
OK you are talking about the 3 prong connector that feeds the pump correct? Look at the wiring colors for clues...Blue is the up signal from the blue/white wire from the up relay, the green/white is the down signal from the down relay and black is ground. Looking at the connector, with the horizontal on top the 2 vertical ones facing down, the top horizontal one is the black 10 ga wire (ground) left vertical is blue/white (up) and the right vertical one is for the green wire (down).

If the connector is bad you can try to replace it with a water proof weather pack connector (if you can find a 3 prong one) or just connect the wires with crimp on marine connectors and seal em up with liquid electric tape.

Keep in mind for the system to work properly the tilt n trim relays must be grounded. They are bolted to the shift bracket which is bolted to the intake manifold on the V6 and V8s. An improvement would be to make up a ground system where an 8 gauge wire or so connects to the mounting stud of each relay (keep in mind there are 3, 2 for TnT and one for the starter system) and back to a good engine ground like the stud for the battery negative on the bell housing. If the ground is bad due to corrosion you can have intermittent problems.
 
Last edited:

ab59

Ensign
Joined
May 10, 2017
Messages
979
thanks Lou , I will make a pigtail of sorts to test the pump and will try to test the plug as well . I have a parts guy in the next town that usually has a lot of OMC Cobra parts so I guess if worst came to worst I could buy another bracket set up , solenoids , wires and all but a butt splice would be much cheaper . May have to anyway if the solenoid is bad . The single click that it makes leads me to believe that it is working but there just is not a connection to the pump being made. I cleaned all the grounds and Positive connections as I reinstalled them on the engine and starter so those should not be at issue .
Most of this I should have figured out on my own but seems like I've been fighting this so long I'm beginning to get brain cramps . :)

thanks again---
 

Lou C

Supreme Mariner
Joined
Nov 10, 2002
Messages
11,837
my pleasure, if you search around you can find OMC wiring diagrams on the 'net, that is good to have. I have an original 1988 OMC shop manual which is helpful for problems like this.
 

ab59

Ensign
Joined
May 10, 2017
Messages
979
Thanks Lou --Eureka I have made some progress ! This morning with a good light and fresh eyes I noticed what I thought was a burned spot on the back of the plug with the missing connector. When I got the light down next to the plug I saw that it was not a burn spot but the back end of the missing connector so I was able to jamb it back up into the plug and held onto it as I made the connection between both halves . When I hit the button everything works like it should. Man that saved a lot of head ache .
Not having such good luck with the shift adjustment so far though as I have forward and neutral with no problem but reverse just gives me the clicking noise. I am adjusting it at the control cable but came in to get a helper as I have been in and out of that boat what seems like a hundred times this morning.
Another point of confusion is in the adjustment methods. If the control cable must be an even throw between forward neutral and reverse then wouldn't adjusting it from this position cause it to not be an even throw ?
I have measured the throw and adjusted same to even distance from neutral but she will not hit reverse . If I adjust it out to pick up reverse it will no longer be and even distance at the adjusting rod.
thanks again---
 

ab59

Ensign
Joined
May 10, 2017
Messages
979
OK , here I go again getting this stuff out of order again. I went back and re read your post about adjustment and I see that I did not do some things. Once I adjusted the transom cable with the jigs I had thought no more adjustment was supposed to be made on that cable but if I am reading your post right , I was supposed to pull and push the end of the cable to check the throw on the bottom shift cable BEFORE I tried to adjust the control cable. Man , no wonder I got brain cramps , I keep getting things turned backwards trying to push past this .
So in the end I should test and adjust the lower ( transom) cable and check for even throw , right ? Once again I'm getting confused because somewhere I read that if you use the recommended jigs to set it up that you were not supposed to change any of the adjustment that the jigs set up.
God I'm hard headed any more , sometimes I think it would be easier to throw a pebble through a brick wall that to get new information into my brain.
 
Top