Mercontrol ignition key switch ID help with Pics!

Zenvalo

Seaman
Joined
Jun 1, 2009
Messages
74
Hello all,

Just wondering if someone can help me figure out how to get a replacement ignition switch and key for my mercontrol or better yet, a part number so I can shop around and not waste too much of everybody else's time...

The guy before the guy I bought the boat from lost his key and ended up removing the key hole part of the ignition.

It still works pretty much like it's supposed to, except you can use anything flat and short. i.e. a house key, car key, flathead screwdriver etc...

I'm not worried that someone could easily steal the boat because of this, but what I am worried about is, since the key part is gone, it doesn't automatically switch back to the run position from start. Once it's running, the starter continues to spin unless it's it's carefully switched back into the run position. Also, when it's running, the motor is louder than the starter therefore it's hard to tell if the starter is spinning or not.

I noticed this when I was doing a decarb and checking for leaks after replacing all of my internal fuel lines.

I couldn't find any numbers on the control unit, but the serial # for the motor is 3722026, making it a 1973 Mercury 500 50hp Thunderbolt...

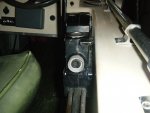
Below are a couple pictures of the control from the side and back to hopefully help identify a little easier. The choke is a separate push button on top of the unit, not integrated into the switch.

Thanks for any and all input on this issue of mine!
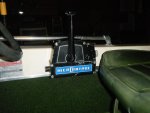


merControl Side.jpg


merControl Key Hole.jpg
 

Zenvalo

Seaman
Joined
Jun 1, 2009
Messages
74
Re: Mercontrol ignition key switch ID help with Pics!

Thanks for the link! I took the control apart and it looks like it has anywhere between 5 and 7 connectors on the back. It's crammed in there so tight it's hard to tell for sure. I don't know why it would need that many for an off/on/start switch. Unless I can somehow convert it to a 3 wire plug, I think I'll just have to deal with it. There is not enough space or wire length inside to cut the wires and solder a new switch on.

The wires going to it as of right now are hardwired/soldered to the terminals on back. Also, there isn't much to tell which wire is which as they are all either black or white.

I tried to put it back together, but am having some issues with the copper colored roller part of the high idle lever. I get everything where it needs to be, but can't seem to find the right position of that roller part after the push rod got moved. Any thoughts on that or how to modify the switch?

Thanks everyone!
 

Zenvalo

Seaman
Joined
Jun 1, 2009
Messages
74
Re: Mercontrol ignition key switch ID help with Pics!

That looks about right, though mine is a 50 hp. I just don't know how easy it would be to solder the old wires to a new switch. There is no more than 2" of each wire crammed in the really small space reserved for the wires before they go into the sheath that heads back to the motor. If there was room to just put some female wire connectors on, I'd be golden, but I don't think there is enough space. And I'm still not having any luck get the two halves of the control housing back together. Grrr!
 

Silvertip

Supreme Mariner
Joined
Sep 22, 2003
Messages
28,762
Re: Mercontrol ignition key switch ID help with Pics!

You cannot use a three terminal ignition switch for a two stroke outboard. Outboards have a magneto ignition whereas an I/O has a battery ignition. Outboards have a CLOSED circuit to kill the engne whereas a battery ignition OPENS the ignitiion to kill the engine. Outboards also have a "push to choke/prime" feature that a three terminal battery ignition doesn't have. The terminals are marked as follows:

C = choke
B = Battery POS
I = Accessory terminal (+12 volts when the key is in the RUN position)
M = Magneto
M = Magneto ground.
S = Starter solenoid
 

Zenvalo

Seaman
Joined
Jun 1, 2009
Messages
74
Re: Mercontrol ignition key switch ID help with Pics!

Good info to have! I just ordered the switch and should have it no later than Saturday. It is a 5 terminal switch and when I said earlier that the wires are all black or white, I was wrong. There are other colors, but someone used that liquid electrical tape stuff to cover everything, so I'm going to probably have to attempt changing one wire over at a time so they don't get mixed up.

So that aside, is there a certain position the high idle lever needs to be in to put the housing back together? I'll do some browsing here on the forum, but if someone has a quick answer or photo, that would be great!

Thanks!
 

Silvertip

Supreme Mariner
Joined
Sep 22, 2003
Messages
28,762
Re: Mercontrol ignition key switch ID help with Pics!

Good info to have! I just ordered the switch and should have it no later than Saturday. It is a 5 terminal switch and when I said earlier that the wires are all black or white, I was wrong. There are other colors, but someone used that liquid electrical tape stuff to cover everything, so I'm going to probably have to attempt changing one wire over at a time so they don't get mixed up.

So that aside, is there a certain position the high idle lever needs to be in to put the housing back together? I'll do some browsing here on the forum, but if someone has a quick answer or photo, that would be great!

Thanks!

So how is it you plan to get by with a five terminal switch when you actually need six as shown above.
 

Moody Blue

Captain
Joined
May 24, 2004
Messages
3,136
Re: Mercontrol ignition key switch ID help with Pics!

Here is a link to the wiring diagram for your motor. It shows a 5-terminal ignition switch. Not sure it is correct or not but I think because the choke function is on a separate button and not a function of the switch you can get by with the 5 terminal type.

http://www.maxrules.com/oldmercs/Wiring/1966ona/26A.jpg
 

Zenvalo

Seaman
Joined
Jun 1, 2009
Messages
74
Re: Mercontrol ignition key switch ID help with Pics!

Thanks for the info guys! I got it back together, still with the old switch, but I least I know how to do it now. Just waiting on the new one to arrive.

Silvertip, the switch that I have currently installed has 5 terminals.

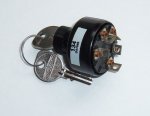
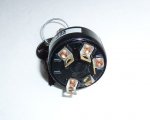
Below are a couple pictures of the one I just purchased and it looks exactly the same. It is not a Push to Choke switch. I know next to nothing when it comes to Merc's so I can't explain why it has 5 as opposed to 6.


Switch2.JPG


Switch.JPG
 

Derekc294

Petty Officer 2nd Class
Joined
Oct 1, 2013
Messages
152
I would like to replace my ignition also as the keyslot is broken thanks to an overanxious 7 yr old wanting to go fishing..lol Can someone direct me to a step by step of opening this unit up for a replacement? I am scared of ruining something.

Thank you in advance!
 

GA_Boater

Honorary Moderator Emeritus
Joined
May 24, 2011
Messages
49,038
I would like to replace my ignition also as the keyslot is broken thanks to an overanxious 7 yr old wanting to go fishing..lol Can someone direct me to a step by step of opening this unit up for a replacement? I am scared of ruining something.

Thank you in advance!

Derek - Start a new topic. This one is old and dead. Thanks
 

Zenvalo

Seaman
Joined
Jun 1, 2009
Messages
74
GA_Boater, I realize this thread is old and has been dead for a while, but since I was the creator, I figure I'll throw my 2 cents in quick...

Derek, there really isn't much that can be screwed up and although it's been a few years since I swapped out my switch, it was the first time I'd ever even tried anything like it. I don't have a step by step method, but just take your time. You'll want the control unit laying on it's side as apposed to the vertical possition it is currently mounted in. After you get the housing screws out, you have to move the choke and throttle lever around a bit to find the position where it will allow the housing to be released. It wasn't too terribly difficult, but there is a pin inside if I recall correctly, that sort of holds the throttle arm in the neutral position. You want to be careful not to lose that.

As far as the wiring goes, that's where it gets a little more difficult as there isn't much room to work. I believe I ended up cutting/swapping/soldering one wire at a time so I wouldn't get them mixed up. After all was said and done, I used a high quality silicone over the whole back of the switch. Once it fully dried, (24-48 hours I think) I put the whole thing back together and it worked great!

There may be threads around by now that have pictures, etc. of the process, but if not, I hope this little bit of info helps.

Good luck!

~Zen
 

GA_Boater

Honorary Moderator Emeritus
Joined
May 24, 2011
Messages
49,038
It is your thread, Zenvalo and you may post at any time. The rule about posting in old topics does not apply to the original poster, you in this case. But let me ask - Would you have reopened the topic or would it still be on the top shelf in the library?

Derek should have started a new topic. You and others might have replied in the new topic.
 

Derekc294

Petty Officer 2nd Class
Joined
Oct 1, 2013
Messages
152
GA_Boater, I realize this thread is old and has been dead for a while, but since I was the creator, I figure I'll throw my 2 cents in quick...

Derek, there really isn't much that can be screwed up and although it's been a few years since I swapped out my switch, it was the first time I'd ever even tried anything like it. I don't have a step by step method, but just take your time. You'll want the control unit laying on it's side as apposed to the vertical possition it is currently mounted in. After you get the housing screws out, you have to move the choke and throttle lever around a bit to find the position where it will allow the housing to be released. It wasn't too terribly difficult, but there is a pin inside if I recall correctly, that sort of holds the throttle arm in the neutral position. You want to be careful not to lose that.

As far as the wiring goes, that's where it gets a little more difficult as there isn't much room to work. I believe I ended up cutting/swapping/soldering one wire at a time so I wouldn't get them mixed up. After all was said and done, I used a high quality silicone over the whole back of the switch. Once it fully dried, (24-48 hours I think) I put the whole thing back together and it worked great!

There may be threads around by now that have pictures, etc. of the process, but if not, I hope this little bit of info helps.

Good luck!

~Zen
Thank you for taking the time to respond. I will give it a try and appreciate the tips very much. First time here also.

GA_Boater- I didnt start a new topic because I was hoping someone would see the pictures he posted of what it looks like and have an opinion or some insight like Zen did. As an admin to a message forum myself I guess I don't understand why you would want another thread created on the same topic. Its actually better to keep all the information in one thread rather than force people to look at 5 threads of the same topic to find an answer. Just my .02 but if that's how you guys run things around here in the future I will do that. But if a thread is not locked I would only assume its open to post in.
 

GA_Boater

Honorary Moderator Emeritus
Joined
May 24, 2011
Messages
49,038
Thank you for taking the time to respond. I will give it a try and appreciate the tips very much. First time here also.

GA_Boater- I didnt start a new topic because I was hoping someone would see the pictures he posted of what it looks like and have an opinion or some insight like Zen did. As an admin to a message forum myself I guess I don't understand why you would want another thread created on the same topic. Its actually better to keep all the information in one thread rather than force people to look at 5 threads of the same topic to find an answer. Just my .02 but if that's how you guys run things around here in the future I will do that. But if a thread is not locked I would only assume its open to post in.

Have you read the rules? It's very plain. Also look at the top of this thread. It isn't the same topic. It's Zen's topic and if he didn't happen to see that you posted in his thread, you could be waiting forever for an answer since his last post was almost a year ago while others that can help might not see your question.. Threads with no activity for three months or more are considered dead. We don't lock threads in case the OP decides to update his thread. You must have rules in your forum that members are expected to follow.

In the future, please start new threads instead of hijacking. Thanks.
 
Last edited:
Top