Mercury 650 Won't Start

scottwoodward

Petty Officer 3rd Class
Joined
May 27, 2020
Messages
78
GA Boater,

You are correct sir. I was looking around the edge of the cap, not the center. The leads are all in the correct position on the cap.

No issues with the timing bet as near as I can tell. I hopefully learned my lesson last time when I broke it. I can recheck the spark and gap, but no reason it shouldn't be the same as last time.
 

scottwoodward

Petty Officer 3rd Class
Joined
May 27, 2020
Messages
78
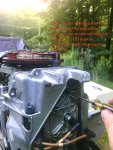
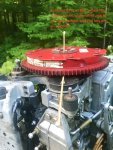
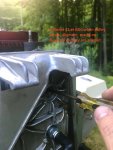
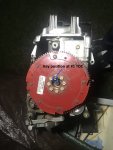
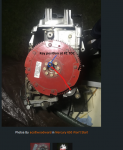
GA Boater, I did the screwdriver test again, but this time, when the flywheel comes around to the point where the pulley arrow, the alignment marks on the flywheel and the key are all aligned, the #1 cylinder is at BDC instead of TDC. See attached photos. In the first photo, you can see the alignment of the pulley arrow, alignment marks on the flywheel and a straight stick coming up from the the key indentation. The second photo is of the screwdriver when those three points are aligned -- you can see the screwdriver is all the way in. In the third photo, you can see the alignment marks for TDC on the flywheel and also the key are basically pointing to the rear of the motor when the #1 cylinder is at TDC and the screwdriver is all the way out, way too early in the stroke.

Even though the key position was in the wrong place before moving it yesterday to be aligned with the pulley arrow, I can confirm that when the pulley arrow and alignment marks on the flywheel were lined up (but the key out of position) that the #1 cylinder was indeed at TDC and the screwdriver was all the way out. Not sure how to proceed next, whether it's a key positioning issue or something else (although I don't know what the something else would be).
 

Attachments

  • photo337469.jpg
    photo337469.jpg
    1.7 MB · Views: 0
  • photo337473.jpg
    photo337473.jpg
    1.6 MB · Views: 0
  • photo337474.jpg
    photo337474.jpg
    1.9 MB · Views: 0
Last edited:

GA_Boater

Honorary Moderator Emeritus
Joined
May 24, 2011
Messages
49,038
It looks like I gave you perfect instructions...........................to set the timing marks at BDC instead of TDC. I am shamed :embarassed: Sorry.

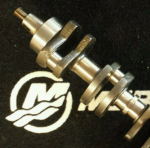
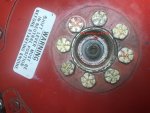
In the pic below of the part number for your crankshaft, the slot for the key in the taper is aligned with the #1 rod journal. With the key pointing to the arrow on the timing pulley, it is indeed at BDC.

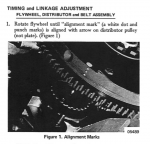
OK, you should be able to slip the belt up or undo the 8 bolts to lift the flywheel so there is no chance of binding the belt and re-time, ignoring the key by using the screwdriver to find TDC. When at TDC, the pulley arrow will point directly at the crankshaft with the key on the other side. Then put it all together at TDC with the flywheel TDC mark over the pulley arrow.

The key (pun intended) is I had a brain fart. I really am sorry for the extra work, Scott.


650crank.png
 

scottwoodward

Petty Officer 3rd Class
Joined
May 27, 2020
Messages
78
GA Boater,

No problem. I'm grateful for your assistance. Every mistake is a learning opportunity for me to get to know this motor better and I still think your assistance is going to result in an improvement.

Reading back the latest instructions (1) unbolt the flywheel after finding TDC for the #1 cylinder; (2) then, lift the belt off the pulley and then reposition the flywheel so that the pulley arrow and alignment marks on the flywheel are lined up, and (3) then re-bolt the flywheel to the hub?

Should I expect that the key will directly opposite its current position when aligned with the pulley arrow when I get it in the right place? I just went out to study where the key should end up being at #1 TDC and it doesn't look like it's going to end up directly opposite. The attached photos shows the key position when the #1 cylinder is TDC by the screwdriver test ... it's pretty much pointing to the rear of the motor, almost toward the spark plugs.
 

Attachments

  • photo337486.jpg
    photo337486.jpg
    1.7 MB · Views: 0
  • photo337487.jpg
    photo337487.jpg
    1.8 MB · Views: 0

GA_Boater

Honorary Moderator Emeritus
Joined
May 24, 2011
Messages
49,038
If the screwdriver is showing the motor at TDC and the pulley arrow is pointing straight at the crankshaft, remove the eight bolts and spin the loose flywheel until the sticker TDC is over the pulley arrow. If it isn't, then redo the belt until the arrow is pointing at the crank.

One of the confusing things is the offset of the distributor. It's to the right side of the cylinder bores and crank centerline, so the keys and arrows correct for the offset.


650line.png
 

scottwoodward

Petty Officer 3rd Class
Joined
May 27, 2020
Messages
78
The pulley arrow is not pointing toward the crankshaft with #1 at TDC.

I think we're saying the same thing, but one more time just to be 100% sure. My 101 for dummies recitation of the instructions: I'll take off the flange and timing belt and reposition the pulley to point to the crank shaft. Then, put the belt and flange back on and tighten it down. Then, I'll unbolt the flywheel and reposition the flywheel to align the TDC sticker to the pulley arrow (***not the three dimples on the flywheel that are the alignment marks, but the actual TDC point on the flywheel ... see attached photo).
 

Attachments

  • photo337506.jpg
    photo337506.jpg
    1.6 MB · Views: 0

GA_Boater

Honorary Moderator Emeritus
Joined
May 24, 2011
Messages
49,038
Yes, we're on the same page.

If you can leave the pulley flange off until everything matches or mark the flange so you know where the arrow is. I have pencil and magic marker stuff scribbled all over my flywheel and pulley flange. I don't have a timing sticker on my flywheel, just one factory punch dot for TDC.
 

scottwoodward

Petty Officer 3rd Class
Joined
May 27, 2020
Messages
78
I'm a little confused. You're referencing a factory punch on your flywheel which I think is the equivalent to the three punches on my flywheel. Should I align the pulley arrow to the three punches or the two bars between where it says "Piston #1 | | TDC" on the flywheel sticker? See attached screen grab which shows the three punches.
 

Attachments

  • photo337511.png
    photo337511.png
    147.5 KB · Views: 0

GA_Boater

Honorary Moderator Emeritus
Joined
May 24, 2011
Messages
49,038
Follow your manual on that. I didn't know you have the 3 punches.
 

scottwoodward

Petty Officer 3rd Class
Joined
May 27, 2020
Messages
78
GA Boater,

Operation complete. As if I needed another road block, the connector from the fuel line to the engine doesn't seem to want to let gas come into the intake fuel line running up to the fuel pump. But, I put gas in each of the cylinders and she turned over. She wants to start, so this is definitely an improvement. If I can get steady gas into the engine, I think she'll run, so I think this back and forth on the position of the key, pulley and flywheel has been productive. I learned a lot, so thank you. I'm getting half way decent at what used to take me hours, now I can do in 20 minutes.
 

The Force power

Commander
Joined
Feb 3, 2019
Messages
2,250
Don't do this.

Those screws never need to be touched. Merc made that part of the motor bullet proof unless the screws are fiddled with. The factory setting doesn't change.

I totally agree! but I thought we don't know the history & what has been done to it (messed with)

It should be at least verified if its set properly
 

GA_Boater

Honorary Moderator Emeritus
Joined
May 24, 2011
Messages
49,038
GA Boater,

Operation complete. As if I needed another road block, the connector from the fuel line to the engine doesn't seem to want to let gas come into the intake fuel line running up to the fuel pump. But, I put gas in each of the cylinders and she turned over. She wants to start, so this is definitely an improvement. If I can get steady gas into the engine, I think she'll run, so I think this back and forth on the position of the key, pulley and flywheel has been productive. I learned a lot, so thank you. I'm getting half way decent at what used to take me hours, now I can do in 20 minutes.

Push the on the pin on the fitting that plugs into the motor and squeeze the bulb until gas squirts out. Watch your eyes.

The pin may be sticking, but the spring behind is kinda stiff.
 
Top