1963 Mercury 650 restoration

MPrimeaux

Petty Officer 1st Class
Joined
May 10, 2019
Messages
240
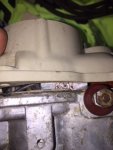
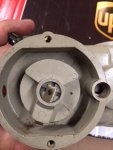
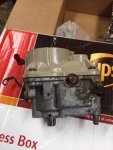
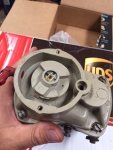
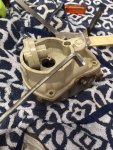
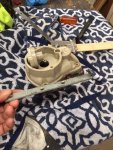
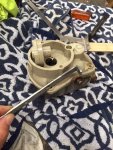
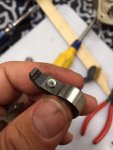
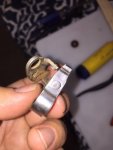
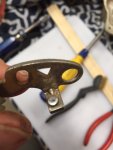
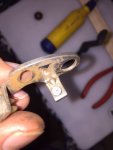
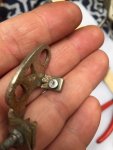
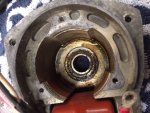
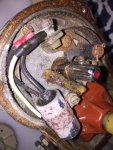
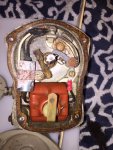
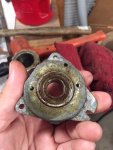
Very carefull with those parts as they are spendy.-----There was a special tool for removing rotors.----I have that item.

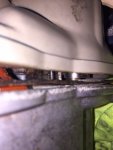
of course.... Well crap... I thought it just pulled out. I can see in through the crack in the cover and the housing and there is definitely a good bit of corrosion and junk on the condenser. I think I really need to get it open. Would a boat mechanic likely have one of these tools?
 

MPrimeaux

Petty Officer 1st Class
Joined
May 10, 2019
Messages
240
Or am I missing something? I don't remember the manual mentioning any tool. I thought it just said to remove the cap and the rotor, then the cover. You do have to remove the rotor to access the points and condenser huh?
 

MPrimeaux

Petty Officer 1st Class
Joined
May 10, 2019
Messages
240
Here are some pictures of what I've got. I need to get this rotor out to remove the cover to clean/repair/replace points,condenser, cam, etc. It won't budge. I tried to get a couple of pics through the space between the cover and the housing (hope that you can see). I see a good deal of corrosion on the cam and the condenser for sure. I feel pretty confident it will all have to be cleaned up. ANY IDEAS?? I've been told that they made a tool for this, although I didn't read anything in the manual about a tool.... or I haven't found it yet anyways. Anyone have any ideas or a picture of this tool? Thanks everyone.
 

MPrimeaux

Petty Officer 1st Class
Joined
May 10, 2019
Messages
240
[No message]
 

Attachments

  • photo313473.jpg
    photo313473.jpg
    25 KB · Views: 1
  • photo313474.jpg
    photo313474.jpg
    31.3 KB · Views: 1
  • photo313475.jpg
    photo313475.jpg
    31.3 KB · Views: 1
  • photo313476.jpg
    photo313476.jpg
    33.9 KB · Views: 1
  • photo313477.jpg
    photo313477.jpg
    35.6 KB · Views: 1

MPrimeaux

Petty Officer 1st Class
Joined
May 10, 2019
Messages
240
Never mind... I found one of those rotor pulling tools. An ell bracket flattened and and then bent to fit. :second:
 

Attachments

  • photo313497.jpg
    photo313497.jpg
    152.3 KB · Views: 1
  • photo313498.jpg
    photo313498.jpg
    159.5 KB · Views: 1
  • photo313499.jpg
    photo313499.jpg
    174 KB · Views: 1
  • photo313500.jpg
    photo313500.jpg
    171.5 KB · Views: 1

GA_Boater

Honorary Moderator Emeritus
Joined
May 24, 2011
Messages
49,038
Only :second:? Your tool work deserves at least a :second:.5.

My rotor looks just like yours and it pulled right off. But you got it off.
 

MPrimeaux

Petty Officer 1st Class
Joined
May 10, 2019
Messages
240
Only :second:? Your tool work deserves at least a :second:.5.

My rotor looks just like yours and it pulled right off. But you got it off.

I figure it was supposed to GA, just stuck. Once I got the right leverage it came right off. It was bittersweet though. Found a bad drive end mag bearing. Points looked pretty good.... I think. Really don't have much experience to compare, but only some pretty minor pitting. Cleaned them up. Condenser was good, but it's cheap enough to replace while I have everything apart. Oh well, it'll give me some time to get my carbs finished up and water pump changed out while I wait on parts.
 

Attachments

  • photo313506.jpg
    photo313506.jpg
    78.7 KB · Views: 1
  • photo313507.jpg
    photo313507.jpg
    70.9 KB · Views: 1
  • photo313508.jpg
    photo313508.jpg
    72.8 KB · Views: 1
  • photo313509.jpg
    photo313509.jpg
    66.4 KB · Views: 1
  • photo313510.jpg
    photo313510.jpg
    91 KB · Views: 1

MPrimeaux

Petty Officer 1st Class
Joined
May 10, 2019
Messages
240
And this is the other mess that I found....:frusty:
 

Attachments

  • photo313511.jpg
    photo313511.jpg
    124.5 KB · Views: 1
  • photo313512.jpg
    photo313512.jpg
    155.2 KB · Views: 1
  • photo313513.jpg
    photo313513.jpg
    150.6 KB · Views: 1
  • photo313514.jpg
    photo313514.jpg
    106 KB · Views: 1

GA_Boater

Honorary Moderator Emeritus
Joined
May 24, 2011
Messages
49,038
We just had a thread in the past couple of weeks about replacing bad bearings in a magneto. I had to put one in my mag when it would lock up every once in a while. It made the timing belt break and I was about 5 miles from the trailer. :eek: Friendly boaters are everywhere! Wouldn't even take gas money.

I replaced both because I figured the still good one was just as old and original, so it was preemptive.
 

MPrimeaux

Petty Officer 1st Class
Joined
May 10, 2019
Messages
240
We just had a thread in the past couple of weeks about replacing bad bearings in a magneto. I had to put one in my mag when it would lock up every once in a while. It made the timing belt break and I was about 5 miles from the trailer. :eek: Friendly boaters are everywhere! Wouldn't even take gas money.

I replaced both because I figured the still good one was just as old and original, so it was preemptive.

Absolutely GA. No sense in just changing one! I'm already there. I may need some coaching on removing the bearings without breaking stuff. I see a couple of small holes in the bearing support plate, but they don't expose the outer race. Hopefully it'll push out without coming apart. I've been putting some penetrating oil on them to hopefully make it a little easier. I went ahead and ordered several little things while I was at it. One thing that I can't seem to find that I would really like to change while I'm in the mag is the cam wick (part # 394-1106A1). I couldn't find one last night. Any ideas/thoughts? I really wouldn't mind getting a new point assembly really, but I don't think that's completely necessary.
 

GA_Boater

Honorary Moderator Emeritus
Joined
May 24, 2011
Messages
49,038
I searched and searched for a wick, then reasoned that after 50 some years a "new" wick would be as dry as mine. Then I grabbed the can of 3in1.png Just enough to dampen the wick, not soaking.

I watch American Pickers in hopes they find the one man hoarding all the NLA Merc parts.
 

MPrimeaux

Petty Officer 1st Class
Joined
May 10, 2019
Messages
240
I searched and searched for a wick, then reasoned that after 50 some years a "new" wick would be as dry as mine. Then I grabbed the can of Just enough to dampen the wick, not soaking.

I watch American Pickers in hopes they find the one man hoarding all the NLA Merc parts.

I heard that!. I read where merc says they never have to be re-lubed, but mine has a pretty good wear indention. I just bit the bullet and bought another points assembly.... ouch! Just got to thinking, I REALLY like the looks of this model motor and have pretty big plans for this boat project in general. I hate to go to the trouble and not have a dependable motor. I might as well get an extra set while I can. I'll put everything back together with the new parts and at the very least have a good used extra set. Have yet another question for you. I can find VERY few videos on adjusting/setting these points. I've been told to set them at .010 when open, but the one video I did find the guy went to a lot of trouble "dwelling" the points to ensure that they were timed correctly in the mag as well as setting the spring tension on them. Since I've taken them all the way off and will actually be installing a new set, do you think I will need to do that.... and if so, Do you or anyone else on here have the dwelling plate and tension gauge that I could buy?.... borrow?..... hell, rent???
 

GA_Boater

Honorary Moderator Emeritus
Joined
May 24, 2011
Messages
49,038
Ol' Carl didn't think we would be using these motors 50-60 years in the future - Little did he know! :D

I flipped my wick in the holding fork. Ready to start another 50+ years wear cycle.

I just set the points to .010 when I cleaned up the magneto. The only special tool was a shadetree. Good or bad, the motor runs fine and the points and cam look OK during the annual Spring points cleaning, a habit I've gotten into.
 

MPrimeaux

Petty Officer 1st Class
Joined
May 10, 2019
Messages
240
Ol' Carl didn't think we would be using these motors 50-60 years in the future - Little did he know! :D

I flipped my wick in the holding fork. Ready to start another 50+ years wear cycle.

I just set the points to .010 when I cleaned up the magneto. The only special tool was a shadetree. Good or bad, the motor runs fine and the points and cam look OK during the annual Spring points cleaning, a habit I've gotten into.

Flipping the wick....:doh:. Wish I would have thought of that... missed the trees for the forest. Oh well, I have a new set coming. I took the lower unit off today to replace water pump and did the unthinkable.... There was a bunch of gummy junk around the shift shaft.... and I was super careful...... but. I clearly moved it. Was in neutral when I started and NOT in neutral when I was done cleaning and lubing. No I'm reading through about a million posts of similar problems. Trying to weed out the garbage. I saw you have coached numerous people through this and I'm sorry to ask for your help again. What I've got so far (please correct me if I'm wrong so I don't have to pull this stupid thing again!!) :

1. I took the LU off in neutral -- need to put the lever on the motor in the FWD position (which is FWD.... I think)
2. Rotate the shift shaft CCW until it goes into FWD which the prop will turn CW but not CCW.
3. I haven't figured out the reverse lock cams.... I payed attention to the position they were in in neutral... have no idea in FWD.
4. Stab LU and test.

Please coach me... I'm getting frustrated at this point. Not being familiar with this motor means I'm having to read for every little step. Someone needs to write some cliffs notes for these procedures and warn idiots like me, " don't do that stupid!!!"
 

GA_Boater

Honorary Moderator Emeritus
Joined
May 24, 2011
Messages
49,038
Look at the stickies on the main page of Merc section. Click the red Mercury & Mariner Outboards link above. Merc850 has a shift shaft setup stickie.

I use Neutral when stabbing the lower back on, not forward. In forward any bump knocks the shaft into neutral. In neutral the springs tend to hold the shaft in neutral.

The reverse lockout cam position is a little different dependent on which Merc motor. Since you took the lower off in neutral, put the cams in the same orientation. I smear grease on the upper cam to hold it in position in the midsection and the ramps face the lower unit or down.
 

GA_Boater

Honorary Moderator Emeritus
Joined
May 24, 2011
Messages
49,038
Don't give up. When I first starting working on Merc outboards it was after 40+ years of messing with cars with a smattering of Mercruisers thrown in.

My first Merc outboard impeller change took me days. Up and down, up and down until I finally got it. And the reverse lock cam was off a tooth. Drop it again! I hadn't found this forum yet, so it was reading the manual where everything is a piece of cake. Sure!
 

MPrimeaux

Petty Officer 1st Class
Joined
May 10, 2019
Messages
240
Look at the stickies on the main page of Merc section. Click the red Mercury & Mariner Outboards link above. Merc850 has a shift shaft setup stickie.

I use Neutral when stabbing the lower back on, not forward. In forward any bump knocks the shaft into neutral. In neutral the springs tend to hold the shaft in neutral.

The reverse lockout cam position is a little different dependent on which Merc motor. Since you took the lower off in neutral, put the cams in the same orientation. I smear grease on the upper cam to hold it in position in the midsection and the ramps face the lower unit or down.

Thanks man... I just had to slow down a little and look at the mechanics of how it worked. I see it now. (I was just frustrated and acting like a little girl.... couple of beers later, I'm good) I normally use neutral also, so I will go back to that. Thanks for the info on the springs holding it in neutral. I feel that in the shift shaft. Neutral is a little more solid than drive gears. Thanks again for the help man... I really appreciate it. This is my last weekend home for a few weeks and there are a few things that I'm trying to get done before I leave. I'm going to post a video a little later of this lower unit... not sure if I can post it here or to youtube or something. It's making a little noise when I turn the drive shaft. Not terrible, I THINK it's ok, but it's been so long since I've pulled a leg that I can't remember if there should be any noise or not.
 

GA_Boater

Honorary Moderator Emeritus
Joined
May 24, 2011
Messages
49,038
After 56 years your joints would creak a little, too. LOL

Youtube is probably the way to go. And the easiest after it finally uploads.
 

MPrimeaux

Petty Officer 1st Class
Joined
May 10, 2019
Messages
240
After 56 years your joints would creak a little, too. LOL

Youtube is probably the way to go. And the easiest after it finally uploads.

That's a hell of a point.... It's not a sewing machine. I'm gonna keep at it for a while and I may post that video tonight. Thanks again brother for baby sitting me!
 

racerone

Supreme Mariner
Joined
Dec 28, 2013
Messages
36,265
If you take it off in NUETRAL then a bump may put it into FORWARD !!!-----That clutch dog has a strong spring that pushes it into FORWARD.-----That sprink DOES NOT hold it in neutral.
 
Top