Why water can intrude through crankshaft lower seal of 77 mercury 1150?

Chris1956

Supreme Mariner
Joined
Mar 25, 2004
Messages
27,148
Normally the lower crank seal, if leaking will only allow water on the #6 (most common) or #5 and #6 (less common) spark plug. Since you have water on #4 as well, it is likely inner or outer exhaust cover and or baffle that is leaking. Sorry.....
 

Award

Seaman Apprentice
Joined
Nov 27, 2018
Messages
46
My motor is 78 80 hp 4 cylinder I had water get in bottom cylinder as well not sure how either I took power head off and I’m taking it apart not sure how long motor sat without being used. The ( water jack plate) ? Is this cover by spark plugs? It’s pitted pretty bad so I’m gonna get a new one. But as soon as you find out let me know
 

racerone

Supreme Mariner
Joined
Dec 28, 2013
Messages
36,297
Award.------The water jacket plate around the sparkplugs can not leak water into the cylinders.-----You need to check exhaust cover plates on the side of the block.-----Bolts may be tough to take out on some of those.
 

tavacska

Petty Officer 1st Class
Joined
Jan 21, 2017
Messages
244
Click image for larger version  Name:	403.JPG Views:	2 Size:	1.79 MB ID:	10695335

Update:
The exhaust cover is opened up AGAIN.

1. Looking at the gasket, it seems easy to find the leaking part. It's the top corner port between Cylinder water jacket and the exhaust side. And it's the only leakage by looking at the baffle gasket. Part of that area peer off easily with bare mating surface. Besides, there seems to be more milky gunk on that leakage side.

2. The inner water jacket cover is covered by thick soot on the outer perimeter and on all the bolts. The inner port wall has cleaner surface for all ports, especially the lowest one. It looks like the steam is sucked into cylinder and spelled out and washed the contacting baffle area. However, all the six mating lines between inner water jacket cover and exhaust ports are still covered by some soot. Which can prove there is no leakage of the inner water jacket cover? I really don't want to mess with the inner water jacket cover.

3. There is a lot gunk around the leakage area. To me it looks like the extra silicon sealer. After so much reading online recently, it seems the gasket failed because of too much silicon sealer and too wet when installing. When there is too much sealer and still wet, the gasket is slippery and can tear apart because of the bolt pressure.

Comments are welcome. Thanks.
 

Attachments

  • 425.JPG
    425.JPG
    975.8 KB · Views: 5
  • 432.JPG
    432.JPG
    1 MB · Views: 5
  • 432.JPG
    432.JPG
    1 MB · Views: 4
  • 402.JPG
    402.JPG
    1.3 MB · Views: 5
  • 403.JPG
    403.JPG
    1.8 MB · Views: 7
  • 403.JPG
    403.JPG
    1.8 MB · Views: 5

merc850

Commander
Joined
Jul 7, 2010
Messages
2,026
Replace both gaskets on the exhaust covers with new ones and make sure that the surfaces are clean and level; don't use any silicon seal. Put Anti-corrosion grease on the bolts and tork them according to sequence on page
1150-exhaust-bolts.jpg
 

Faztbullet

Supreme Mariner
Joined
Mar 2, 2008
Messages
15,618
Quit using them cheap paper gaskets, use the OEM silicon impregnated gasket.
 

tavacska

Petty Officer 1st Class
Joined
Jan 21, 2017
Messages
244
Replace both gaskets on the exhaust covers with new ones and make sure that the surfaces are clean and level; don't use any silicon seal. Put Anti-corrosion grease on the bolts and tork them according to sequence on page

Got it, thanks. I think the exhaust cover for 1150 should be 150-200 lb-in, as I read from other posts. I will do it 150 lb-in.
 

Faztbullet

Supreme Mariner
Joined
Mar 2, 2008
Messages
15,618
After some searches it seem Merc has quit making the silicon impregnated gasket for Inline 6's and went back to paper. It was a greenish black gasket.
 

tavacska

Petty Officer 1st Class
Joined
Jan 21, 2017
Messages
244
I did a lot search on the gaskets and found the same results. the only green gasket is for the midsection gasket where the power head sits on.
I think what I get now is the genuine Mercury OEM gaskets from a reputable vendor. I will apply a very very thin silicon and wait 20 mins before installing it.
 

Faztbullet

Supreme Mariner
Joined
Mar 2, 2008
Messages
15,618
Use no silico n!!!! Use aviation gasket sealer....also you need to replace the inner baffle gasket.
 

tavacska

Petty Officer 1st Class
Joined
Jan 21, 2017
Messages
244
The inner plate gasket will be a headache to me.
1. What will be an alternative for the resiweld? I don't want to use loctite red, can I use loctite blue?
2. Inner plate gasket needs any sealer? What kind of sealer? The sealer is also paper with no pre-coating.
3. Inner water jacket screw will be 125 in-lb?
 
Last edited:

sludgeguy68

Petty Officer 2nd Class
Joined
Jul 16, 2010
Messages
111
Hi, I'm no expert but I resealed mine last year using Jeff Grigg's method and it seems to be holding up. I would remove the inner plate since you're there already and it could be the problem.

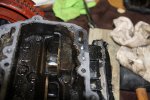
The gaskets should be glossy with the thermo sealer; if not, send back and ask if in stock or order from a different vendor (both are sold under the same part number for some reason). All threads should be chased with a tap and bolts cleaned/replaced if worn.

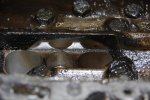
I took the inner plate off mine and discovered a severe bend in it that was causing the water intrusion; it rocked back and forth when I placed it on the block. I sanded it down until it sat completely flat on the block using sandpaper on glass (would be faster with a table surface belt sander).

Clean all edges with acetone before installing. I installed the inner plate with an extremely thin coat of high temp RTV (NOT the copper kind) on both sides of the gasket, using torque specs and pattern with locktite blue.

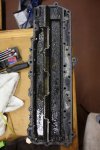
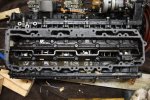
My middle plate was also pitted and bent, I had to grab one from a donor motor that was in better shape. Even with a straight-ish plate, you need to ensure the middle plate isn't touching the inner diverter, otherwise it'll expand and push out at operating temp. Put a very thin film of grease along the length of the diverter on the inner plate and rest the middle plate on top without using any bolts. File or mill the middle plate until there is no grease transfer, and there is no light escaping between the plates.

Once milled and no light escaping around the middle plate, clean and install middle and outer plates with a very thin coat of black high temp RTV on the gaskets. I used locktite blue here as well. I don't have torque specs handy but they're in the manual.

Hope this helps.
 

tavacska

Petty Officer 1st Class
Joined
Jan 21, 2017
Messages
244
Sludgeguy, thanks. That explains every details.

Now I need to look for the glossy gaskets. Mine does not look glossy. Do you have your vendor information that you got the gaskets from?
 
Last edited:

sludgeguy68

Petty Officer 2nd Class
Joined
Jul 16, 2010
Messages
111
Sludgeguy, thanks. That explains every details.

Now I need to look for the glossy gaskets. Mine does not look glossy. Do you have your vendor information that you got the gaskets from?

Sorry I dont, the guy who bored my block ordered a powerhead kit it from a dealer catalog, and I didnt get a good look at it.
 
Top