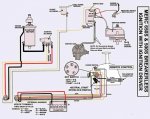
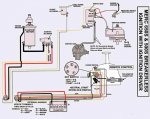
Mercury 65 HP 4 Cylinder Wiring Diagram

Criv69

Seaman Apprentice
Joined
Sep 10, 2015
Messages
32
Just picked up a 4 cylinder Mercury 4 cylinder. All of the wiring is torn apart. I'm having trouble locating a wiring diagram. Wondering if anyone here has access to a diagram or maybe has a similar motor and could post a couple pictures. Much appreciated.
 

Tassie 1

Chief Petty Officer
Joined
Apr 13, 2018
Messages
582
Google Maxrules,
4 cylinder mercury outboard wiring diagrams

moderators delete if not allowed,

it's been awhile,
 

Chris1956

Supreme Mariner
Joined
Mar 25, 2004
Messages
27,137
I would think that your cylinder 65HP motors is pretty old, say late 60s or early 70s. You may have some trouble finding the exact wiring diagram for your motor. I would recommend you find any wiring diagram for a 4 cylinder Merc (75HP - 85HP?), with the same ign type. It will likely be the same as yours.
 

Criv69

Seaman Apprentice
Joined
Sep 10, 2015
Messages
32
I was able to get the serial number off of it this morning 2603*** which if I'm reading the charts right makes it a 69' model year so I can understand it being difficult to find materials for this motor.

That search helped a lot. Maybe someone that currently has one of these motors can send a couple pics under the cowl. Not much luck finding any pictures through google.
 

Faztbullet

Supreme Mariner
Joined
Mar 2, 2008
Messages
15,616
Don't spend a dime on it till you jump starter and get a compression test first....
 

Criv69

Seaman Apprentice
Joined
Sep 10, 2015
Messages
32
Agree with you Faztbullet. I've learned that lesson the hard way. I'm doing a compression test this morning once I get it off the donor boat.
 

Criv69

Seaman Apprentice
Joined
Sep 10, 2015
Messages
32
I'm only getting about 65 PSI across all cylinders. It does appear my "head gasket" is nothing but silicone and I suspect this may be the issue there.
 

merc850

Commander
Joined
Jul 7, 2010
Messages
2,026
The "head gasket" is just a water jacket seal, the cylinders are cast in 1 piece into the block; but the low comp. and the silicone seal makes me think that the motor has been worked on by losers and possibly overheated. I wonder about your gage too - all the numbers are low but the same, try it again.
 

Chris1956

Supreme Mariner
Joined
Mar 25, 2004
Messages
27,137
If all the compression numbers are the same, the motor is probably good, and the compression gauge is likely bad. I would recheck with a different gauge.
 

Criv69

Seaman Apprentice
Joined
Sep 10, 2015
Messages
32
It's a brand new gauge. Literally bought this morning. I've also tested it on the motor in my jetski and it read about 90 psi. Although a bit low about what I would have expected for the amount of hours I have on it.
 

GA_Boater

Honorary Moderator Emeritus
Joined
May 24, 2011
Messages
49,038
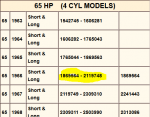
The motor is a 1966;

66650.PNG

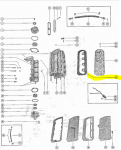
It has no separate head, the block is one piece. You need item #41 - Cylinder Head Cover Gasket Quicksilver # 27-33015. This gasket won't cure the low compression, only water leaks from the cover.

650block.PNG

The compression numbers are low, but most importantly they are even. Has the motor been sitting unused for a while? Lack of use can cause low numbers. See if you can get it running before throwing in the towel. My motor sat for years and only 50 PSI until I got her running after fixing the wiring. You may have the same situation.

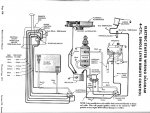
This should be your wiring diagram from Maxrules mentioned above. http://www.maxrules.com/oldmercs/Wiring/1966ona/30.pdf

This manual will work for you. It's a Clymer, but better than a SELOC in my opinion and cheaper than a rare as hen's teeth factory manual - Clymer B719. Pick a source - iBoats doesn't sell it. http://lmgtfy.com/?q=clymer+b719
 

merc850

Commander
Joined
Jul 7, 2010
Messages
2,026
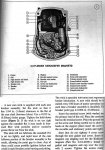
After you clean the carbs and check the fuel pump you should check the magneto; if you're serious about this motor a manual is a must. kiekhaefer-magnetosmall.jpg
 

Tassie 1

Chief Petty Officer
Joined
Apr 13, 2018
Messages
582
Also a bit on id of the motor, if a '66 it should a chrome strip around the cowell and a chrome handle on the top as well,
known as silver bands
the later model was known as redbands coz they had red bands on the cowel ( not the right spelling l know ) but no handle on the top,

my younger son had one 8-10? yrs ago
DO NOT DO what he did in a attempt to impress his mate,
run it on high revs on muffs,
one spark plug, and a fair piece of jacket, decided enough was enough and decided to exit and hit the back fence with a bang,

he had been warned not to do it,

l still like to remind him of that fact every now and then, lol

anywho, these motors look good on the same era boats, not as good as the white motors though,
one day maybe...
 

Faztbullet

Supreme Mariner
Joined
Mar 2, 2008
Messages
15,616
Don't waste your time or money. The motor has been overheated that why the water jacket failed and was siliconed. Also it don't matter how long it set as it will never regain 40 psi. That motor needs at least 100psi to idle and run correctly..
 

Criv69

Seaman Apprentice
Joined
Sep 10, 2015
Messages
32
This is a 69' motor. Serial number is 2603040. Puts it after the last row shown in that picture. It seems this is a weird year because through some searching I've found three diagrams all listed for this motor. The closest one I can find is this one. So far I've pulled the ignition driver and and re soldered the connections. Next I need some new boots for the spark plugs and to replace a couple other questionable wires.

It appears someone has done some work to this as they have installed a new harness and plug just never connected any of the wires.

I'd at least like to see if I could get spark and then see if it might run somewhat.

At this point I've sold enough of the donor boat parts (mostly scrap aluminum) and still have the trailer left to sell so the way I look at it, I've got very little in it if anything. Even if I blow a couple hundred on parts theres still a ton of good parts on this motor to part out. If nothing more it's something to do on nights and weekends.
 

Attachments

  • photo289558.jpg
    photo289558.jpg
    54.1 KB · Views: 20

Criv69

Seaman Apprentice
Joined
Sep 10, 2015
Messages
32
Just an update. I've rewired the distributor. The old wires were toast so I resoldered some new wires in. I've started hooking everything back up and realized at some point someone replaced the wiring harness with the incorrect one. The harness that is attached to the motor has 7 wires. The diagram that matches my motor shows it should only have 5 wires. I've got most of them figured out.

I'm planning to just set up some temporary switches so I can work the starter/on position.

Red wire from battery(+) to starter solenoid.

Black wire from battery(-) to engine ground.

Yellow wire from starter solenoid to momentary switch to battery (+)

Not planning to wire the electronic choke as the mechanical lever works fine for now.

Not sure what the other yellow wire going to the switch box is. I assume it would goes to battery (+) to simulate "Key On" position.

If anyone can tell me what yellow wire coming from switch box to the motor side plug is would be helpful. As stated above I believe this just needs to be battery (+) to simulate key on.
 

Attachments

  • photo289558.jpg
    photo289558.jpg
    54.1 KB · Views: 9

Chris1956

Supreme Mariner
Joined
Mar 25, 2004
Messages
27,137
The yellow wire on a Merc went to the starter solenoid secondary winding. The secondary winding caused the solenoid to close and allow the starter to turn.

Of course, your wiring diaphragm shows two yellow wires......,
 

merc850

Commander
Joined
Jul 7, 2010
Messages
2,026
The SALMON wire that goes to the blue wire terminal is the engine shut-off to ground - do not put + voltage to it, the Lightning Energizer is like a magneto and generates the power to fire the switchbox.
 
Top