Continuity Washer on drive mounting stud

RaceCarRich

Petty Officer 1st Class
Joined
May 31, 2015
Messages
233
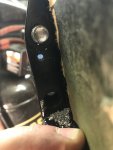
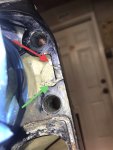
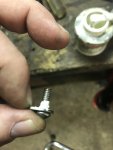
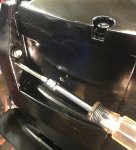
I’m refinishing my drive so I tried to remove the oddly shaped stainless washer that would go around a drive mounting stud. I went to remove the torx fastener that retains the washer to the drive and it snapped.

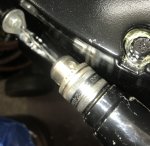
I’m guessing this washer has something to do with continuity. Is this correct? Any issue if it goes on a different stud? Figured I could drill and tap a new retaining fastener hole near a different stud much easier than trying to drill or remove the little broken piece of fastener.
 

wrench 3

Commander
Joined
Aug 12, 2012
Messages
2,108
You're right about the continuity. I've never seen anyone try to remove one before but I see no problems with relocating it. I'd install the anchor screw with a small amount of sealer on the threads directly below the washer to stop corrosion but make sure that the head is clean for continuity.
 

achris

More fish than mountain goat
Joined
May 19, 2004
Messages
27,468
When I'm changing anodes and re-installing drives/transoms etc, my bestest friend is a multimeter. :D
Use one on either the resistance scale or the continuity check to ensure everything is electrically connected to everything else. Check between the prop and each anode (trim ram, 2 of, anode plate, gimbal housing anode), also check to one of the drive mounting studs, then move to the inside of the boat and check between the engine block and one of the gimbal housing studs. Basically, check everything!

Have fun.

Chris.....
 

RaceCarRich

Petty Officer 1st Class
Joined
May 31, 2015
Messages
233
Thanks for confirming and the testing methodology. Pretty much what I figured but wanted a second opinion from those in the know.
 

skunkedskippy

Petty Officer 2nd Class
Joined
Apr 30, 2017
Messages
130
Yep, broke the same screw on my Bravo. The really embarrassing part is that the screw didn't even need to be removed. I bought an extractor bit, but as you probably know, there is not much clearance in that area. I was able to drill into the broken screw with an extension, but I can't get the extractor/t-handle to reach. And I've been unable to find a extension that accommodates the extractor. Good luck with what ever you decide to do. Please post updates when you have time.
 

RaceCarRich

Petty Officer 1st Class
Joined
May 31, 2015
Messages
233
Thanks. Will do.

I had a 12-24 stainless screw so I needed to get a 12-24 bottom tap. Picked up a set for under $5 at Home Depot today.

Figure I’ll work on it this weekend.
 
Last edited:

RaceCarRich

Petty Officer 1st Class
Joined
May 31, 2015
Messages
233
Turns out I didn’t need a bottom tap after all. I didn’t notice because I had the driveshaft side taped off from when I painted the drive but the hole went through to a cavity as shown.
 

Attachments

  • photo308794.jpg
    photo308794.jpg
    2 MB · Views: 0
  • photo308795.jpg
    photo308795.jpg
    633.1 KB · Views: 0
  • photo308796.jpg
    photo308796.jpg
    1.8 MB · Views: 0
  • photo308797.jpg
    photo308797.jpg
    1.9 MB · Views: 0
  • photo308799.jpg
    photo308799.jpg
    1.8 MB · Views: 0

RaceCarRich

Petty Officer 1st Class
Joined
May 31, 2015
Messages
233
Not sure all the photo captions came through but the takeaways are 11/64 drill bit works for 12-24 screw (unless you have #16). Air drill was used due to smaller size (and the chuck still wore through a piece of cardboard and wounded my new paint). Aluminum tapped like butter. In last photo, red arrow shows new screw coming through, green arrow shows the backside of the original broken screw. Easy enough but I should have done before painting.
 

RaceCarRich

Petty Officer 1st Class
Joined
May 31, 2015
Messages
233
I’ve never welded stainless but don’t see why it wouldn’t complete the circuit. Careful with the heat on the aluminum.
 
Top