Water getting in.............

sogood

Petty Officer 1st Class
Joined
May 11, 2016
Messages
361
Bellows ring_LI.jpgOpposite bellows ring_LI.jpg

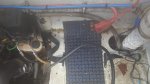
So, further to the above, I finally got the gimbal housing off and had a better look at what was going on inside. While my bellows, on first inspection seemed to be in one piece, with no cracks or damage, the same can't be said of the housing.You can see from the photos, that both the "retaining ring" in front of the bearing has a chunk missing out of it along it's bottom edge. Likewise with the bellows "flange. As the bellows clamps onto both of these parts, it was only a matter of time before it sprang a leak, especially as the leg has to stay raised when the boat is moored, putting extra tension on the bellows in these exact spots.

So, I'm curious to know if the "retaining ring" ( forgive the terminology) is removable/replaceable and if so, is it a push fit or does it screw in. I'll be replacing the bearing also, for what it's worth. Likewise with the flange on the gimbal. The damage doesn't look repairable, so does this mean replacing the whole gimbal housing? Not pretty, but happy to get to the bottom of my leak and not to the bottom of my harbour!

Any thoughts or input much appreciated.
 

Bt Doctur

Supreme Mariner
Joined
Aug 29, 2004
Messages
19,084
That is caused by water staying in the bellows.and corroding away. You had a leak that you missed or didnt think is was that important as long as the bilge pump worked. A new housing is needed and a maintence plan for annual service
 

Rick Stephens

Admiral
Joined
Aug 13, 2013
Messages
6,118
Damage there, of that kind, would have me planning to pull the motor out and the transom apart and do a full survey of the surrounding boat structure. Too often to go along with corrosion is rot in the wood. Pulling motor and transom is an afternoon's work. Drill some test holes once you have full access to transom and stringers.
 

sogood

Petty Officer 1st Class
Joined
May 11, 2016
Messages
361
Thanks for the input guys. Not quite what I hoped to hear, but not unexpected either. I suppose it give me the opportunity to give things a thorough going over, as suggested. This boat is still something of a work in progress ( aren't they all!!) and I'm learning a lot as I go along. Thanks again and updates will follow.
 

Lou C

Supreme Mariner
Joined
Nov 10, 2002
Messages
11,780
Salt water use? Never seen anything like that even here in the salt pond! I/O powertrains are not tolerant of deferred maintenance. The drive should be pulled each fall, or even sooner if you start hearing suspicious noises that suggest a noisy gimble bearing (almost always due to water intrusion) or knocking u joints (same cause and can destroy the transom mount if they let go at speed). That can sink the boat!
 

sogood

Petty Officer 1st Class
Joined
May 11, 2016
Messages
361
Damage there, of that kind, would have me planning to pull the motor out and the transom apart and do a full survey of the surrounding boat structure. Too often to go along with corrosion is rot in the wood. Pulling motor and transom is an afternoon's work. Drill some test holes once you have full access to transom and stringers.

So, I'm looking at going the whole nine yards on this and sorting it all out properly, once and for all. I may have a good clean freshwater use gimbal assembly sourced, so that's a start. I've googled and trawled through youtube but can't find any detailed tutorials on pulling the motor. I've pulled motors on cars in the past, but never on a boat and was looking for specific do's and don'ts regarding my engine. Many videos described as "Pulling the motor" simply show someone with a hoist or similar, actually lifting the engine from the boat, with little or no introduction or detail.

I intend to give the transom etc. a good going over with a view to replacing it if needed ( probably so) and am very comfortable with woodwork, fibreglass etc. but no doubt I'll have questions.

But in the meantime, pulling the engine is my first concern. I already have the leg removed and also the gimbal/ bellhousing from the outer transom. I know I need to pull the motor anyway, to get the transom plate off, so any pointers much appreciated. Thanks for the responses, and honesty, to date.
 

achris

More fish than mountain goat
Joined
May 19, 2004
Messages
27,468
Remove drive
Disconnect, and plug fuel line
Disconnect battery lead at starter motor
Disconnect battery ground cable at back of engine
Disconnect throttle cable at carb
Disconnect remote control shift cable and lower shift cable from shift plate
Disconnect water hose at either transom plate or thermostat housing
Loosen rubber exhaust tubes at top of y-pipe.
Disconnect instrument harness 10 pin Canon plug harness connector
Remove top locking nut from each side mount
Remove rear mount bolts (2)
Sling engine and lift...

Anything I've missed?

Chris
 

sogood

Petty Officer 1st Class
Joined
May 11, 2016
Messages
361
Remove drive
Disconnect, and plug fuel line
Disconnect battery lead at starter motor
Disconnect battery ground cable at back of engine
Disconnect throttle cable at carb
Disconnect remote control shift cable and lower shift cable from shift plate
Disconnect water hose at either transom plate or thermostat housing
Loosen rubber exhaust tubes at top of y-pipe.
Disconnect instrument harness 10 pin Canon plug harness connector
Remove top locking nut from each side mount
Remove rear mount bolts (2)
Sling engine and lift...

Anything I've missed?

Chris

That is about as clear and concise as is possible. Many thanks. It covers anything that I thought might be the case. Updates will follow.
 

Rick Stephens

Admiral
Joined
Aug 13, 2013
Messages
6,118
Pulling a boat motor is so hugely easy compared to a pickup motor as to be not comparable. Last one I did was literally 45 minutes from first bolt removed to hanging on a sling. Post away whenever you have questions.
 

Scott Danforth

Grumpy Vintage Moderator still playing with boats
Staff member
Joined
Jul 23, 2011
Messages
47,246
Crack a beer
Remove drive
Disconnect, and plug fuel line
Disconnect battery
Disconnect battery lead at starter motor
Disconnect battery ground cable at back of engine
Disconnect throttle cable at carb
Disconnect remote control shift cable and lower shift cable from shift plate
Crack another beer
Disconnect water hose at either transom plate or thermostat housing
Loosen rubber exhaust tubes at top of y-pipe.
Disconnect instrument harness 10 pin Canon plug harness connector
Remove top locking nut from each side mount
Remove rear mount bolts (2)
Sling engine and lift...
Crack another beer
Place engine on stand
Unbolt Transom plate


Anything I've missed?

Chris

Chris.... I corrected it.
 

sogood

Petty Officer 1st Class
Joined
May 11, 2016
Messages
361
I've started doing some associated work on the above, firstly in the form of a small trolley to house/move the engine once it's removed. And happily, my starter which had been submerged, is up and running again, on the bench at least. I soaked it for a few days in a bucket of fresh water and a little detergent. Then I dismantled it, cleaned it, dried it and left it sitting in the hot press for a week or two. I lubed where needed, re-assembled and it works fine again, spinning like a tornado with the Bendix engaging etc.

In preparation for the lift,I started disconnecting bits and pieces on the engine today, before the cold got to me. And this leads to my (latest) question. In the attached picture, you can see the assembly at the transom, which is easily removable. This will help with pulling the engine, but in each bottom corner, you can see a ledge, where the batteries would usually sit.

These ledges are part of the deck floor and they run up in a continuous piece, up the inside of the transom. They reduce the access width of the transom by about 12" on either side. So, if and when I want to replace a section of the transom which is the full width, how do I get my full width transom section in? I'd rather not fit the transom in sections. Can I cut these ledge/floor sections out for access and then reglass them back in when I'm done?

All this will become much clearer once the engine is out, for which I'm awaiting word on an engine hoist loan. Any thoughts welcome
Transom Engine bay.jpg
 

Attachments

  • Transom ledge.jpg
    Transom ledge.jpg
    144.1 KB · Views: 0

Grub54891

Vice Admiral
Joined
Jun 17, 2012
Messages
5,897
Yes you can cut the ledges out, actually the inside part is a stringer, it will have to be sistered back in properly. I think you will find the wood inside them rotted also, how far? Good question.
 

Rick Stephens

Admiral
Joined
Aug 13, 2013
Messages
6,118
Nice part with decking and bulkheads is they cut away fairly easy and go back together better than original. Typical factory boat builder leaves a lot to be desired on sealing up wood used for decking and bulkheads. They often leave wood with the hidden side left bare. Which soaks up moisture over the life of the boat. You can slice hunks out of the way with a saw, and fiberglass in new pretty easily, with the added benefit of being sealed up, by the more appreciative to longevity, owner of the boat who's doing the work himself.

Can be fun project if you like being dusty, twisted into a pretzel, and sore in every part of your body. Quite satisfying that way :D
 

sogood

Petty Officer 1st Class
Joined
May 11, 2016
Messages
361
So, everything is undone, disconnected and my neighbour will be with me in the morning, complete with his tractor and front bucket hoist, minus the bucket. I even removed the exhaust boots and elbows just to ensure that things should go as smoothly as possible. Rather than removing the two front motor mount bolts, I removed the four actual fixing coach bolts, as my trolley stand is made up to allow me to temporarily fix the motor to it, using the mounting plate holes. In doing so, I was surprised to find the coach bolts came undone with the minimal of effort.
I thought that maybe they'd worked a bit loose over time, through vibration. Not so. When I tested this by tightening them back in again, they just kept turning, with no bite at all!!
So, as expected, I'll be taking an in depth look at the stringers. I'm actually happy to have this opportunity, secure in the knowledge that after all is said and done, I'll have a stronger, safer, longer lasting boat. I intend to go "over the top" with any repairs, as I'm not getting any younger and don't really want to have to repeat this again. Updates to follow, watch this space and thanks for the responses to my previous questions.
 

sogood

Petty Officer 1st Class
Joined
May 11, 2016
Messages
361
So my neighbour arrived this morning with his tractor and in 5 minutes the motor was sitting on it's trolley. Then the rains came so I didn't get much done, except to have a look see in the bilge. More rain is forecast for tomorrow, but I'll make a start in removing the inner transom assembly etc. Then I'll get into washing out the bilge really well so I can see what I'm dealing with. I'll post updates as I progress and no doubt will have plenty of questions to ask. Engine out.jpgEngine bay 2.jpg
 

Rick Stephens

Admiral
Joined
Aug 13, 2013
Messages
6,118
Looks like fun times ahead. From here it kind of looks like the motor mounts are independent of your main stringers. They might be easier to rebuild than the typical. Looking forward to seeing how your test bore holes come out. Don't be afraid to drill there and here, aft and fore. Start low, work your way towards the bow. Water works its way up into everything by capillary action, but damage occurs down low first.
 

Grub54891

Vice Admiral
Joined
Jun 17, 2012
Messages
5,897
Be sure to document where all stringers, mounts are located, from height, side to side, diagonal, front to back. Take lots of pictures, and then take some more!. You can never have to much info. Helps a lot when building the new mounts and transom.
 

sogood

Petty Officer 1st Class
Joined
May 11, 2016
Messages
361
A glorious day here today with blue skies and sunshine and very warm for the time of year. So I got some chopping done before I had to meet up with my friend to make a start on his canopy/cover. I cut away some more material and got down, in a few places, as far as the original fibreglass on the inside of the transom. I cut away the aforementioned battery shelf for better access, but I still foresee issues in relation to fitting the new transom. Ergo my previous question about putting the transom in, in sections. Not my preferred option, but the only other alternative that I can think of, is to cut the cap away across the top of the transom, which would give me total access, for a full depth, full width replacement transom. It would also make removal of the old material somewhat easier.

I'm not worried about dressing off the cut once all is finished. I have a few thoughts in mind. Can I assume that removing this section of the cap won't affect the structural integrity of the boat? I can easily brace the hull across it's width just to prevent any serious movement. FWIW, the boat is currently sitting on its' bunked trailer, minus the weight of the engine. Any thoughts appreciated.
I'm considering making the cut on the cap across the corner, like a mitre, provided that gives me the required access. Otherwise it would be a straight cut across, roughly where the cleat is.

Transom cutaway.jpgCap.jpg
 

Rick Stephens

Admiral
Joined
Aug 13, 2013
Messages
6,118
There's folks on this forum with a hell of a lot more experience than I with transom restorations, but off hand I have seen others do their restorations both ways, cutting the cap or sectioning the transom. Also seen transoms go in in overlapping layers.You kind of have to pick your poison. I would be sitting in the helm chair with a margarita (freezing weather or no freezing weather) contemplating the task from every angle until I picked whatever seemed most doable for me. Off hand I think I would cut the cap. Not all that big a deal to put it all back - for me the hardest part would be the gel coat repair where I cut it. Others seem to find gel coat pretty easy.... Guess it's just a personal shortcoming I have there.

Rick
 
Top