Mercruiser 165HP 6cyl 400F At One Area

Amir10

Cadet
Joined
Sep 17, 2018
Messages
11
Howdy.

Hoping someone can help shed some light on my concern here. I'm new to boating and this is my first craft. So please bear with me. I'm fairly handy and I plan on doing a lot of work myself.

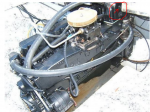
My Mercruiser 165HP 6cyl (old school from 75 - I believe its Ford) with a early version Alpha one driver is running seriously hot in the this one particular area where the exhaust manifold connects to the block. I have it circled red in image attached.

I was on the lake yesterday cruising around for several hours and when I checked with an IR gun on that area, it showed 405F! I was running around 3000rpms. Needless to say, this scared me and I went straight back to the dock.

The thing is the engine water temp on the gauge is always reading normal. 145 -165 when running and idling around 145 or lower. I trust this reading because I replaced the temp sender and it matches when I check on the block with an IR gun.

I've also checked around the entire engine block with and there are no temps higher than 170 at any point on the block.

This particular area that is running this hot is also pretty rusted up and I'm guessing its because of the excessive heat. I'm suspecting this is not normal and something is amiss. This is my first boat and it being a restored antique, I'm trying to take good care of everything. Especially the engine. My question is this normal? Seeing such high temps as 400F anywhere on the block? Or should I take things apart to figure out what's going on?

Any suggestions would be greatly appreciated. :)
 

Attachments

  • photo303461.png
    photo303461.png
    492 KB · Views: 5

achris

More fish than mountain goat
Joined
May 19, 2004
Messages
27,468
It's a GM engine...
high temperature at that point would be considered normal. It's not water jacketed..
​​​
I also noticed you don't have an exhaust manifold 'water reversal kit' installed... Look into it before you crack that manifold...

Chris....
 

Amir10

Cadet
Joined
Sep 17, 2018
Messages
11
It's a GM engine...
high temperature at that point would be considered normal. It's not water jacketed..
​​​
I also noticed you don't have an exhaust manifold 'water reversal kit' installed... Look into it before you crack that manifold...

Chris....

Wow! Really quick reply! Thank you for the fast and concise response Chris.

I looked into 'water reversal kit' before I even finished reading your reply! Lol.

Is there any place selling these or do I just source the parts myself?
 

achris

More fish than mountain goat
Joined
May 19, 2004
Messages
27,468
The kit was released many years ago, but it's no longer available... The good news is that it's not difficult to 'make up' from parts that are still available...

Give me a day (it's 4am here)... And I'll do a list of parts and some instructions...

Chris....
 

Amir10

Cadet
Joined
Sep 17, 2018
Messages
11
Thank you much Chris! Such a list and instructions would be astronomically helpful! Will keep an eye out for when you send.

And yeah I read through that post already and definitely do not want to be having such problems as cracking manifolds. The water reversal trick seems fairly straight forward to me and such an easy mod that I really would not have any reason to not do it!
 

achris

More fish than mountain goat
Joined
May 19, 2004
Messages
27,468
The original engine in my boat was also a 165, and I also fitted the kit. Yeah really easy... No good reason not to have it.
 

achris

More fish than mountain goat
Joined
May 19, 2004
Messages
27,468
ok, here we go....

I'll assume you have read the service bulletin and understand how the water needs to be sent from the rear of the manifold to the front, instead of the other way around, and why...

Parts you'll need.
Manifold rear end cap. (Same as the front one) -60252A2
Gasket for above 27-480431
Screws for new cap (4 required) 10-37562 (1" x 5/16" UNC)
Restrictor plate -60207
Gaskets for plate (2 required) 27-997772
Brass 90° fitting (for exhaust elbow) 22-36305T
Water heater hose of the same diameter as the nipples on the end cap and the 90° elbow (from memory, it's 3/4". I could be wrong, check it). 2 lengths a little longer than the manifold.
Hose clamps (2 required) for the above hose.

Installation.
Drain water from the manifold (remove plug on the bottom, near the aft).
Remove small hose between thermostat housing and manifold front end cap. Discard.
Remove exhaust elbow and discard gasket.
Remove manifold rear end cap and gasket and fit new cap with nipple, and new gasket and longer screws. Your choice as to where the nipple faces. The original kit, which had molded hoses had the nipple facing inboard, the hoses ran along the top of the manifold, between the rocker cover and the carb. If you don't have molded hoses, trying to run them both along there may result in a kink. Most who don't have the molded hoses run the hose from the thermostat housing, out around the outside of the carb and onto the nipple facing outboard... (plenty of pictures on the interweb)
Remove the pipe plug from the inside side of the exhaust elbow and fit the 90° fitting, facing forward, use a SMALL amount of thread tape.
Fit the gaskets and restrictor plate (air bleed hole facing forward) on the manifold and refit the elbow.
Run a hose from the front end cap nipple to the new 90° fitting. This one can run along between the carb and rocker cover.

Finished. Enjoy a nice cold beer. :D

Don't think I have forgotten anything.... :noidea:

Cheers,

Chris......

60252A3.JPG
 

Amir10

Cadet
Joined
Sep 17, 2018
Messages
11
ok, here we go....


Restrictor plate -60207

Thank you very much for this great information chris!

I'm making a list of the parts from the list your provided with part numbers. I understand what all is needed now and where it will be used. But for the restrictor plate 60207, I'm not quite sure I follow where that will be used and why? I'm guessing its to prevent the water from exiting from the exhaust elbow as soon as it enters the new manifold end rear cap?
 
Last edited:

achris

More fish than mountain goat
Joined
May 19, 2004
Messages
27,468
Exactly. It has a small (about 1/8") hole in so air can't get trapped beneath it.
 

Amir10

Cadet
Joined
Sep 17, 2018
Messages
11
Remove the pipe plug from the inside side of the exhaust elbow and fit the 90[FONT="Calibri" said:
°[/FONT] fitting, facing forward, use a SMALL amount of thread tape.

Another quick question Chris. Can I install the 90 degree fitting on either side of the exhaust elbow? I see that the exhaust elbow has a total of three pipe plugs on it. I'd like to install the fitting on the right side. See image. Would this work?
 

Attachments

  • photo303627.png
    photo303627.png
    729.4 KB · Views: 5

achris

More fish than mountain goat
Joined
May 19, 2004
Messages
27,468
Yes. You can install the fitting in any of the holes.
 

Amir10

Cadet
Joined
Sep 17, 2018
Messages
11
Yes. You can install the fitting in any of the holes.

Thank you Chris. You're very helpful! I have everything I need and will do this project next weekend.

Another quick unrelated to this topic question if you don't mind. I don't necessarily want to start a whole different thread for.

How can I tell what pitch my prop has? I see the prop finder too on here but it's asking for pitch when I select my engine. I believe to be having a slipping prop issue and want to swap out props but I don't really know which prop I'd buy. I currently have a fancy looking stainless steel prop on there. Any clues would be helpful. Worst case scenario my coupler is bad and that'll put a quick end to my boating season. :confusion:
 

achris

More fish than mountain goat
Joined
May 19, 2004
Messages
27,468
...How can I tell what pitch my prop has? I see the prop finder too on here but it's asking for pitch when I select my engine. I believe to be having a slipping prop issue and want to swap out props but I don't really know which prop I'd buy. I currently have a fancy looking stainless steel prop on there. Any clues would be helpful. Worst case scenario my coupler is bad and that'll put a quick end to my boating season. :confusion:

Depends on the prop... Most have it stamped into the outer hub somewhere. Others have it cast into the end of the inner hub...

prop1.JPG

Chris........
 
Top