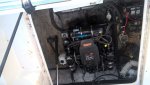
I just did an R&R last fall. I did not see a lot of details in the manual for removal of the engine. Just 17 steps, kind of like using a roadmap in Texas, they only make sense after you get there. Removing key parts of the boat was almost as much work.
From service manual 32 that I used to remove a 2002 model 4.3, for your reference...
1. Disconnect the battery cables.
2. Remove the engine cover.
3. Loosen the clamp and remove the instrument wiring harness plug from the engine wiring harness receptacle.
4. Loosen the hose clamp retaining the fuel line to the fuel inlet.
5. Close the fuel shutoff valve, if equipped.
6. Disconnect and plug the fuel line to prevent fuel in the line from leaking into the bilge.
7. Disconnect the throttle cable and retain the fasteners.
8. Disconnect the shift cable from the shift plate and retain the fasteners.
9. Disconnect the power steering hoses.
10. Disconnect the seawater inlet hose from the transom.
11. Loosen the hose clamps at the bullhorn.
12. Remove the gear lube monitor and the hose and place out of the way.
13. Disconnect any grounding wires and accessories that are connected to the engine.
14. Support the engine with a suitable sling through the lifting eyes on the engine.
15. Remove the rear engine mounting bolts.
16. Remove the front lag bolts. Retain the fasteners.
17. Carefully remove the engine.
There are some drawings in the manual along the way for orientation and referencing.
For step 10 pertaining to the inlet hose, I decided ahead of time to replace that hose and just cut the current one figuring it would be easier to install the new one than finagle the access to remove the old one and keep it, and it was. Extra cost but was worth it to me, plus now that is new.
There was a small cooling hose from the power steering cooler on the back of the engine to the transom rack, it was not called out in the instructions. It got stretched a little before I saw it.
Be sure to get all new rear mounting kit for bolts, nuts fiber washers and double wound lock washers.
Never waste an opportunity like this to justify some new tools
")
For this effort I got the full 5 pc. set of hose removal picks, they were vary valuable when it came to the exhaust.