reavesga
Petty Officer 2nd Class
- Joined
- Feb 14, 2010
- Messages
- 163
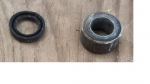
I went to reinstall my drive today and noticed that the O-ring for the water tube is too big. I rechecked my part number 25-33504 and that seems to be the right number at least according to my Mercruiser dealer and marineengines.com illustrated parts diagram. It is clearly too big though to fit into the machined O-ring groove on my gimbal housing. The O-ring that came out was tossed so I don't have it for comparison. I could take some ultra gray and "glue" it in place as I reinstall the drive, but that might be dicey as I am almost 100% sure I will end up pinching the O-ring between the drive and the gimbal housing. I think I should go down to my local parts house and get a smaller O-ring. Not by much but enough so it fits in the O-ring groove. So here is the question. Is that the right part number, 1972 vintage Mercruiser with 140 Hp motor and is it supposed to be too big and some magic happens at installation that forces it into the groove without pinching?
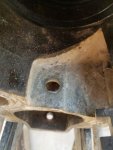
Second question. there is a big rubber ring that came out around the drive. the book shows it going into the housing first. Question, what is the seal that keeps the water out. Is it the paper seal around the bolts or that rubber ring that goes up in the housing? If my shift shaft is leaks, it looks like it is on the wrong side of the paper seal around the bolts.
Just trying to learn some philosophy on how that drive is supposed to seal up back there. Everyone says don't put ultra gray on the seal around the bolts, so I will not, but is that what everyone actually does?