52FordF2
Petty Officer 1st Class
- Joined
- May 31, 2013
- Messages
- 372
I have a 1976 MC 1 Gimbel assy version.
Mercruiser Service Manual 90-68648 1963-1973
Mercruiser Service Manual 90-71707 1974-1977
I’m just typing this up to give others help on taking apart the old MC-1 Transom Assembly.
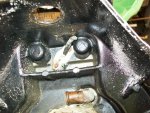
The two large dowel pins that go thru the Gimbel ring pivot point into the bell housing. Are held in with two aluminum style nails. Look around the dowel pin for the nail head, If you push "pivot" the Gimbel ring to port or starboard you can see the bent backside of the nail. After you remove the nail pins use a dowel pin puller on the dowel pins. The dowel pin has a 1/4-28 unf thread hole.


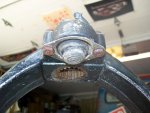
The big pin in the bottom of the gimbel ring has an 1/8 Dia cotter pin. If it doesn't look like it's there, it may have a little rusted piece remaining. Use a long 1/8 dia punch or aircraft drill bit. Then with the big pin just use a punch and hammer to pop it out from the bottom. The slot in it is to help realigned pin when it goes back together.
NOTE: (Don't lose the shims, one with each dowel, one with the bottom pin, and one with the top pin. Label each shim.)

There is a hole in the side of the Gimbel housing to access the hose clamp screw on one of the bellows. You could cut the bellows instead, then after its apart remove hose clamps.
The top pivot pin is held in by a long socket head Allen screw. If penetrating oil doesn’t do it and the screw head strips out, try an EZ out screw extractor. Otherwise you will need to drill out screw.
The smaller screws after plenty of penetrating oil may turn or break off. The trailer tilt bracket screws were a 1/4-20 unc. The ones holding the Trailer tilt switch Grommet bracket holder in the Transom housing broke off for me. Had to use a long aircraft drill bit for it, I accidently drilled thru the housing . This wasn’t a bad thing, because if you look there at how much room you have. You will notice that you could not get a tap in. It would have to be a long aircraft type tap. I just turned it over, drilled though hole and tapped from backside. I then put a set screw with Loctite to seal the hole.
Used (Slap Hammer Type) puller to remove all Bearings. To pull the upper needle bearing you will need a long puller. Had to modify a Harbor Freight with a longer shaft. Try to get the oil seals and bearings out in one piece. May need to try the Bearing Supply Houses for replacement.

Most of the time I hear that people look for this Trim/Tilt switch, but it is no longer produced.

My trailer tilt switch wires were only an inch long, but the switch still worked. If the switch looks usable it may be able to be taken apart. The switch rubber boot just peeled off easily. Removed clamp. The plastic piece and the rubber wire cover boot, the two sections were glued with something. Very gently use a razor knife between them and pull them apart. The wires look like they were crimped. Drilled out crimp and the wires came out. Then just clean up the wire lug hole with a drill bit. Disassembled Switch and soldered longer wires to it.


The plastic piece and copper lugs were probably formed together at manufacturing. Do not know if the spring inside the plastic piece is copper or steel. It’s hard to tell with the junk inside it. Have been flushing it out with WD40. Will need to put some type of non-electrical grease back into it. Like the grease used on battery terminals. Then cycle it, to get excess grease out.
After I clean and paint the Transom Gimbel Assy I'll reinstall.
I’ll try to do a video of the reassembly.
Mercruiser Service Manual 90-68648 1963-1973
Mercruiser Service Manual 90-71707 1974-1977
I’m just typing this up to give others help on taking apart the old MC-1 Transom Assembly.
The two large dowel pins that go thru the Gimbel ring pivot point into the bell housing. Are held in with two aluminum style nails. Look around the dowel pin for the nail head, If you push "pivot" the Gimbel ring to port or starboard you can see the bent backside of the nail. After you remove the nail pins use a dowel pin puller on the dowel pins. The dowel pin has a 1/4-28 unf thread hole.


The big pin in the bottom of the gimbel ring has an 1/8 Dia cotter pin. If it doesn't look like it's there, it may have a little rusted piece remaining. Use a long 1/8 dia punch or aircraft drill bit. Then with the big pin just use a punch and hammer to pop it out from the bottom. The slot in it is to help realigned pin when it goes back together.
NOTE: (Don't lose the shims, one with each dowel, one with the bottom pin, and one with the top pin. Label each shim.)

There is a hole in the side of the Gimbel housing to access the hose clamp screw on one of the bellows. You could cut the bellows instead, then after its apart remove hose clamps.
The top pivot pin is held in by a long socket head Allen screw. If penetrating oil doesn’t do it and the screw head strips out, try an EZ out screw extractor. Otherwise you will need to drill out screw.
The smaller screws after plenty of penetrating oil may turn or break off. The trailer tilt bracket screws were a 1/4-20 unc. The ones holding the Trailer tilt switch Grommet bracket holder in the Transom housing broke off for me. Had to use a long aircraft drill bit for it, I accidently drilled thru the housing . This wasn’t a bad thing, because if you look there at how much room you have. You will notice that you could not get a tap in. It would have to be a long aircraft type tap. I just turned it over, drilled though hole and tapped from backside. I then put a set screw with Loctite to seal the hole.
Used (Slap Hammer Type) puller to remove all Bearings. To pull the upper needle bearing you will need a long puller. Had to modify a Harbor Freight with a longer shaft. Try to get the oil seals and bearings out in one piece. May need to try the Bearing Supply Houses for replacement.

Most of the time I hear that people look for this Trim/Tilt switch, but it is no longer produced.

My trailer tilt switch wires were only an inch long, but the switch still worked. If the switch looks usable it may be able to be taken apart. The switch rubber boot just peeled off easily. Removed clamp. The plastic piece and the rubber wire cover boot, the two sections were glued with something. Very gently use a razor knife between them and pull them apart. The wires look like they were crimped. Drilled out crimp and the wires came out. Then just clean up the wire lug hole with a drill bit. Disassembled Switch and soldered longer wires to it.


The plastic piece and copper lugs were probably formed together at manufacturing. Do not know if the spring inside the plastic piece is copper or steel. It’s hard to tell with the junk inside it. Have been flushing it out with WD40. Will need to put some type of non-electrical grease back into it. Like the grease used on battery terminals. Then cycle it, to get excess grease out.
After I clean and paint the Transom Gimbel Assy I'll reinstall.
I’ll try to do a video of the reassembly.
Last edited:


