1988 110 v4 overheating

seven_magnum

Petty Officer 2nd Class
Joined
Oct 4, 2011
Messages
127
It's been a while but I'm back!

I need some help with a boat I have always wanted, and finally was able to buy. She's wearing twin evinrude 110's, model numbers E110TXCCA.

It sat for two years, but had been running prior to that point. So I decided to do some maintenance before getting it in the water. I changed both impeller/water pumps, gear lube, spark plugs, fresh gas. I also have an original OMC service manual on the way. Should be here on Friday.

Both motors fire right up, but the port side is giving me some issues. On muffs, it ran about 5 minutes, strong telltale stream, lots of water out the prop then I got an overheat alarm. With the amount of water its pumping and the new impeller I'm positive that isn't the problem.

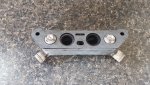
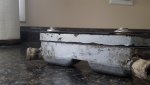
I did notice once I ran the starboard engine, the exhaust cover stays cold to the touch. The port did not. Also, the starboard engine has a little water exiting the prop, but a ton of water coming out vents at the top rear of the cavitation plate. The overheating port had none. It seems to me this is where the water that cools the motor should exit, and I'm not getting flow through the engine.

After some reading I am now thinking thermostats, diverters, poppet valves should be addressed and while I'm in there check for any debris that would impeade any water flow or bleeding of air. It seems there are some common issues with these motors involving those parts.

I want to do both motors while I'm at it, so I believe that's 8 thermostats, 8 diverters, 8 poppets and springs?, 4 head gaskets. Finding these parts is a pain, but it seems most everything is available I just cant find it in the exploded views.

Is there any gaskets i will need besides head gaskets? I'm trying to get an order together ahead of time so i can knock it out and get on the water.

Any other words of wisdom that may be of use?

Thank you very much for the help!

Foster
 

Bosunsmate

Admiral
Joined
Apr 7, 2012
Messages
6,129
It could be the little hole at the back of the thermostat housing, it can block up. I think this motor has that set up. I at least double that holes size by drilling it out, problem solved. You should even triple its size
 

Bosunsmate

Admiral
Joined
Apr 7, 2012
Messages
6,129
Yes it does have that thermostat setting. You should get the very rear water cover gaskets for the back of the heads and then you can clean out in the galleries there. Get the thermostat gaskets and many people just drill in through the back of the lower cowling to access the thermostat bolts but you may have better chance.
Looks a good set up so long as Iran-Us doesnt send oil prices up much more
 

seven_magnum

Petty Officer 2nd Class
Joined
Oct 4, 2011
Messages
127
Thanks for all the help! I'm going to order

1. 4 thermostats
2. 4 thermostat gaskets
3. 4 poppets
4. 4 poppet springs
5. 4 poppet grommets
6. 4 thermostat housing gaskets
7. 4 head gaskets
8. 4 head cover gaskets
9. 8 water deflectors

It sounds like real fun getting the housing on and off, but I'll manage. I cant wait to get back out on the water.

Fortunately the 115 gallon tank is full. That will hopefully last a trip or two. I'm not looking forward to how thirsty this old girl will be.

One last question. These motors are still using the vro system. Everything I read is half dozen one way 6 the other to keep or disable it. Any advice? As of now, it seems to be working.

Thanks!

Foster
 

racerone

Supreme Mariner
Joined
Dec 28, 2013
Messages
36,274
Is this a saltwater boat ??-----The VRO units can be tested for oil output.----They are a misunderstood unit.----The oil tank has a filter.----All hoses fitting must be inspected and tight .----No leaks allowed.
 

seven_magnum

Petty Officer 2nd Class
Joined
Oct 4, 2011
Messages
127
To my knowledge it's never seen salt. It lived on the finger lakes/Erie its entire life.
 

racerone

Supreme Mariner
Joined
Dec 28, 2013
Messages
36,274
I would do a compression test on these " crossflow " motors before spending a lot of coins.
 

Bosunsmate

Admiral
Joined
Apr 7, 2012
Messages
6,129
Plane the head on a flat piece of glass/mirror on light sandpaper until it all looks shiny, ie high spots are all gone.
Check the deflectors havent expanded/deteriorated (the rubber hose pieces in the water channels behind the head) if it has them
And then enjoy for years to come
 

ct1762@gmail.com

Senior Chief Petty Officer
Joined
Jan 17, 2019
Messages
764
man the thermostats on those are such a pain! ditto for the 2 cyl loopers. i've always wondered why the engneers didn't put them on top of the head.... better flow or something? i mean the 3 cyl, 4 and 6cyl loopers are all at the top. is it a crossflow thing? anyway, i'd remove the powerhead on this motor and put a new base gasket on it and clean it up anyway instead of drilling into the pan.
 

seven_magnum

Petty Officer 2nd Class
Joined
Oct 4, 2011
Messages
127
I finally have the parts in hand and started the work. The diverters went in the one motor without a hitch. It was a pain trying to torque the bottom head bolts in place but I'm confident I have it right.

My question is about the thermostats.

I have seen some threads where people pre assemble everything and let the sealant cure, then final assemble it as one to the motor. The back cover would work fine like that, but with the cork gasket I would never get the thermostat far enough into the housing. They will compress in a little, but never enough to keep the gasket in place. See pictures.

should I assemble the body and cover, let it set, then install the motor side gasket as I'm putting it on the motor? Or do I have this whole thing messed up?

It does seem that they will compress properly when I tighten it up.

Thanks!
 

Attachments

  • 20190706_144227_compress95.jpg
    20190706_144227_compress95.jpg
    1.3 MB · Views: 1
  • 20190706_144239_compress18.jpg
    20190706_144239_compress18.jpg
    1.9 MB · Views: 1

sludgeguy68

Petty Officer 2nd Class
Joined
Jul 16, 2010
Messages
111
I had success using a plywood guide. Apply thin layer of gasket sealer and assemble, then use plywood block with clamps to compress it all together tightly and let it set overnight. Remove block/clamps and hold valves in place with wire ties, put sealer on mating surface, get it started on the block, then snip off the ties and tighten it up.
 

seven_magnum

Petty Officer 2nd Class
Joined
Oct 4, 2011
Messages
127
I wanted to update this post, last Friday I was off work so I had at it. I coated the gaskets with sealant, pieced it together and lightly zip tied the poppets in place. The last gasket did not want to stay on, so I left it sort of float until I got the bolts started. The first one I struggled with for 15 minutes to get it in place and the bolts started. I used an offset wrench I'll post a picture of later to hold it in place and starr the bolts. The second one I was ready for, I had all 3 bolts started in about a minute. It really went too easy!

on the hose all was well, so I took it to Walenpaupak for a swim. It ran like a champ! I have a leak in the bilge to deal with, I think from the wash down pump but plan to be back out again Tuesday!

Also, I ran the boat just over an hour and used about 15 gallons, running about 30. I did have some idle time in the no wake zone but I thought it wasnt bad all things considered.

Thank you all for the help!
 

seven_magnum

Petty Officer 2nd Class
Joined
Oct 4, 2011
Messages
127
Last year was a success with the boat but I have a couple little things to work on. One thing I'm looking to change is the props. It's currently wearing aluminum 3 blade 12 and 3/4 by 21. Wide open throttle I'm about 5400 RPMs and 35 miles an hour. The biggest problem I'm having is a 25 mile an hour speed limit for a lot of the year. It is a struggle to keep it on plane at speed. I am moving a lot of weight forward, but I think 4 blade props would also be a big help. I really dont need speed, just the ability to plane at slow speeds and as much efficiency as possible.

I am not opposed to going with stainless props, they dont seem as expensive as I had thought. Any reason to shy away from a stainless 4 blade? And if I go that route, should I drop to say a 19 pitch?

Boat is in fresh water lakes 99% of the time with maybe one or two trips to salt water.

Thanks!
 

sludgeguy68

Petty Officer 2nd Class
Joined
Jul 16, 2010
Messages
111
Yeah your RPMs seem to be in the right zone, so pitch change might not be a great move. I would look into trim tabs to tuck your bow in... I picked up smart tabs for my rig and am now able to plane out at much lower speed - a world of difference for $100 bucks. I'm no expert, but food for thought.
 

roger3645

Petty Officer 1st Class
Joined
Aug 30, 2005
Messages
271
Yes, the smart tabs are well worth the money and do allow you to plane at lower speeds.
 

ct1762@gmail.com

Senior Chief Petty Officer
Joined
Jan 17, 2019
Messages
764
Just bear in mind a 4 blade stainless 19'' will be the equivalent of a 21'' aluminum (roughly) for RPM due to the increased drag of an extra blade. You can always put those butt-ugly planing fins on the cavitation plate.
Also, if you are really only getting 35 mph out of a 21'' prop @ 5400 you have some MAJOR slip going on! I'd check your tach with an accurate shop one, and then inspect the prop hub. could be slipping there as well. I had a 15' whaler with a 90 v4, and with the same prop 21'' aluminum and 5400 rpm, i was going about 54mph on GPS. Something is wrong.
 
Last edited:
Top