67 johnson 60hp carbs

tony69starcraft

Seaman Apprentice
Joined
Mar 7, 2019
Messages
34
i bought a 16ft ‘69 starcraft off a guy last summer with a ‘67 60hp johnson super seahorse on it. the guy was a hillbilly and couldn’t get it to run right. it would idle ok but when you try to accelerate it would bog down until you got to WOT. i’m assuming the carbs hadn’t been cleaned in several years or possibly decades, so i bought a carb rebuild kit and i’ve taken it apart. i noticed 2 things wrong with the carb.

1. there was no float needle in it, that’s essential right?

2. whatever this thing is, the last person to try to take it out damaged the slot, will this affect performance?

finally, he put an automotive coil on it, he said it was from an old ford pickup. is that going to hurt anything? it seemed to run fine with it on there, but i don’t want to damage anything

thanks in advance,
tony
 

Attachments

  • photo308789.jpg
    photo308789.jpg
    97.8 KB · Views: 0
  • photo308790.jpg
    photo308790.jpg
    97.3 KB · Views: 0

jimmbo

Supreme Mariner
Joined
May 24, 2004
Messages
12,961
The Venturi Nozzle should no be removed, as it requires a special Tool to properly position it in the Venturi. If no properly positioned the engine will run less than perfectly.

A carb does need a means of regulating the Fuel level in the Fuel Bowl so..., yes an Inlet/Float Needle is essential.

Regarding the coil, you may experience a reduced life expectancy of the breaker points using the wrong coil.

Before you go and spend any more Money on it. Have you done a compression test? If yes, what were the Numbers?
 

tony69starcraft

Seaman Apprentice
Joined
Mar 7, 2019
Messages
34
i don’t have the tool to do a compression test, so that’s a no. i took the “venturi nozzle” out and cleaned it on one side, so i’m gonna have to just put it back in and let it ride. clearly they’ve been out before so i can’t be in any worse shape than when i started

thanks for the input guys.
 

tony69starcraft

Seaman Apprentice
Joined
Mar 7, 2019
Messages
34
in case you guys hadn’t picked up on this already, i’ve never done this before. i’m not mechanically impaired, but i grew up in the age of fuel injection. rebuilding carbs isn’t a skill i needed to learn.

also i didn’t buy a manual, so any advice you want to give is appreciated
 

F_R

Supreme Mariner
Joined
Jul 7, 2006
Messages
28,195
Jimbo said it pretty well. The buggered slot in the tube, by itself, will not hurt performance. If the venturis are not centered properly (tool required), it may affect performance. Just how much is open to guess. Do the best you can and hope for the best. You absolutely do need the float valve. I don't know how you got it to run without it.
 

racerone

Supreme Mariner
Joined
Dec 28, 2013
Messages
36,299
I think the needle is on the work bench or floor.----Just hiding.-----And a carburetor is much cheaper to repair than fuel injection.------No special tools / skills / $100 per hr shops needed.----But only if you do the work yourself.
 

F_R

Supreme Mariner
Joined
Jul 7, 2006
Messages
28,195
About the coil: Car coils were made in two types. One type required a resistor in the +12V feed, the other type had a built-in resistance. We have no clue which type you have on your motor. Your 60hp had a resistance in the feed wire. We also have no clue as to whether or not you have the original wiring cable.

Bottom line is you might have too much resistance (weak spark) or you may have too little resistance (burnt or short life of breaker points).
 

Joe Reeves

Supreme Mariner
Joined
Feb 24, 2002
Messages
13,262
And if you ever get that thing back together :).... Here'ya go!

********************
(Carburetor Adjustments - Older V/4 Downdraft Carb)
(J. Reeves)

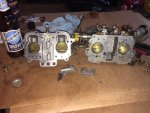
NOTE: The early model downdraft carburetors incorporated "Adjustable High Speed Jets". The later model downdraft carburetors used "Fixed High Speed Jets". The high speed jets would be located in back of the two bottom drain screws. Follow the below instructions accordingly.

NOTE: If you do not have adjustable high speed jets, ignore those paragraphs pertaining to same...... BUT do make sure that you manually inspect and clean the two brass fixed high speed jets which would be located in back of the two 7/16" slotted hex head bolts in the bottom front portion of the float chamber.

Lift the center High Speed Control lever and turn it so that the point faces forward, resting on the high ridge. This will disengage the lever control gear from the individual high speed jets (slots). Have the slow speed needle valve knobs installed upside down so that they can be turned without encountering any obstruction.

Gently seat each of the High Speed needle valves, then back each one out one (1) turn. Gently seat each of the Slow Speed needle valves, then back each one out one and one half (1-1/2) turns. NOTE... have the jam nut on the s/speed needles snug so that vibration won't have any effect on them, but loose enough so that you can turn them without a great amount of effort.

(High Speed)
With a reliable person at the wheel, and one kneeling in front of the engine, start the engine (yes, it will run lousy with the above initial needle valve settings), put it into forward gear, and apply full throttle. Start with the High Speed adjustment on the left using a screwdriver that properly fits the slot.

(High Speed Adjustments)
At full throttle, with the proper size screwdriver, slowly start turning one of the H/S needles in segments of 1/8 turn, waiting momentarily for the engine to respond, then repeat turning. You will reach a point where the engine will start to die out. At that point, back that needle valve out approximately 1/4 turn. Now, go to the other High Speed needle valve and repeat that procedure. At some point in that 1/4 turn out, you will find the smoothest high speed setting (you can now lower the throttle rpm). That will have both high speed needle valves set correctly, and at that point you can lift that center lever adjustment of that high ridge, keeping it lifted until the point is facing the engine, then lower it into its proper position. (When you turn that lever now, you're adjusting both High Speed needle valves at the same time.)

(Slow Speed Adjustments)
Now, lowering the rpms of course, take the engine out of gear and set the throttle just to where the engine will stay running. Again, in segments of 1/8 turn, slowly start turning in one of the slow speed needle valves, waiting a few seconds between each turning for the engine to respond. As you turn the s/speed needles in, the rpms will increase..... and as it does, lower the rpms to where the engine will just stay running (otherwise the rpms will climb quite high). You will reach a point whereas the engine will either start to die out or it will spit back (sounds like a mild backfire). At that point, back the needle valve out 1/4 turn. Repeat the process with the remaining slow speed needle. Again, at some point in that 1/4 turn out, you will find the smoothest setting. When finished, tighten the jam nut somewhat, then remove and reinstall the s/speed knobs correctly (right side up).
********************

(Carburetor Float Setting)
(J. Reeves)

With the carburetor body held upside down, the float being viewed from the side, adjust the float so that the free end of the float (the end opposite the hinge pin) is ever so slightly higher (just ever so slightly off level) than the other end. And when viewed from the end, make sure it is not cocked.
********************
 

tony69starcraft

Seaman Apprentice
Joined
Mar 7, 2019
Messages
34
thanks for all great advice guys! you guys are awesome!

the carb kit is supposed to arrive tomorrow, when i get it all put back together and on the boat, i’ll update you on how things went.
 

tony69starcraft

Seaman Apprentice
Joined
Mar 7, 2019
Messages
34
the carb has fixed high speed jets, but does anybody know about where to start the low speed jets when i get it back together? i can fine tune it, i just need a starting point. 1 1/2 turns? 2 1/2 turns?
 

racerone

Supreme Mariner
Joined
Dec 28, 2013
Messages
36,299
About 1-2/2 turns out.-----A compression test or inspection of pistons / rings via the 4 bypass covers is a must do.-----No point tuning a motor that has been " hurt " by a previous owner.
 

Joe Reeves

Supreme Mariner
Joined
Feb 24, 2002
Messages
13,262
the carb has fixed high speed jets, but does anybody know about where to start the low speed jets when i get it back together? i can fine tune it, i just need a starting point. 1 1/2 turns? 2 1/2 turns?

Yeah, I know Tony. Look closer at my reply via post #9. Apparently you skipped over it.
 

tony69starcraft

Seaman Apprentice
Joined
Mar 7, 2019
Messages
34
you’re right, i thought that whole paragraph applied to the high speed needles. i should’ve read more carefully
 

lindy46

Captain
Joined
Nov 27, 2008
Messages
3,886
If you don't want to invest in a compression tester, most auto parts stores will have one to borrow. I never put money into a motor until I test compression.
 

tony69starcraft

Seaman Apprentice
Joined
Mar 7, 2019
Messages
34
i didn’t even consider that, thanks for the suggestion.

how much compression is good compression?
also, what’s the procedure for checking it? just turn the motor over and see what it reads?
 
Last edited:

Joe Reeves

Supreme Mariner
Joined
Feb 24, 2002
Messages
13,262
How much compression is good compression? also, what’s the procedure for checking it? just turn the motor over and see what it reads?

How much?... 100+

All spark plugs removed... If rubber tipped gauge, keep gauge pressed in the plug hole while cranking. Make a note of the psi reading of all cylinders.

The cylinders are numbered as standing in back of the engine, facing the spark plugs... as follows:

2.....1
4.....3
 

tony69starcraft

Seaman Apprentice
Joined
Mar 7, 2019
Messages
34
the carb is as clean as i’m gonna get it, i’m just waiting for usps to deliver my rebuild kit.

the two post things that go on top of the venturi nozzles 100% did not have gaskets under them. it appears the the rebuild kit comes with them. could that have partly been to blame for the motor’s poor performance? it doesn’t seem like that would have a profound effect on anything, but maybe?
 

Attachments

  • photo308899.jpg
    photo308899.jpg
    124.4 KB · Views: 0

Joe Reeves

Supreme Mariner
Joined
Feb 24, 2002
Messages
13,262
The cap that goes over the nozzles..... some had "O" Rings, some had gaskets. Whatever it took, if left out, that created one hellava air leak. The carburetor would be impossible to adjust.

The recess around the brass nozzle indicates that carburetor requires the "O" Rings.
 

tony69starcraft

Seaman Apprentice
Joined
Mar 7, 2019
Messages
34
so here’s what i was talking about. there’s an o ring that goes in a recess around the nozzle, but the rebuild kit also came with these gaskets. do i need both or just the o rings?
 

Attachments

  • photo309086.jpg
    photo309086.jpg
    90.7 KB · Views: 0
Top