How do I remove 56 Johnson Javelin carb??

KathyD19

Petty Officer 1st Class
Joined
Jul 17, 2012
Messages
350
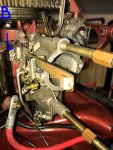
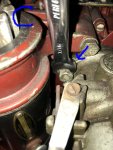
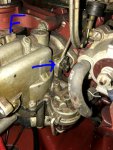
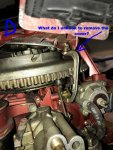
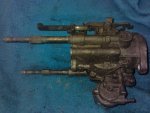
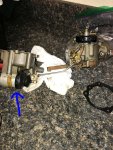
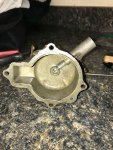
I am stumped as to how to remove my carburetor so I can use the carb kit I ordered. I removed the fuel line, but I'm not sure what to remove regarding the throttle linkage (see picture "F"), perhaps the cotter key? And I am absolutely confounded by how to access the two nuts holding the carb to the intake manifold (see pictures "B" and "C"). I *think* it's a 7/16th nut but if I can reach it, it's not in the right position to even get my crescent wrench on it let alone move it, can't use a socket wrench either because it's too tight an area. I tried to remove the metal cover that goes over the flywheel to see if that would give me any more wiggle room to access it. I removed the screws but wasn't sure how to remove the "c-shaped clamp" shown in picture "D". I know carburetors are meant to be able to be serviced so it's obviously got to be able to be removed. Oh great forum gurus, please let me in on the secret!?!?
 

Attachments

  • photo295604.jpg
    photo295604.jpg
    516.2 KB · Views: 0
  • photo295605.jpg
    photo295605.jpg
    514.2 KB · Views: 0
  • photo295606.jpg
    photo295606.jpg
    632.7 KB · Views: 0
  • photo295607.jpg
    photo295607.jpg
    648.8 KB · Views: 0

jbuote

Lieutenant Junior Grade
Joined
Aug 17, 2016
Messages
1,001
Hey Kathy!

Based on your pics, this newbie brain, would be thinking of pulling the starter off to get to your "B"/"C" pictures.
As for "F", I'd probably pull that cotter pin and swing the linkage arm up out of the way.. May not have to take the "C Clamp style" thing off.

I have NO idea if that's the recommended way or not, and I'm not suggesting you do so without further confirmation, so hopefully the others will let you know.

Just something to think about in case it might help. :noidea:
 

Scott Danforth

Grumpy Vintage Moderator still playing with boats
Staff member
Joined
Jul 23, 2011
Messages
47,497
the Johnson factory manual covers carb removal
 

F_R

Supreme Mariner
Joined
Jul 7, 2006
Messages
28,195
I'll tell you how I do it (usually). In most cases, I'll be doing a comprehensive tune-up, including the ignition, so I start by removing the recoil and flywheel. That makes the rest of the stuff easier to access.

However, if the flywheel removal is not in your plans, just remove the electric starter, and the bracket containing the vacuum switch from the opposite side. Then the carb nuts can be accessed. They take a 1/2" wrench.

The recoil lockout is disconnected by removing the screwdriver-slotted screw that holds it to the recoil housing, and the spring, which I see you already have unhooked.
 

hardwater fisherman

Lieutenant Commander
Joined
Mar 19, 2010
Messages
1,725
The throttle link in picture "F" should just pop off from the top end where it connects to the cam roller. I do not have any motors quite that old. But all mine do come off like that.
 

KathyD19

Petty Officer 1st Class
Joined
Jul 17, 2012
Messages
350
Scott- Is that Johnson Factory Manual available on this site? I'd love to look at it.

F_R thank you for your input. I don't want to have to remove the flywheel if I don't have to (this whole motor has been one step forward, two steps back) so I will remove the electric starter. I will have to look at my parts diagram to be sure I know what the vacuum switch is but since you mentioned a bracket, I think I know what you're referring to.

Hardwater Fisherman, sadly nothing just "pops off" with this engine...it seems to be challenging me at every step but I'll take a closer look at the top area near the cam roller.

I had a dream last night that I had the boat out at the lake, tied to the dock while I parked my truck. I came back and it had sunk. Oddly, I was a bit relieved lol. Can you tell that 2 summers in a row with no lake time and nothing but repair down time is getting to me? :(
 

hardwater fisherman

Lieutenant Commander
Joined
Mar 19, 2010
Messages
1,725
Here is a picture I found of what claims to be the same carb as yours. The link is still attached to the carb. It should be held in place with a plastic bushing on the cam roller. It takes a little bit of force to remove it.
 

Attachments

  • photo295660.jpg
    photo295660.jpg
    32.6 KB · Views: 0

KathyD19

Petty Officer 1st Class
Joined
Jul 17, 2012
Messages
350
Hmmm....thank you. I am going to print this picture and take it outside to the motor with me. I'm more of a visual learner so this is good
 

flyingscott

Fleet Admiral
Joined
Apr 8, 2014
Messages
7,988
Get yourself a set of box wrenches cheap ones are fine. Do not get ratchet wrenches as they tend to be thicker and are harder to fit in narrow places. Take the cotter pin out of the throttle.link and just push it out.
 

KathyD19

Petty Officer 1st Class
Joined
Jul 17, 2012
Messages
350
Prayers and progress tonight!! I got the carb off! Now, on to more questions: I've attached pics and need to know if I have to remove the part the blue arrow is indicating, which I *think* is the choke solenoid (which on my motor is not and has not ever been hooked up since I've owned it) before soaking the carb bowl? I don't want to damage the black rubber "boot" cover that's on one end. If I do have to remove it, any advice or warnings before doing so? I also attached two pics showing the carb bowl etc (looks pretty clean to me, but then again, what do I know??) and one of the float. The float seems to be the newer style (my carb kit came with the older/ tannish-yellow cork float), looks a little rough on the surface but again, I have no clue. I am going with a YouTube video for doing the carb kit but anything you guys can tell me is GREATLY appreciated!

Oh, also I know I need to remove whatever is still attaching the two portions. I broke one cotter pin removing the throttle linkage and kind of panicked because I hope my local hardware store has something small enough to replace it. Before detaching the two parts, I wanted to be sure if I broke another cotter pin that I had a source to get new ones.
 

Attachments

  • photo295780.jpg
    photo295780.jpg
    971.7 KB · Views: 0
  • photo295781.jpg
    photo295781.jpg
    785.6 KB · Views: 0
  • photo295782.jpg
    photo295782.jpg
    766.1 KB · Views: 0
  • photo295783.jpg
    photo295783.jpg
    721.5 KB · Views: 0
Last edited:

F_R

Supreme Mariner
Joined
Jul 7, 2006
Messages
28,195
Of course, you have to remove the choke solenoid before soaking.
That float is toast. Use the one that came in your kit. It "should" have the ethanol resistant coating on it, unless it has been sitting on somebody's shelf for 20 years.
 

lindy46

Captain
Joined
Nov 27, 2008
Messages
3,886
Bowl looks pretty clean, but soak it good in acetone. Blow out all the orifices with spray carb cleaner and be sure to remove the little dome on top of the carb and clean underneath. That is the idle circuit and all the holes must be clean with no residue. When the dome is off, you can inspect the hole where the tip of the slow speed needle enters. Make sure it is not chipped or otherwise broken. I've seen them chipped from overtightening the slow speed needle, and I've seen the tip of the needle broken off in the hole. You can't tell any of that without removing the dome.
 

KathyD19

Petty Officer 1st Class
Joined
Jul 17, 2012
Messages
350
F_R, yes I was looking at the float better last night and parts of the black coating were flaking off on my fingers. Hopefully that's what's causing my issues. I will remove the choke solenoid...anything special I need to know about unhooking it? I used some PB Blaster on the two strap screws because they wouldn't move last night. I don't know how long that float in the carb kit sat at the sellers place so it's unknown if it has an ethanol-proof coating. Is there anything I can coat it with myself to be sure it's ok so I don't have to tear this down again?
 

KathyD19

Petty Officer 1st Class
Joined
Jul 17, 2012
Messages
350
Lindy- I'm not sure what you're referring to as "the dome"?? Are you talking about the area that is covered by the "welch plug"? If so I removed that already.
I removed the glass bowl that I believe is the fuel filter. I also took the brass fitting off by where the float attached and removed the needle in there. It looked kinda gunked up.
 
Last edited:

F_R

Supreme Mariner
Joined
Jul 7, 2006
Messages
28,195
F_R, yes I was looking at the float better last night and parts of the black coating were flaking off on my fingers. Hopefully that's what's causing my issues. I will remove the choke solenoid...anything special I need to know about unhooking it? I used some PB Blaster on the two strap screws because they wouldn't move last night. I don't know how long that float in the carb kit sat at the sellers place so it's unknown if it has an ethanol-proof coating. Is there anything I can coat it with myself to be sure it's ok so I don't have to tear this down again?

Don't coat it, just go with it. Worrying is not good for you.
 

KathyD19

Petty Officer 1st Class
Joined
Jul 17, 2012
Messages
350
F_R, thanks..you're right about worrying not helping. :) I got it soaked, dried out, rebuilt and reassembled. Barrel test tomorrow. Prayers appreciated. ;) I'll post with the results.
 

jbuote

Lieutenant Junior Grade
Joined
Aug 17, 2016
Messages
1,001
You got this!

My first outboard carb rebuild didn't quite work as expected.
Did it again and it was fine...

With all these folks guiding you, I bet it's better first time for you than it was for me!

It's going to work! (Positive thoughts for you... :D )
 

KathyD19

Petty Officer 1st Class
Joined
Jul 17, 2012
Messages
350
Thanks Jbuote! Couldn't have done ANY of this without this forum!!
 

Johnson110

Chief Petty Officer
Joined
Dec 31, 2003
Messages
640
Love the engine, I have a 1956 15 hp Johnson oh and my wife too is a dental hygentist !
 

KathyD19

Petty Officer 1st Class
Joined
Jul 17, 2012
Messages
350
IT'S ALIVE!!!!!!!!!! Started right up in the barrel!! Woohoo!!! I can't believe it! I'm going to take it to the lake in a little bit and see how she works. My only question is that when I put the face plate back on and then screwed on the white "arrow-like" knobs that adjust the high and low speeds, as I tightened down the screw holding them on, that also moved the needles. (packing nuts are tightened accordingly so they won't allow the needles to vibrate loose). When I tried to turn the white knobs back out the turn and a half, of course, I can't go that far with them as they hit their bump-stops and can't spin the whole way around. I can just leave them off and use a flat blade screwdriver to adjust the needle ends directly but that shouldn't have to be done that way. Suggestions?

Oh and one last thing..can I use Seafoam in the fuel for this engine? I use it for all my other gas powered devices and love it but I don't want to use it until I know it's ok.

https://youtu.be/TLh_hHNyeqA
 
Top