Tagged’s 140 Johnson Resurrection

racerone

Supreme Mariner
Joined
Dec 28, 2013
Messages
36,269
Do not have enuff fingers and toes to count how many pistons I have seen like that !----And if one person has seen that many , how many have failed like that ??
 

jimmbo

Supreme Mariner
Joined
May 24, 2004
Messages
12,961
The ring breakage issue developed when someone had a brain fart about moving the top ring closer to the piston crown, maybe the poor excuse for what became of Gasoline may have contributed to the problem too.
 

Tagged

Petty Officer 2nd Class
Joined
Jul 10, 2012
Messages
123
That’s why y’all were thinking I should take the heads off. Got it.

What years were bad? I’d see that with a bore-scope, wouldn’t I? Or, I’d know it if I had it, right? (Yes, I’m still looking for alternatives to pulling the heads.)
 

racerone

Supreme Mariner
Joined
Dec 28, 2013
Messages
36,269
The failures occur on all of them from 1973 to about 1998----- Hard for some folks to believe that fact !
 

interalian

Commander
Joined
Jul 23, 2009
Messages
2,105
Pity I missed this thread as I was away at a football tryout weekend with my son.

I would have told you not to bother removing the water covers on the heads. Any buildup of salt/oxide between the cover plate and gasket matters not one whit to performance of the cooling as it's just seepage through the gasket. The water only needs to move between the head and the cover's gasket.

If you've not yet prised the cover off, just put the bolts back in and tighten them. If the gasket hasn't been disturbed, the broken bolt won't matter either.

To prove water flow through the system, remove the leg and run water from a hose up the water pipe. Take off both rubber elbow hoses at the bottom of the heads and see if you get about the same amount of water out each.

I'd replace the thermostats as a precaution, paying particular attention to the little bleed holes in the cover to make sure they're open. Assemble the t-stats AFTER flushing the block in case there's any crud to dislodge.

There's a rebuild thread in my signature line if you're interested.
 
Last edited:

Tagged

Petty Officer 2nd Class
Joined
Jul 10, 2012
Messages
123
Thanks, Interalian. I’ll definitely review your thread. In my case, I had to open the port side cover to see whether it was full of mud dauber nests, since the rubber hose was missing and I could see a nest in the neck.

I probably could have have left the starboard side cover alone. But I didn’t, so here we are. ;-)

No worries. Ain’t nothing but a thing.

Tonights progress: I successfully rewired the T/T relays! The trick was ignoring the schematics and just building the darn thing. I was just confusing myself with the books. Once I figured out (from the diagram) how the system worked, I was able to mock it up on the workbench.

In in the attached picture, the donor solenoids are mounted to the bench in front of the battery. The button switch in the lower right of the photo was the cowl-mounted buttons from the donor motor. And the yellow Romex cable runs off to the T/T wiring harness.

And it works!
 

Attachments

  • photo283521.jpg
    photo283521.jpg
    2.2 MB · Views: 0

Tagged

Petty Officer 2nd Class
Joined
Jul 10, 2012
Messages
123
I also pulled and cleaned the lower carburetor this weekend. It was also very clean. I gave it a once-over anyway, then blew it out and reassembled. Now both carbs are ready for fresh fuel.

Speaking of fuel... will I need to run premium in this motor? I see discussions online about leaded vs unleaded fuels.

What’ y’all’s opinion?
 

Tagged

Petty Officer 2nd Class
Joined
Jul 10, 2012
Messages
123
Here’s what the service manual says.about fuel, by the way...
 

Attachments

  • photo283522.jpg
    photo283522.jpg
    2 MB · Views: 0

spybot

Chief Petty Officer
Joined
Jul 4, 2016
Messages
504
I also pulled and cleaned the lower carburetor this weekend. It was also very clean. I gave it a once-over anyway, then blew it out and reassembled. Now both carbs are ready for fresh fuel.

Did you use a carb rebuild kit ?
If so did you replace these plugs ?
they are for your idle and they must be cleaned out.
There are 4 small holes (Just the other side of the butterfly) make sure these are clean.
 

Attachments

  • photo283531.jpg
    photo283531.jpg
    503.2 KB · Views: 0

Tagged

Petty Officer 2nd Class
Joined
Jul 10, 2012
Messages
123
No, I didn’t. What’s behind them?

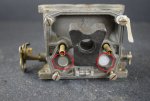
my carb cleaning process is to disassemble and follow fuel flow through the carb by inspection, cleaning each orifice with aerosol carb cleaner as I go, then blowing each passage out a second time with compressed air.

In in this case, there are, I think, four or five inlets for fuel.

2 behind and below the butterfly, one larger than the other.

1 in front of and below the butterfly,

1 above and behind the butterfly, connected to the emulsion tube and the air bypass,

and maybe, 1 top Center for the primer. I’m not sure about that one from memory. I’ll confirm this week.

Did I miss anything?
 

jimmbo

Supreme Mariner
Joined
May 24, 2004
Messages
12,961
No, I didn’t. What’s behind them?

Probably the idle and off-idle fuel ports. Those fuel feeds had to be drilled and the plugs close up the access point after the machining is done. Dirt, gum, and varnish often accumulate behind those plugs and the only way to get it out is to remove the plugs as part of a carb overhaul. Soaking the carb or spraying solvents through the passages does not guarantee removal, it may loosen the crap just enough so it will come loose later while the engine is running and plug up the feeds
 

Tagged

Petty Officer 2nd Class
Joined
Jul 10, 2012
Messages
123
That explains why sometimes a “good cleaning” doesn’t fix the problem. Any risk in waiting for a problem before digging into it?
 

spybot

Chief Petty Officer
Joined
Jul 4, 2016
Messages
504
Yeah you are in the water just set off with a few buddies n beers for a day on the water. Then the engine starts playing runs great then boggs down then runs again.
Day wasted and you spend the next day trying to track down the problem.
For the sake of 2 $15 kits. I pay the equivalent to $42 per kit over here in Scotland.
Do a fresh rebuild on them
 

Tagged

Petty Officer 2nd Class
Joined
Jul 10, 2012
Messages
123
Its too cold to work on the motor in the garage. So I'm thinking ahead...

When it comes time to start final reassembly, I'm going to want to clean out the bolt-holes, and use some sort of anti-seize or loc-tite on the bolts.

What procedure or product is recommended for this? I'm thinking specifically about the carburetor/intake manifold, the water jacket cover plates, and the lower unit.
 

Tagged

Petty Officer 2nd Class
Joined
Jul 10, 2012
Messages
123
Victory!

The thing I was most worried about? Didn’t happen.

I pulled the the lower unit tonight. The two “broken bolts” weren’t broken off. They were missing, and the holes were full of mud. I’m calling that a win!

As with pretty much everything else, the water pump etc looked good. I think it’s had a new water pump recently. It’s getting a new impeller anyway.

A couple of bug nests, and a couple of dead wasps, and everything else looked good.

I shone a flashlight up into the midsection to check for more nests, and each passage looks really clean.

What else should I look for while I’m in here?
 

spybot

Chief Petty Officer
Joined
Jul 4, 2016
Messages
504
Yeah i follow that as well.
I had a few questions one time and Stu from Dangar messaged a couple of answers for me. He is a decent guy
 
Top